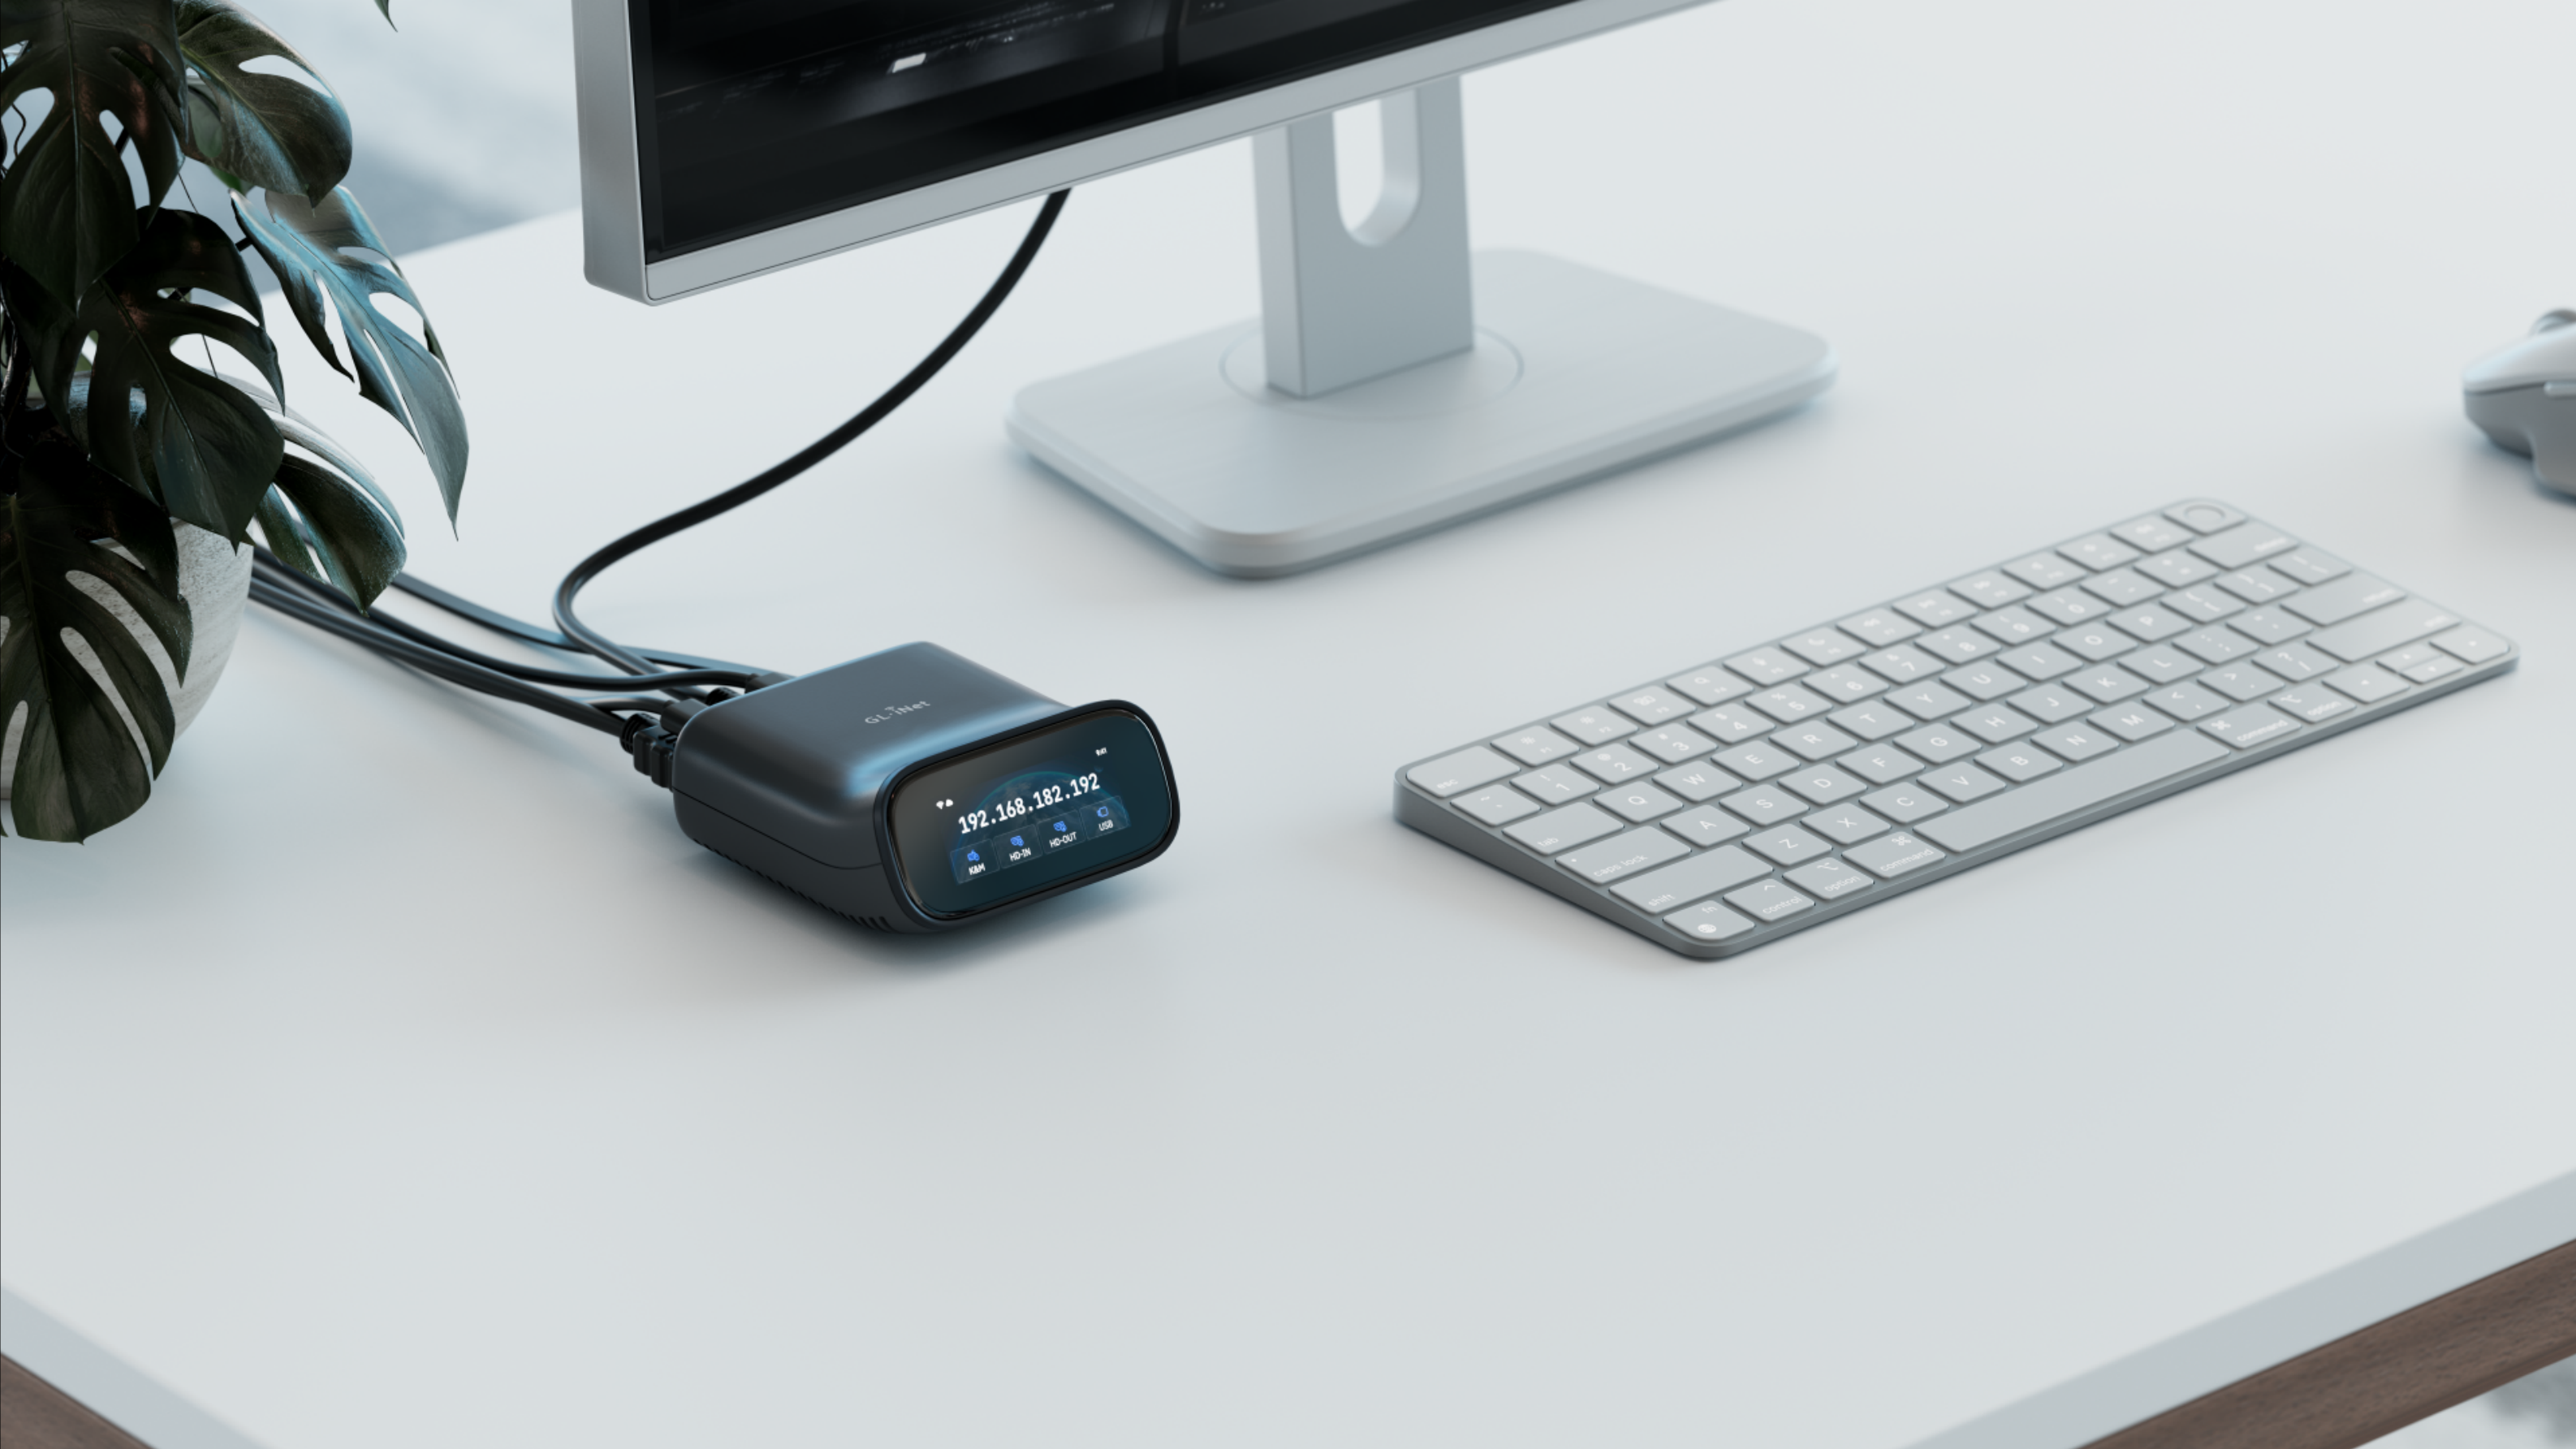
Comet Pro (GL-RM10) User Guide
Comet Pro (GL-RM10) is a remote KVM over Wi-Fi solution, tailored for seamless remote control and device management.
It is powered by a 4-Core A53 CPU, equipped with 1GB DDR3 memory and 32GB eMMC storage to ensure smoothness. With the touchscreen display, you can view the device's IP address at a glance and perform basic operations such as Wi-Fi connection.
In terms of connectivity, Comet Pro supports Dual Band Wi-Fi 6, enabling stable and high-speed network connections. It also offers video passthrough functionality, allowing for the direct transmission of video signals with no quality loss. With support for 4K@30FPS video output, it provides a high-definition visual experience during remote control.
Whether for personal or professional use, Comet Pro is an excellent choice for efficient remote device management.
Product Overview
Appearance
Interface
Quick Setup Guide
Connect the Devices
For clarity, the controlling device is referred to as Device A, and the controlled device as Device B.
-
Connect the Comet Pro to the power source.
-
Use an HD cable to connect the Comet Pro's HD IN port to the HD OUT port of the Device B. Use another HD cable to connect the Comet Pro's HD OUT port to the monitor if the Device B is a desktop computer.
-
Connect the Comet Pro's USB Type-C port to the USB interface of the Device B using a USB cable.
-
Connect the Comet Pro to a network source via an Ethernet cable or Wi-Fi.
-
Ethernet: Connect the Comet Pro's Ethernet port to a network source.
-
Wi-Fi: Swipe left on the touchscreen, connect Comet Pro to an existing Wi-Fi network (2.4G/5G supported).
-
-
Device connection is complete.
Now you can access Comet Pro's control panel locally or remotely.
Local Access to Comet Pro
There are two methods to access Comet Pro via LAN.
Method 1. via Domain Name
First, ensure your controlling device is on the same LAN as your Comet Pro.
Launch a browser on the controlling device. Chrome or Edge is recommended for better compatibility.
Enter glkvm.local
in the address bar. You will be directed to the GLKVM login page. Enter the admin password.
You will be able to access Comet Pro's control panel locally, thus access the controlled device connected to it.
Method 2. via IP Address
Find Comet Pro's IP address in the upper router, enter this IP address in the browser, and you will be able to access it locally, thus access the controlled device.
Take GL-AXT1800 as an example: Comet Pro is connected to the GL-AXT1800 router via both Wi-Fi and an Ethernet cable (you can also connect via Wi-Fi only), and the controlled device is connected to Comet Pro via HD cable and USB cable.
Log in to the router's web admin panel and find the IP address of Comet Pro in the Client list.
As shown below, the glkvm has two IP addresses: one is for Wi-Fi connection, the other is for ethernet connection. Both can be used to access Comet Pro locally.
Open a new tab in the browser and enter Comet Pro's IP in the address bar. You will be directed to the GLKVM login page. Enter the admin password.
You will be able to access the Comet Pro's control panel locally, thus access the controlled device connected to it.
Remote Access to Comet Pro
Method 1. via GLKVM App
-
Install the GLKVM App on your controlling device.
-
Sign up and log in.
Sign up for a GL.iNet account. If you already have one, skip this step.
Enter the username and password to log in.
-
Bind your device.
If your Comet Pro and the controlling device are in the same local area network, click Add Device. It will start searching automatically.
If your Comet Pro has not been detected or it is not in the same local network, click the + button in the upper right corner to add it manually.
Customize the device name and input the S/N, which can be found on the bottom label.
Binding device. Please ensure a stable network connection.
Binding successful. Your Comet Pro has been bound to your account. Click Done.
You will be directed to the homepage, where your Comet Pro will be displayed Online.
Click on it, input the admin password (created during the first access), and you can remotely access the Comet Pro's control panel, thus access the controlled device connected to it.
Method 2. via Tailscale
Comet Pro integrates Tailscale, allowing you to bind it to the Tailscale virtual network for remote access.
In the control panel, navigate to Apps Center -> Tailscale, bind your Comet Pro to your Tailscale account.
Next, bind your controlling device to the same account. Then you will be able to remotely access your Comet Pro by typing its Tailscale virtual IP into a web browser on the controlling device, without installing GLKVM app.
Click here for more instructions.
Control Panel Introduction
Settings
In the control panel, navigate to Settings, you will get a page as below.
Video
You can modify the video quality, orientation and EDID settings of the control page.
-
Quality: Adjust the video quality to low/medium/high/ultra-high according to your network and resolution requirements.
-
Orientation: Adjust the control page rotation degree.
-
EDID: Extended Display Identification Data. It aims to automatically match the display optimal parameters. The default configuration is suitable for most scenarios and usually does not need to be modified. Click here for details.
-
Mode: You can switch the mode between WebRTC H.264 and Direct H.264. This feature is available in v1.4.0 and above.
Remote Device Settings
You can adjust the relevant settings of the controlled device.
-
Speaker/Audio: Control audio output from the controlled device (e.g., system sounds, video audio)
-
Microphone: Transmit local audio input (e.g., your voice) to the controlled device for remote interaction. This feature is available in firmware v1.4.0 and above.
-
Keyboard: Turn on or off the keyboard of the controlled device.
-
Show Virtual Keyboard: Display and use the virtual keyboard on the control page.
-
Mouse: Turn on or off the mouse of the controlled device.
-
Show Local Cursor: Display the mouse of the current device on the screen.
-
Mouse Jiggle: This feature is available since firmware v1.3.0.
It is applied to prevent the computer from entering sleep due to prolonged inactivity (e.g., remote meetings, server management).
-
Scroll Rate: It refers to the speed at which the mouse wheel scrolls or the number of lines/units scrolled per wheel rotation, affecting how quickly content moves on the remote.
-
Scroll Direction: It determines whether scrolling the mouse wheel up/down moves content on the remote screen in the same direction (natural scrolling) or the opposite direction (traditional scrolling).
Four direction modes are available: Standard, Vertical Invert, Horizontal Invert, and Both Invert.
-
Mouse Mode: Including Absolute Mode and Relative Mode.
-
Relative Sensitivity: It is available when the Mouse Mode is Relative.
System
You can change the system display settings of the control panel, or reset the device with one click.
-
Device Identity: Change or customize your KVM's identity recognized by the controlled device. This feature is available since v1.4.0.
Note that the EDID and device identification will remain synchronized; changing one of them will make the other one automatically updated to ensure correct recognition.
-
Language: Switch the language of control panel.
-
Color Mode: Switch the theme color, including dark and light modes.
-
Time Zone: You can change the time zone of the KVM control panel. This is only for the KVM control panel, not the system time of the controlled device.
-
Reset KVM: Factory reset your KVM with just one click.
Network
Check the network details of your KVM device. This feature is available since firmware v1.4.0.
As shown above, Comet Pro connects to the router via an Ethernet cable and Wi-Fi at the same time.
Click Modify to change the Ethernet or Wi-Fi settings.
Toolbox
In the control panel, navigate to Toolbox.
Clipboard
The clipboard allows you to easily paste text from the controlling device to the controlled device, without the need to transfer files.
Shortcut
It shows some common shortcut options.
Click Show All to show all shortcut options.
Click Modify to adjust the shortcut options.
Wake On Lan
Wake-on-LAN (WOL) is a technology that allows the controlled device to be remotely powered on or awakened from a low-power state.
Click Add Device to choose a device from the same LAN and set up Wake-on-LAN.
Terminal
You can access the Comet Pro's terminal to perform advanced settings.
Click Access, you will be re-directed to the GLKVM terminal, as shown below.
Accessories
GL.iNet offers optional accessories for KVM devices, providing additional convenience for remote management.
Firstly, connect the accessories to the controlled device. Please refer to the user guide of the corresponding accessories.
Then log in to the control panel, navigate to Accessories.
Note: Accessory settings are only displayed after installation.
Fingerbot
The Fingerbot is adhered to the physical power button of the controlled device, to achieve remote control of the controlled device's power supply.
It works as per the following settings.
-
Time: The duration for which the Fingerbot presses.
-
Strength: Two levels of pressing strength are provided: Light Press mode and Hard Press mode.
-
Light Press Mode: Perfect for short or soft-touch buttons.
-
Hard Press Mode: Ideal for deep or firm buttons.
-
ATX Power
The ATX Board is installed in the computer host box to achieve remote control of the controlled device's power on/off/reboot.
It works as per the following settings.
-
Power: Provides short press and long press functions.
-
Restart: Restart the device.
Virtual Media
Comet Pro allows you to transfer files between the host controlling device and the controlled device.
In the control panel, navigate to Virtual Media.
Drag or click the box to upload files from host, or upload from URL.
As an example, two images have been uploaded from the host controlling device to the Comet Pro here.
Click Mount To Remote, two options are provided: File Sharing and Image Mounting.
File Sharing
It Emulates a read-write USB drive. Upload the files from the host to the Comet Pro and transfer to the controlled device.
Click on File Sharing, and a window will pop up in the upper-right corner of the control panel to display file sharing steps. Click "Don't remind me" to hide this prompt.
Then turn to the Comet Pro's control panel, go to This PC of your controlled device, and find a Removable Disk. Some operating systems may display its name as GLKVM.
Now you can view, move or delete the files in this drive.
Image Mounting
It emulates a read-only CD-Rom, supports BIOS/UEFI boot, for system reinstallation or ISO-based software installation.
Comet Pro can simulate a read-only virtual CD/DVD or disk drive on the target host. You can access this drive during the BIOS or UEFI startup process.
This function can help you reinstall the operating system or mount an ISO to install applications on the target host and other tasks.
Click on Image Mounting, in the pop-up Mount Settings, select the file and ensure this file can be mounted as an iso format, then click Mount Image.
Then you can use this file on the controlled end.
Apps Center
In the control panel, navigate to Apps Center, the integrated applications can be found here.
Tailscale
Comet Pro integrates Tailscale, allowing you to bind it to the Tailscale virtual network for remote access.
In the control panel, navigate to Apps Center -> Tailscale, bind Comet Pro and your controlling device to your Tailscale account. Then you can remotely access it by typing its Tailscale virtual IP into a web browser on the controlling device, without installing GLKVM app.
Click here for more instructions.
Once enabled, the page will show the bind account. Exit Node feature is particularly introduced since firmware v1.4.0.
Help
Here you can find more information about GL.iNet KVM and help documentation, as well as export logs for troubleshooting.
System Settings
In the control panel, navigate to the upper-right corner to access the following system functions and options:
- Collapse Toolbar
- Full-Screen
- Upgrade Firmware
- Cloud Service
- Security (including Change Admin Password and 2FA Auth)
- Reboot
- Logout
Upgrade
Local and Online Upgrades are supported.
Cloud Service
GL.iNet KVM panel can be accessed locally, so as to manage the controlled device under local network. Click here for more details.
If you want to access the controlled device remotely, we suggest you download the App to use Cloud service.
Security
-
Change Admin Password.
-
2FA Auth: Enable two-factor authentication to protect your account.
Accessory Guide
GL.iNet offers optional accessories for KVM devices to provide additional convenience for remote management.
Fingerbot
The Fingerbot, acting as a physical button emulator, is designed to enable remote control of physical power button on the controlled device.
Remove the cover above the Fingerbot to find a USB Bluetooth Receiver, and insert it into the USB port of Comet Pro.
Attach the Fingerbot to the controlled device, ensure that the robotic arm of the Fingerbot can reach the physical power button of the controlled device when pressed downward, so as to achieve control of the power supply of the controlled device.
Then log in to Comet Pro's control panel, go to Accessories to customize the Fingerbot settings.
Please refer to GL-Fingerbot (FGB-01) User Guide for details.
ATX Board
The ATX Board, acting as a smart power management module, enables remote control of the controlled device's power supply by simulating physical power button operations (power on/off/reboot).
Unlike the Fingerbot, which controls device through physical button presses, the ATX main board will be directly installed in the controlled device's host box, providing more concealed and stable power management.
Please refer to GL-ATX Board User Guide for details.
Still have questions? Visit our Community Forum.