Shadowsocks (SS) Setting
===
You will learn how to set up shadowsocks server and client on the mini router in this guide. This guide is for DIY purpose and provided as is. To do the following steps, you have to learn how to use SSH and WinSCP to connect to the router first.
Setup SS Server
Note: If you want to use your router as Shadowsocks server, you have to have Internet IP address that it can be access everywhere. Your ISP should also allow you to use as servers otherwise it is not accessible worldwide.
1. Edit Shadowsocks-server.json file
Input the following command to edit the configuration file "shadowsocks-server.json“
root@GL-AR750:~# vi /etc/shadowsocks-server.json
Then the following file content will display.

switch to edit mode by press i on your keyboard, then you can change parameter in the configuration file:
- Server:
0.0.0.0(default, don't modify) - server_port:
443(default, 443 is the port for https so it is good for camouflage) - password: your password This is the only thing that you have to set up by yourself.
- method:
rc4-md5is default encrypt method, rc4-md5 is the fastest encryption method.
when you finish all above modification, you can click Esc to exit edit mode, then click :, typewq to write the modification into the configuration files and quit.

2. Edit ss-server init file
Type vi /etc/init.d/ss-server in the command line

When you open ss-server configure file, you can see the following configuration

Press i to switch to edit mode, remove the "#" before /usr/bin/ss-server - C /etc/shadowsocks-server.json -u &, then click "Esc", to exit edit mode, and type :, typewq to write and quit the configuration file.
3. Start SS Server services
Input /etc/init.d/ss-server start , then the ss-serer services start on your router.

After you start ss-server, the above information will display.
You can also restart the router so that the server is started automatically.
4. Open Port on the mini Router
The port is not opened automatically so you can do this manually.


A window will pop-up warning you to separately login as a root user into advanced setting.
Click "OK"

Login with your password as a root user.

Advance Setting Page Review

Click "Traffic Rules" Tab to active external port forwarding in your network.

Scroll down to the "Open ports on router" and input information as following:
Name: "your rule name"
Protocol: TCP+UDP
External Port: 443
Click "Add" after filling relate information and scroll down to the bottom, then click "save&apply"
Now the port forwarding shall be activated and also the Shadowsocks Server is ready to use.
5. Port forward
You don't need to setup port forward if you are using the GL router as the main router.
But if connect the mini router to your main router as a client, you need to setup port forwarding in your main router.
Todo: port forward in other brand of router.
6. Check your public IP address
You can use any of your PC, laptop, tablet or smartphone to connect your Wi-Fi, then open a web browser (IE, Chrome, Safari, Firefox etc.)
Open any IP address checking website, the following websites are for your options:
- www.myipaddress.com
- www.checkip.org
- https://www.whatismypublicip.com/
- https://www.showmyipaddress.eu/
- http://ip.w69b.com/
The webpage will detect and show your public IP address, record it.
7. Configuration is ready
Now your ss server info is ready. Please write this down so that you can use to connect to your server. * Server IP: Your public server IP * Encryption: rc4-md5 * Password: your password
Using SS on PCs or Smartphones
1. Download the clients of your OS platform:
https://shadowsocks.org/en/download/clients.html
2. Setup your client on different devices
Install the Shadowsocks Client on your device (iOS, Android or Windows devices), then setup the following information:
Host: your Public IP address (you checked in step 3.2)
Port: 443
Password: your password (same as you setup in ss-server)
Encryption: rc4-md5 (same as you select in ss-server)
3. Start using Private Shadowsocks Services
After setup, you just start your shadowsocks on your devices, enjoy it.
You can test or check whether it's workable by open a web browser on your smartphone (use 3G/4G data but not WiFi), then go to a IP address checking website to check if the IP address is same as your SS-server public IP address.
Shadowsocks Client Setup on the router
1. Setup SS-Server in Luci

Select "Shadowsocks" in the services pull-down menu.
Click "Servers Manage" tab to setup SS-Client for GL-AR750 Router

Click "Add", fill the following information:
Alias (Optional): Any name you would display
Server Address: "Your Public IP"
Server Port: 443
Password: "Your Password"
Encrypt Method: RC4-MD5
Click "Save&Supply",

The following window will displayed, then click "Save & Apply"

2. Active SS-Server Client in GL-Router
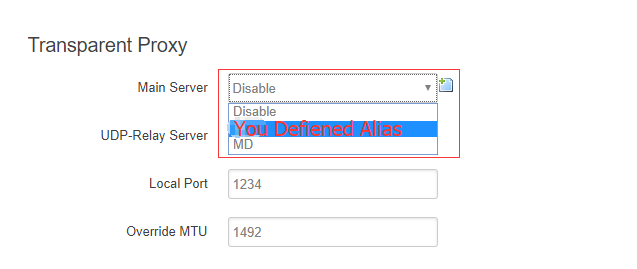
Then switch to General Settings tab, select "You defined Alias" as Main Server in the Transparent Proxy


After select the right Main Server, then click "Save & Apply" at bottom of the General Setting Page


After All Settings completed, the Transparent Status shall be "RUNNING" , enjoy your SS client.