Connect a GL.iNet router to public hotspots with a Captive Portal
What is a captive portal?
A captive portal is a Web page where public hotspots require users to view and interact with the page before Internet access is granted.
Why use a router for public hotspots?
-
Public Wi-Fi is not safe
It's hard to overstate the risks of public Wi-Fi. By connecting your GL.iNet router to public Wi-Fi, you can log in to your VPN account directly through the router's Admin Panel. It will automatically encrypt all connected devices on the local network, saving you the trouble of setting up a VPN on every single device.
-
Use as a repeater to allow connections with multiple devices
Besides that, some public Wi-Fi networks (e.g., hotel Wi-Fi) limit access to, for example, two devices. When traveling in a group, this is impractical. Instead, you can connect a travel router to the hotel Wi-Fi and use it as a repeater to broadcast a Wi-Fi signal to all your devices, including laptops, smartphones, tablets, etc. The hotel Wi-Fi will only recognize the travel router as a single device, but you can connect as many devices as you want to the free Wi-Fi.
How to connect router to public hotspots with captive portal?
Watch this video or follow the steps below.
-
Connect a smartphone or computer to the router.
Power on the router. On your smartphone or computer, search for the router's SSID and enter the Wi-Fi password. The default SSID and password are printed on the bottom of the router.
-
Log in to your router's web Admin Panel.
On your smartphone or computer, open a web browser and enter the router IP address (default IP:
192.168.8.1) into the address bar. You will be able to access the router's web Admin Panel.If you are logging in for the first time, select a language and create a login password for the router's web Admin Panel.
-
Connect your router to the public hotspot. Please refer to the Repeater tutorial.
Troubleshooting
If you fail to enter the captive portal, your router may be unable to access the Internet. Please try the following methods for troubleshooting.
Method 1: Enable Public Hotspot Login Mode & Camouflage
Note: These two features are available only in firmware v4.6 and above.
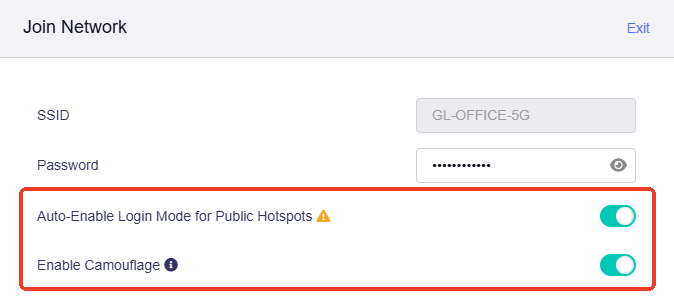
When connecting the router to a public hotspot, on the Join Network page, enabling the following features can help improve the connection success rate.
-
Auto-Enable Login Mode for Public Hotspots
If this option is enabled, this router will automatically enter Login Mode for Public Hotspots when it is successfully connected to a hotspot but not the Internet. In this mode, some services will be suspended while the DNS mode will be switched to automatic, which may leak your network activity to the hotspot provider (e.g. hotel or shopping mall).
-
Enable Camouflage
If enabled, the router will masquerade as the client device you use to access the admin panel by emulating that device’s MAC address.
Method 2: Change router settings
-
Log in to the web Admin Panel, navigate to NETWORK -> DNS. Make sure the DNS Rebinding Attack Protection is disabled and the Mode is set to Automatic.

-
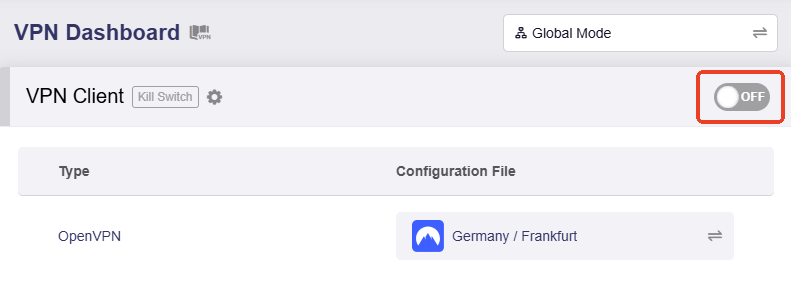
In the web Admin Panel, navigate to VPN -> VPN Dashboard. Make sure all VPN connections are disabled.
For firmware v4.7 and earlier, the page is displayed as below.

For firmware v4.8 and higher, the page is displayed as below.
-
In the web Admin Panel, navigate to APPLICATIONS -> AdGuard Home. Make sure the AdGuard Home is disabled.

-
Open a web browser, re-enter or refresh the webpage of captive portal. Wait a minute and check if it will be redirected to the captive portal authentication page automatically.
If you are using a smartphone and your web browser doesn't redirect to the captive portal, please turn off your smartphone's Wi-Fi and turn it on, then reconnect to the router's Wi-Fi. The captive portal should pop up directly after you enter the Wi-Fi password.

Method 3:MAC Clone
Some hotels limit the number of devices each customer can connect to the hotel's Wi-Fi by recognizing their MAC addresses, and they record the device's MAC address when it first connects. In this case, you can clone the MAC address your phone uses to connect to the hotel Wi-Fi to the router, allowing the router to use that MAC address to access the hotel's Wi-Fi.
-
Connect your phone to the hotel Wi-Fi. Find the MAC address that your phone uses to connect to the hotel's Wi-Fi.
Here is an example for iPhone (iOS 16.1.2): go to Settings -> Wi-Fi -> Select the hotel Wi-Fi and you will find the Wi-Fi Address. Write down this address.

For some older models, the MAC address may not be available in the Wi-Fi settings. In this case, the device may use its real MAC address when connecting to public Wi-Fi, which can be found in your phone's Settings > About (or "About Phone").
-
Connect your phone or computer to the router. Log in to the router's web Admin Panel, then clone or manually input this MAC access.
For firmware v4.5 and earlier, please select NETWORK from the left side -> MAC Address.
Select Manual Mode, enter the MAC address obtained in Step 1 and click Apply.

For firmware v4.6 and higher, please select INTERNET from the left side -> Repeater section, click Modify.

In the pop-up window, switch the MAC Mode to Clone, manually input the MAC address and click Apply.

-
It may be necessary to reboot the router to take effect.
Method 4:Seek help from hotel staff
Some hotels have very strict verification policies for their networks. If none of the above methods work, try asking hotel staff to directly add the MAC address of your router (use the factory default MAC address, not the random one) to the whitelist of the hotel network.
Still have questions? Visit our Community Forum or Contact us.