Connect to the Internet via cellular
Note: This guide is based on firmware v4.8. For earlier versions, please refer to here.
Most GL.iNet routers support cellular connectivity. This guide covers three types of models:
-
Built-in 4G Single-SIM models
Some models include a built-in 4G module with a single SIM card slot, such as the GL-E750 (Mudi). Please refer to Setup for Single-SIM models.
-
Built-in 5G Dual-SIM models
Some models include a built-in 5G module with dual SIM card slots, such as the GL-X3000 (Spitz AX). The cellular settings in the web Admin Panel may differ slightly. Please refer to Setup for Dual-SIM models.
-
USB Modem compatible models
Some models do not have a built-in SIM card slot, but feature a USB port and support cellular connectivity via a USB modem, such as the GL-MT3000 (Beryl AX). Please refer to Setup for USB modem.
Note: Some SIM cards require activation before first use. To ensure compatibility, activate the SIM card in a smartphone before inserting it into the router.
Setup for Single-SIM models
The following steps apply to models with a built-in cellular modem and a single SIM card slot.
Here we use the GL-E750 (Mudi) as an example.
We recommend you power off the router first, insert a pre-activated SIM into the slot, then power it on. If you insert the SIM card after the router has booted up, the web Admin Panel may not update automatically. In that case, please refresh the page or restart the router.
Auto Setup
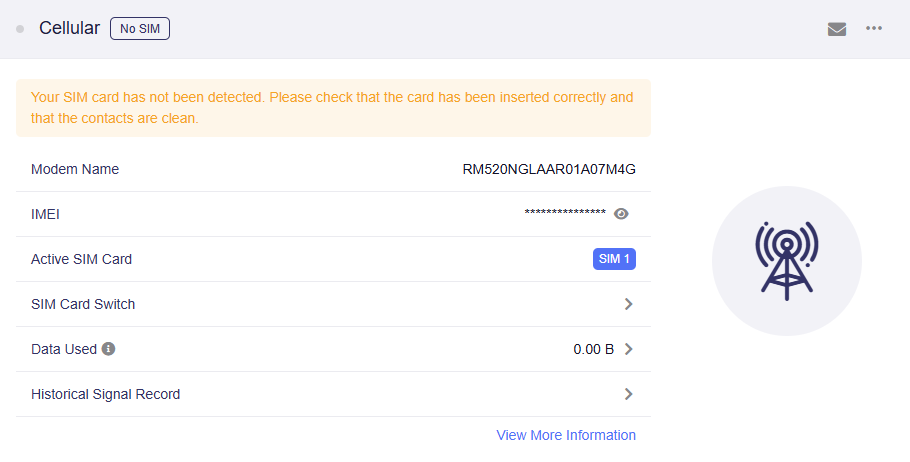
Log in to the router's web Admin Panel and navigate to INTERNET -> Cellular.
-
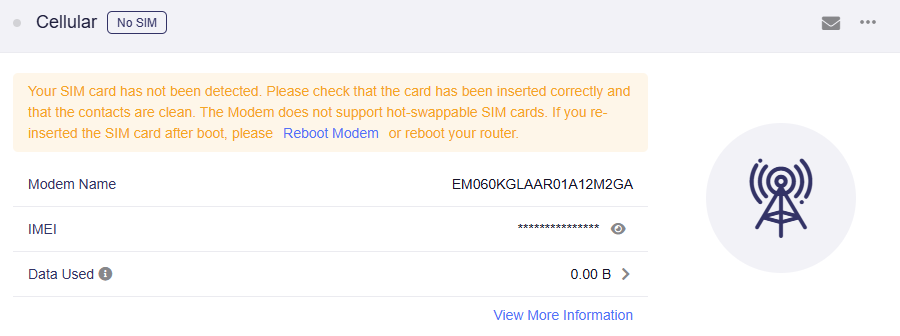
When no SIM card is inserted, the page displays a message "Your SIM card has not been detected".
-
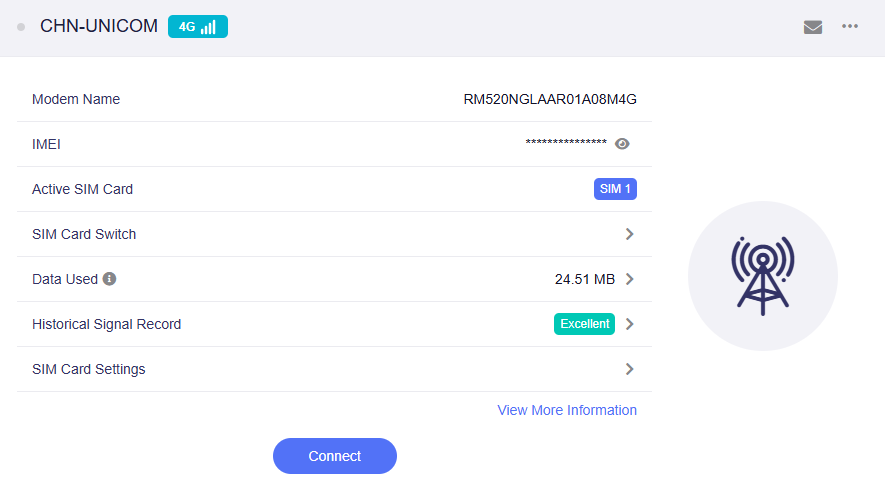
Insert a SIM card. The device will start connecting as shown below.
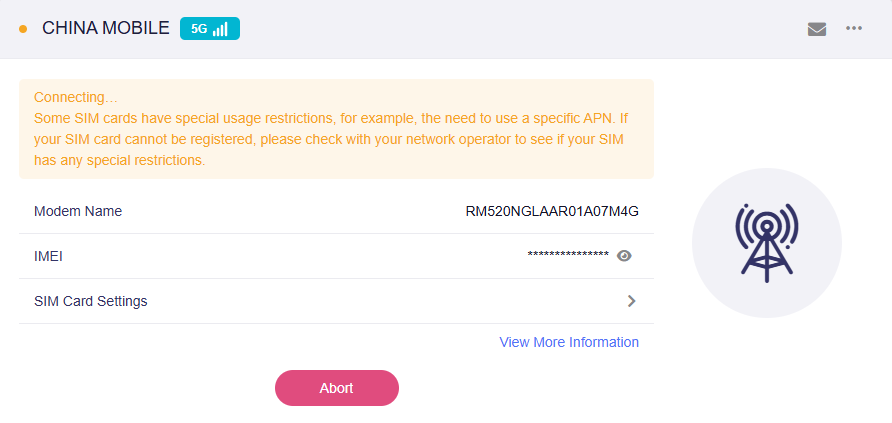
If it does not connect automatically, click the Connect button if available.
If the SIM card is not detected, try restarting the router to see if it can be detected.
-
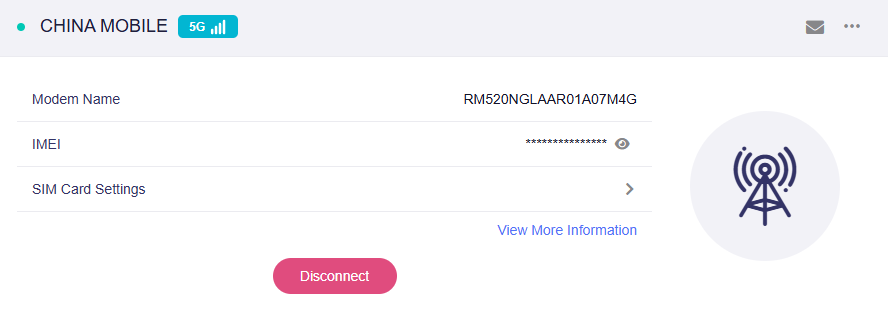
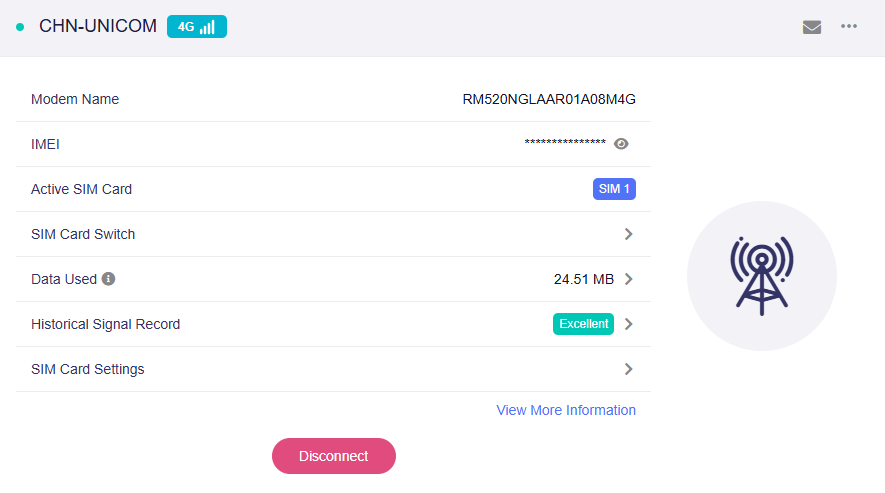
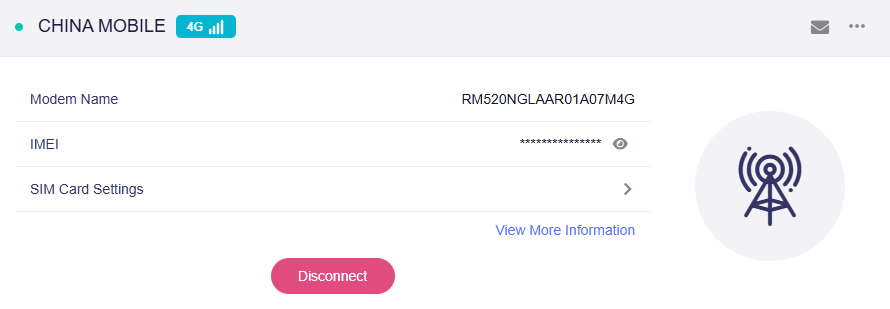
Once the cellular network is connected, the page will display the network details with a green dot, indicating a successful connection.
If Auto Setup fails, please try Manual Setup.
Manual Setup
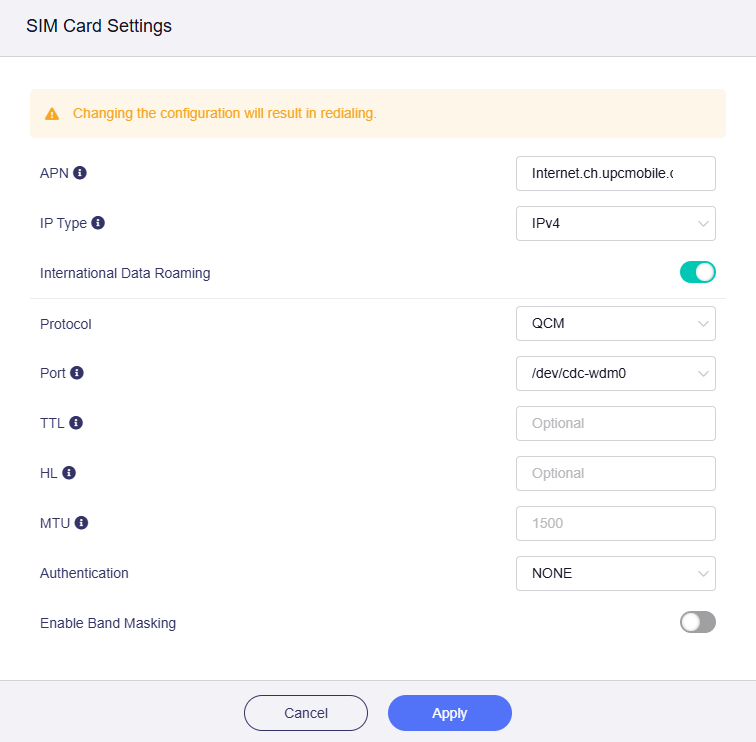
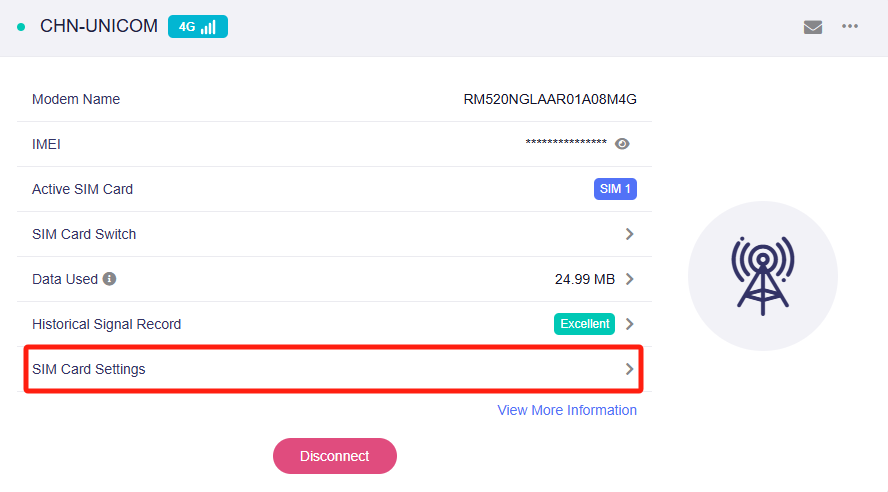
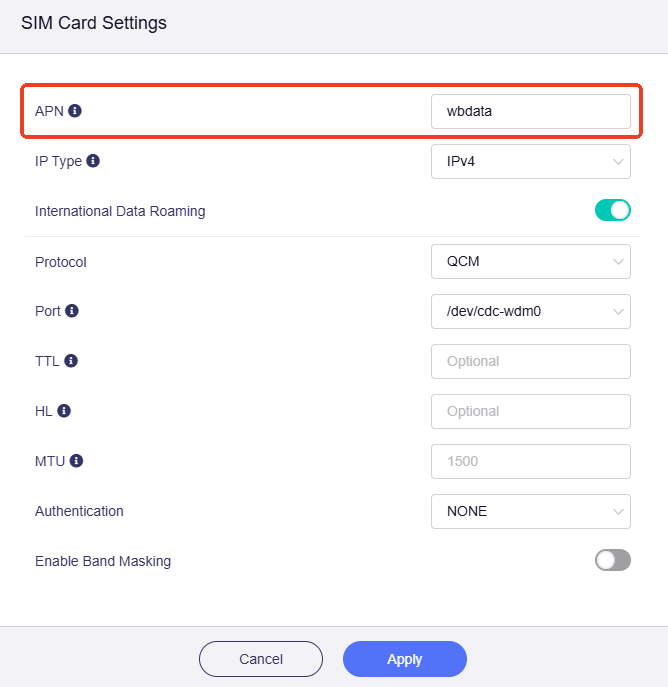
In the router's web Admin Panel, navigate to INTERNET -> Cellular, then click SIM Card Settings.
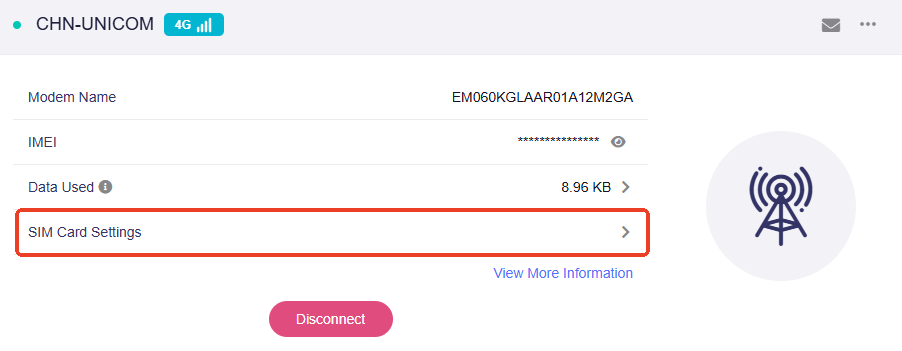
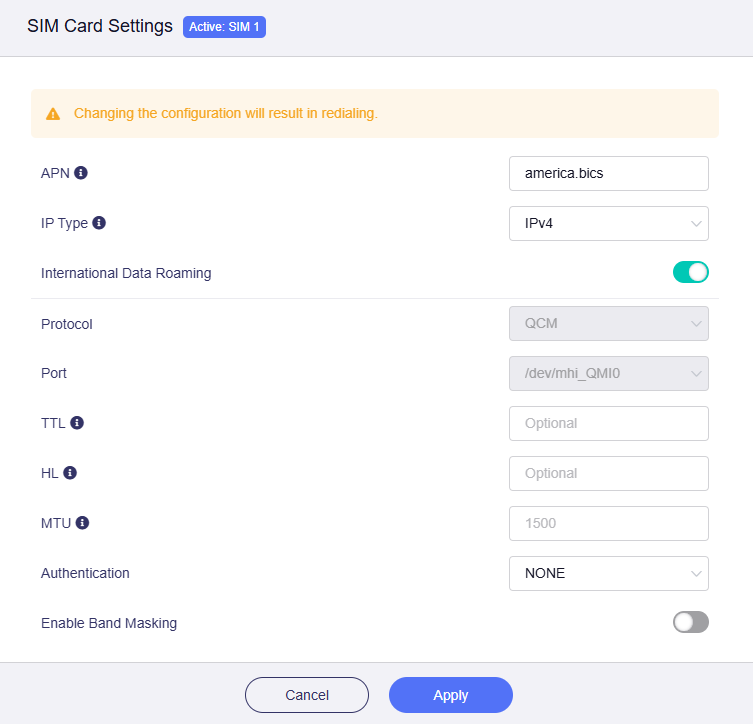
You can view or modify the cellular settings of the current SIM card.
Note: Some SIM cards may require a specific APN. If your SIM card fails to register, please contact your carrier to check for any restrictions. Configure the correct APN on your router if necessary.
Applying the changes will trigger a reconnection.
-
APN: APN (Access Point Name) is a gateway parameter required for a cellular network connection. It allows the router to connect to the internet provided by your mobile carrier. You can use the default APN or set a custom APN provided by your carrier.
-
Protocol: The cellular communication protocol (e.g., 3G, QMI, or QCM). This is usually auto-detected, and you can change it to match your modem and carrier requirements.
-
Port: The serial port used to communicate with the cellular modem. This is usually auto-detected and does not require manual adjustment.
-
TTL: TTL (Time To Live) defines the maximum time packets can survive in the network. By default, the router decrements the TTL of incoming packets from client devices by 1 before forwarding them. If you need to override it, you can set a fixed value here. The TTL setting is valid only for IPv4.
-
HL: In IPv6, HL (Hop Limit) limits the number of transmission hops for data packets in the network and serves as the equivalent of TTL in IPv4.
-
MTU: The default MTU value is 1500 bytes.
-
Authentication: Choose the authentication method required by your carrier (e.g., NONE, PAP, CHAP). This is usually set to NONE if no credentials are needed.
-
Band Masking: You can enable Band Masking if you want the router to block certain bands or use only specific cellular bands. Click here for details.
Setup for Dual-SIM models
The following steps apply to models with a built-in cellular modem that supports dual SIM cards. The pages may differ slightly from single-SIM models.
Here we use the GL-X3000 (Spitz AX) as an example. It supports Dual SIM, Single Standby, which means it can hold two SIM cards for cellular access, but only one SIM card can be active at a time. You can manually switch between the two SIM cards.
We recommend you power off the router first, insert your pre-activated SIM card(s) into the slots, then power it on. If you insert the SIM card after the router has booted up, the web Admin Panel may not update automatically. In that case, please refresh the page or restart the router.
Auto Setup
Log in to the router's web Admin Panel and navigate to INTERNET -> Cellular.
-
When no SIM card is inserted, the page displays a message "Your SIM card has not been detected".
-
When a SIM card is inserted, the page displays as follows. Click Connect.
If the SIM card is not detected, try restarting the router to see if it can be detected.
-
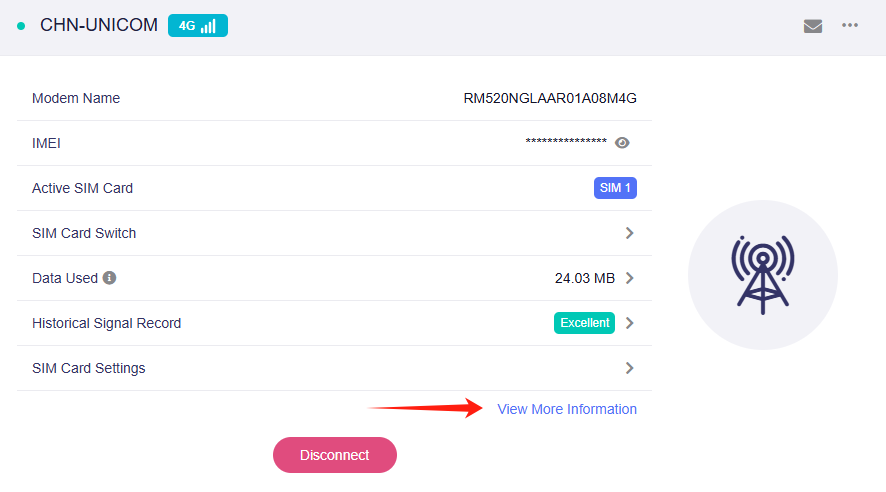
Once the cellular network is connected, the page will display the network details with a green dot, indicating a successful connection.
-
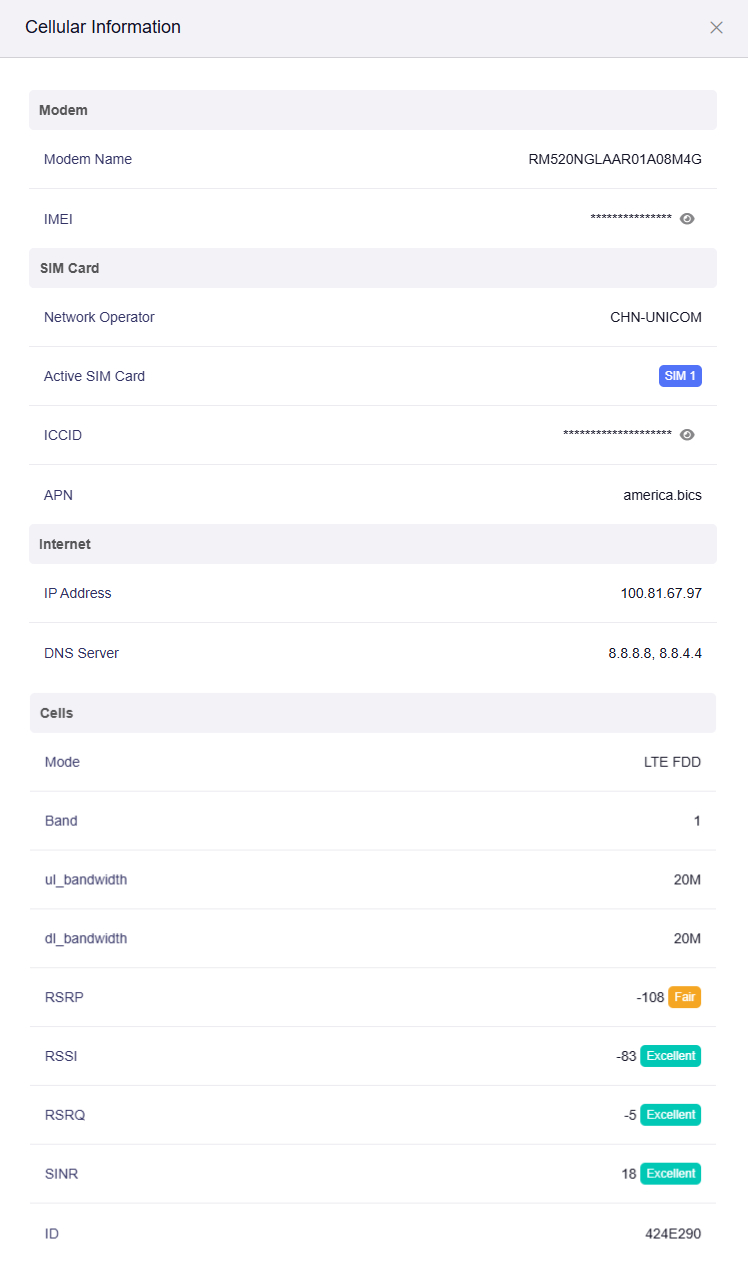
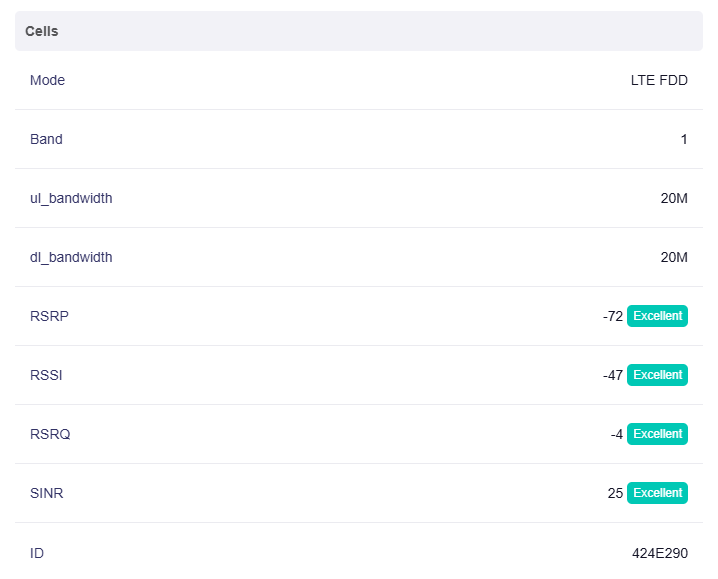
Click View More Information to show more cellular information, including modem details, SIM card details, Internet details, and cellular signal.
If Auto Setup fails, please try Manual Setup.
Manual Setup
In the router's web Admin Panel, navigate to INTERNET -> Cellular, then click SIM Card Settings.
You can view or modify the cellular settings of the current SIM card.
Note: Some SIM cards may require a specific APN. If your SIM card fails to register, please contact your carrier to check for any restrictions. Configure the correct APN on your router if necessary.
Applying the changes will trigger a reconnection.
-
APN: APN (Access Point Name) is a gateway parameter required for a cellular network connection. It allows the router to connect to the internet provided by your mobile carrier. You can use the default APN or set a custom APN provided by your carrier.
-
Protocol: The auto-detected cellular communication protocol (e.g., QMI or QCM) based on your modem and carrier.
-
Port: The auto-detected serial port for communication with the cellular modem.
-
TTL: TTL (Time To Live) defines the maximum time packets can survive in the network. By default, the router decrements the TTL of incoming packets from client devices by 1 before forwarding them. If you need to override it, you can set a fixed value here. The TTL setting is valid only for IPv4.
-
HL: In IPv6, HL (Hop Limit) limits the number of transmission hops for data packets in the network and serves as the equivalent of TTL in IPv4.
-
MTU: The default MTU value is 1500 bytes.
-
Authentication: Choose the authentication method required by your carrier (e.g., NONE, PAP, CHAP). This is usually set to NONE if no credentials are needed.
-
Band Masking: You can enable Band Masking if you want the router to block certain bands or use only specific cellular bands. Click here for details.
SIM Card Slot Settings
In the router's web Admin Panel, navigate to INTERNET -> Cellular, then click SIM Card Switch.
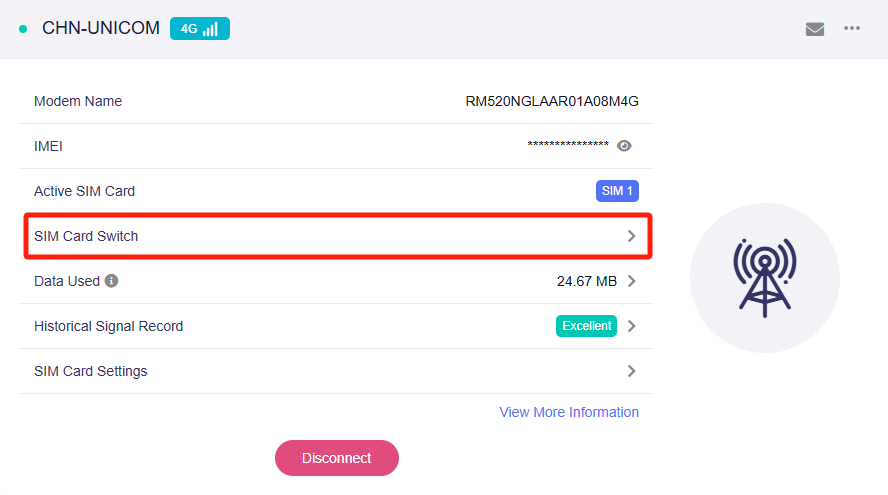
It will display the auto switch button, the activa SIM card, the ICCID and Network Operator.
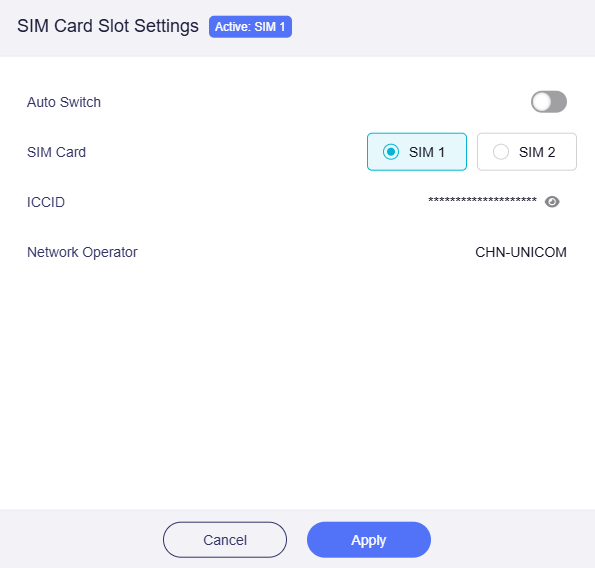
If two SIM cards are inserted, you can enable Auto Switch.
-
Auto Switch: Enables automatic switching between SIM 1 and SIM 2. The network detection method for SIM Auto Switch is the same as the one configured on the Multi-WAN page.
-
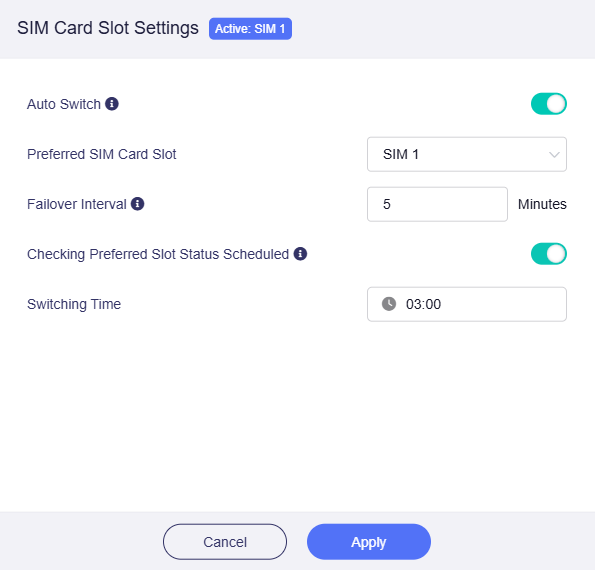
Preferred SIM Card Slot: Please set the preferred SIM card to SIM 1 or SIM 2.
-
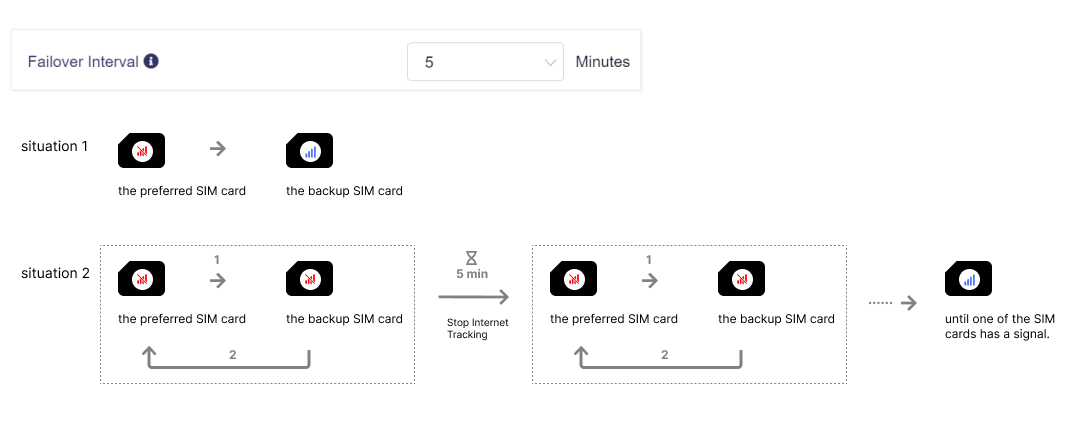
Failover Interval: Available values range from 5 minutes to 24 hours.
If the internet connection is still unavailable after a failover, the device will switch back to the preferred SIM slot and wait for this interval before retrying failover.
This option applies when both the preferred SIM card and the backup SIM card have no signal. The device will switch between SIM cards until one of them obtains a valid signal.
-
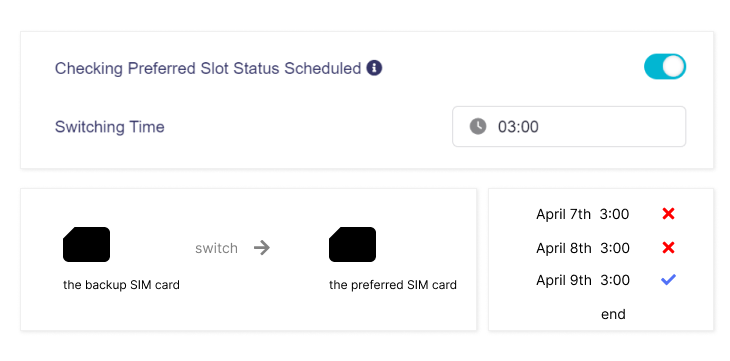
Checking Preferred Slot Status Scheduled
When enabled, the device will check the preferred SIM slot daily at the configured time and attempt to switch back if the preferred SIM regains internet access.
This prevents the backup SIM from consuming excessive data. If the preferred SIM still has no signal, the device will continue using the backup SIM.
Note: The Auto Switch feature does not switch to another SIM card immediately. First, the device needs time to confirm that the current SIM cannot access the internet. Second, the other SIM is not in standby mode and requires time to activate.
Setup for USB modem
The following steps apply to models without built-in SIM card slot, but has a USB port for connecting an external USB modem.
Here we use the GL-MT3000 (Beryl AX) with an external USB modem SIMPoYo uFi as an example.
We recommend you power off the router first, insert a pre-activated SIM into the USB modem, plug the modem into the router's USB port, then power on the router. If you plug the USB modem after the router has booted up, the web Admin Panel may not update automatically. In that case, please refresh the page or restart the router.
Quick Setup
-
Power off the router first. Insert a SIM card into the USB modem, plug the modem into the router's USB port, then power on the router.
-
Log in to the router's web Admin Panel, navigate to INTERNET -> Tethering, then click Connect.
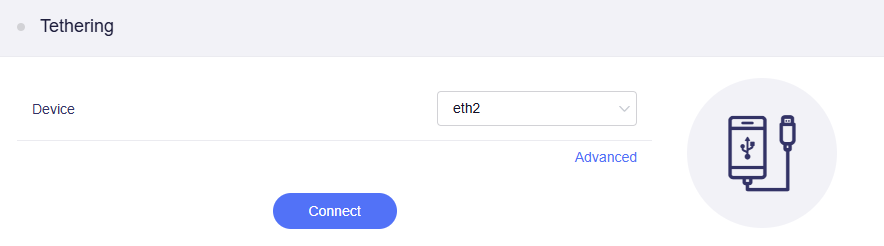
If you need to set advanced settings (e.g., TTL, HL, and MTU), click Advanced to customize, then click Connect.
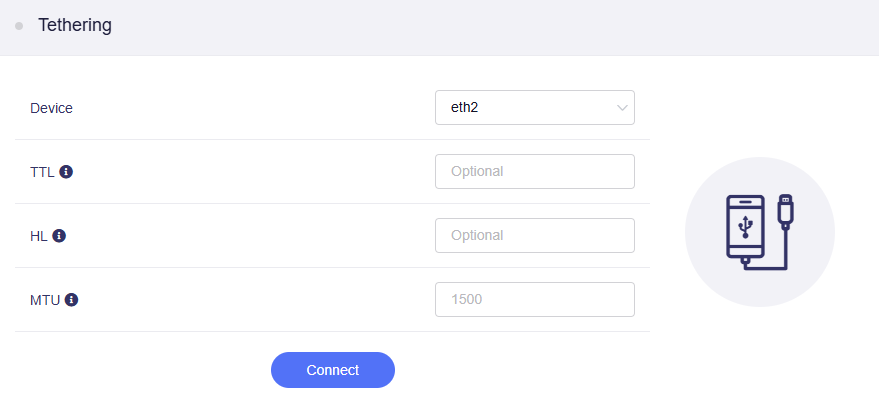
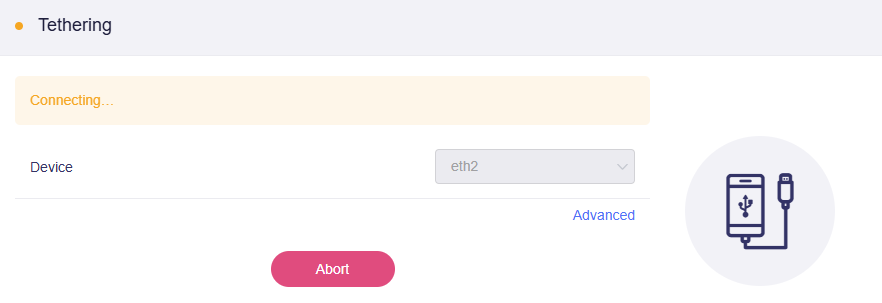
It will start connecting.
-
Once connected, the page will display the network details with a green dot, indicating a successful connection.
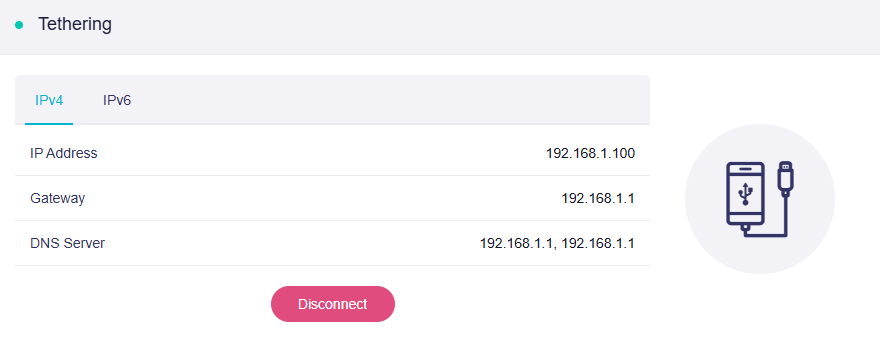
Note: After initial setup, if you restart the router with the USB modem plugged in, or replug the modem, it will be recognized automatically, and the network connection will be established without clicking the connect button again.
Compatible Modems
Here is a list of supported modems that we had tested before.
SIMPoYo uFi is a compact plug & play USB dongle with the Wi-Fi hotspot, designed for fast, reliable connectivity anywhere. It works seamlessly with most GL.iNet routers, as well as laptops, power banks, car USB ports, and other USB power sources. It comes with 10GB of free data for 30 days, valid in the UK, and 34 European countries.
| Model | Cellular | Tested | Tested by | Comments* |
|---|---|---|---|---|
| SIMPoYo 5G uFi | 5G | Yes | GL.iNet | |
| SIMPoYo 4G uFi (SP-N150C4) | 4G | Yes | GL.iNet | |
| Quectel EC20-E, EC20-A, EC20-C | 4G | Yes | GL.iNet | |
| Quectel EC25-E, EC25-A, EC25-V, EC25-C | 4G | Yes | GL.iNet | |
| Quectel EC200A series | 4G | Yes | akw2312 | Host-less |
| Quectel EP06-E, EP06-A | 4G | Yes | akw2312 | |
| Quectel EM060K-GL, EM120K-GL | 4G | Yes | akw2312 | |
| Quectel EM120R-GL, EM160R-GL | 4G | Yes | akw2312 | |
| Quectel RM520N-GL | 5G | Yes | akw2312 | |
| Quectel UC20-E | 3G | Yes | GL.iNet | |
| ZTE ME909s-821 | 4G | Yes | GL.iNet | |
| Huawei E1550 | 3G | Yes | GL.iNet | |
| Huawei E3276 | 4G | Yes | GL.iNet | |
| Huawei E3372 | 4G | Yes | anonymous | |
| Huawei E3372h-320 (Ukraine) | 4G | Yes | anonymous | Host-less |
| TP-Link MA260 | 3G | Yes | GL.iNet | |
| ZTE M823 | 4G | Yes | Arnas Risqianto | |
| ZTE MF190 | 3G | Yes | Arnas Risqianto | |
| Pantech UML290VW (Verizon) | 4G | Yes | GL.iNet/steven | QMI |
| Pantech UML295 (Verizon) | 4G | Yes | GL.iNet/steven | Host-less |
| Novatel USB551L (Verizon) | 4G | Yes | GL.iNet/steven | QMI |
| Verizon U620L (Verizon) | 4G | Yes | anonymous | Host-less |
-
QMI: This modem supports QMI mode. Please select QMI as the cellular communication protocol, and /dev/cdc-wdm0 as the serial port in the SIM card settings.
-
Host-less: This modem supports Tethering mode. Please manage the connection via the router's Tethering interface rather than the Cellular interface.
Traffic Statistics
In the router's web Admin Panel, navigate to INTERNET -> Cellular, then click Data Used.
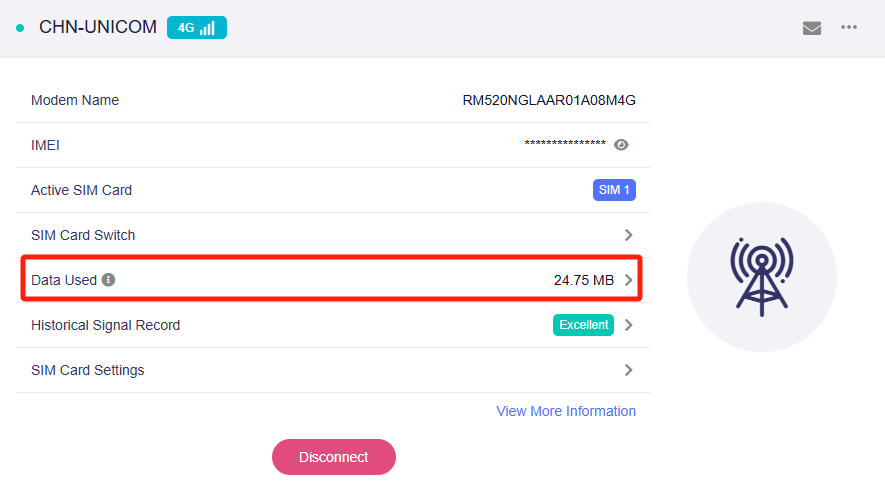
You will enter the Traffic Statistics page. It displays the used data of SIM card(s), and provides data limit settings.
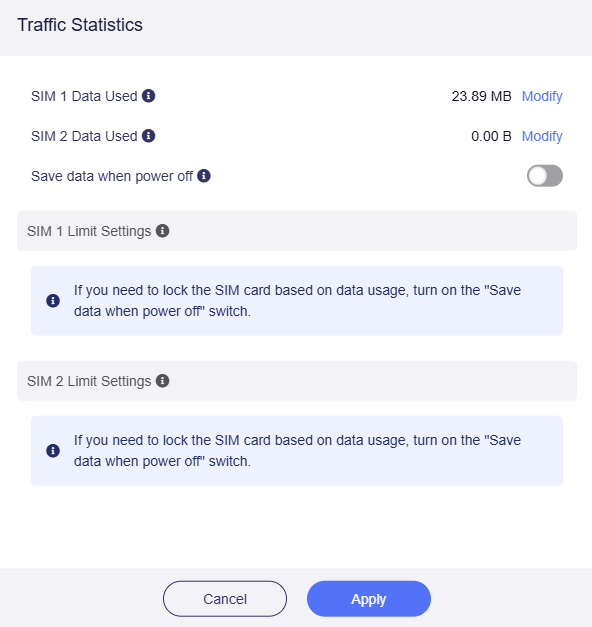
If the Data Used exceeds the Data Cap Amount, please modify the Data Cap Amount or the Data Used manually. Otherwise, the network may be disconnected, or the SIM card may Auto Switch (for Dual-SIM models).
-
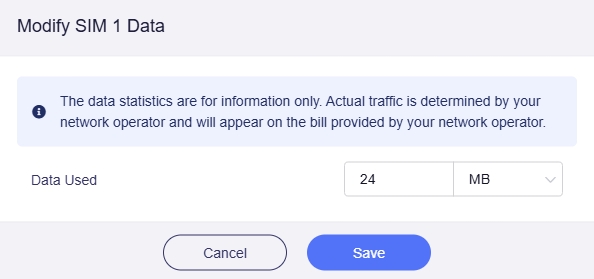
Modify the Data Used
Click Modify on the right side of SIM 1/2 Data Used.
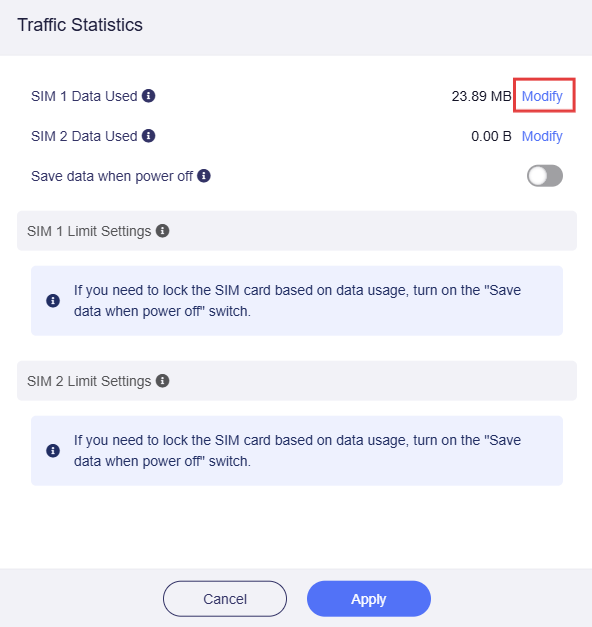
Then you can modify or reset the data used.
-
Set up SIM data limit
If you want to set up the SIM data limit, enable Save data when power off first. It means the data can be saved even after the device is powered off.
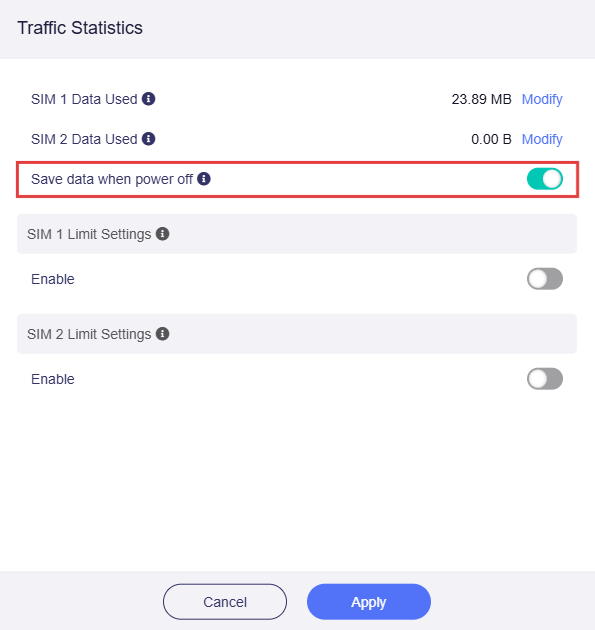
Then enable the SIM 1 or SIM 2 Limit Settings.
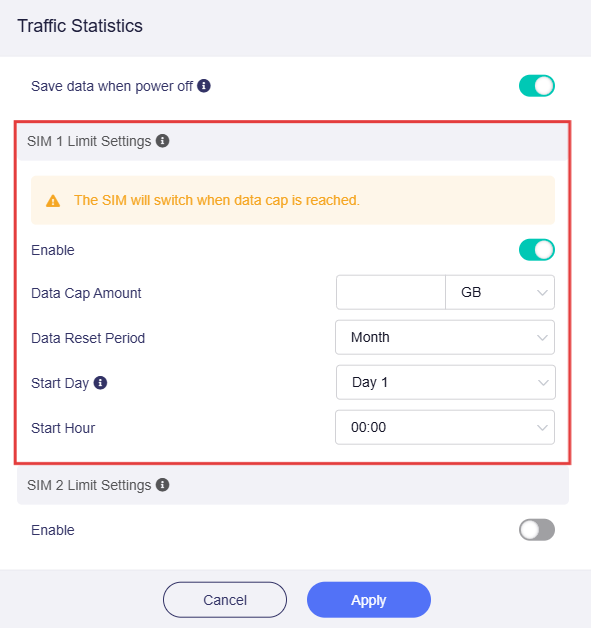
For Dual-SIM models, we suggest enabling the SIM Card Slot Auto Switch at the same time. If the SIM 1 Data Cap Amount is set and the SIM Card Slot Auto Switch is enabled, SIM 1 will automatically switch to SIM 2 when it's data exceeds the Data Cap Amount and SIM 1 will be disabled.
Historical Signal Record
In the router's web Admin Panel, navigate to INTERNET -> Cellular, then click Historical Signal Record.
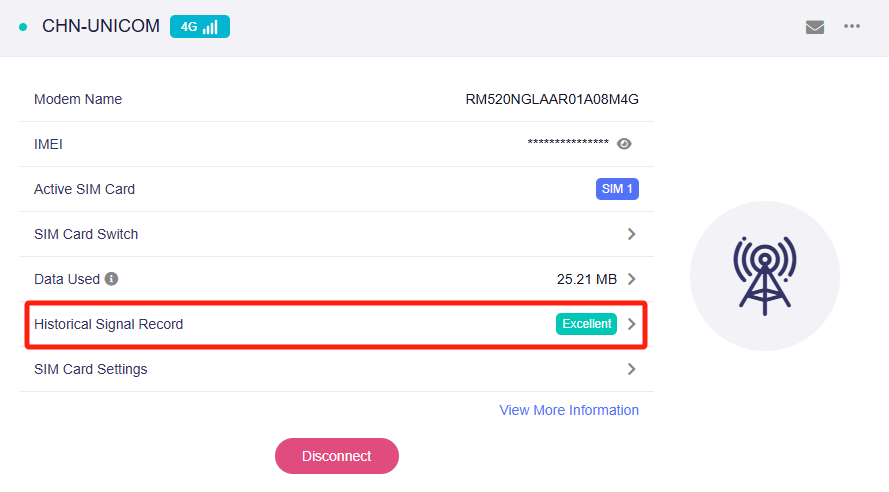
You can check the quality of your cellular connection here. If the signal is weak, try switching towers for a better signal.
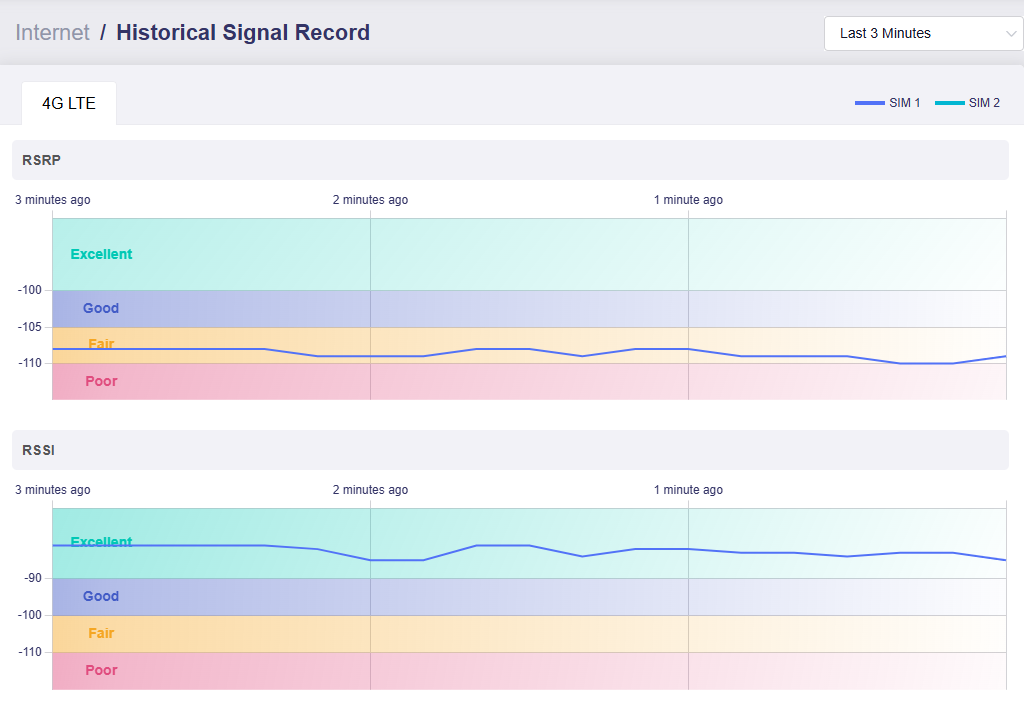
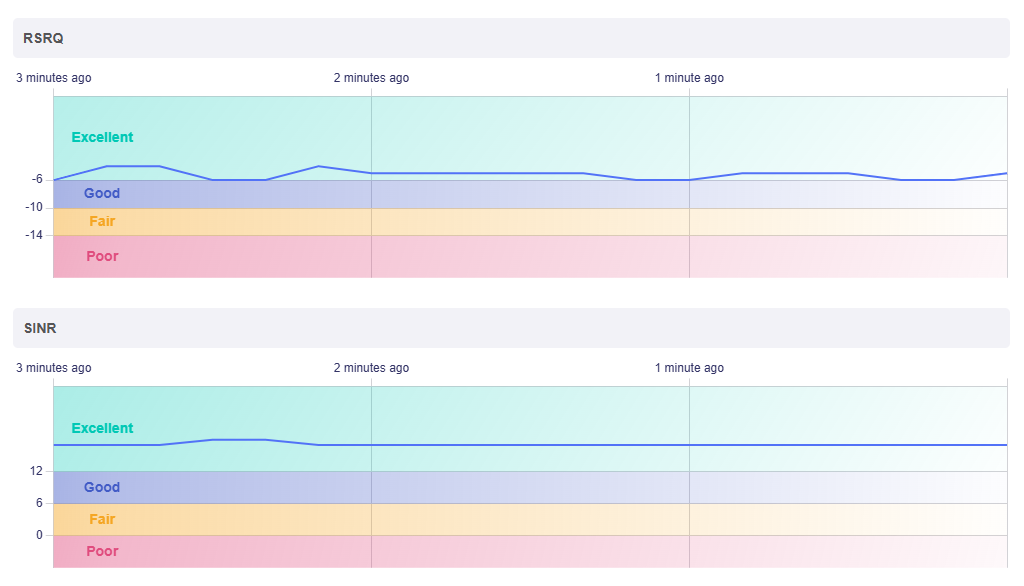
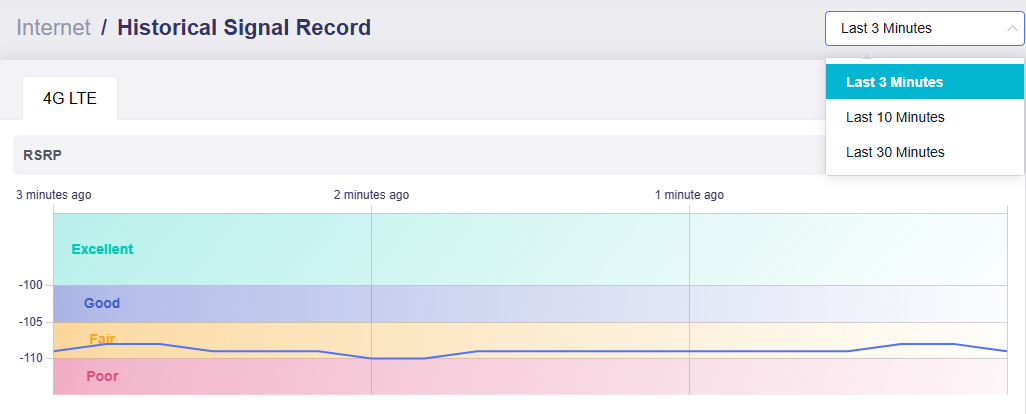
View the signal strength history by selecting different time frames in the upper-right corner.
Band Masking
Band Masking allows you to block specific bands or use only preferred cellular bands to improve weak cellular signal.
In the router's web Admin Panel, navigate to INTERNET -> Cellular -> SIM Card Settings, toggle on Enable Band Masking.
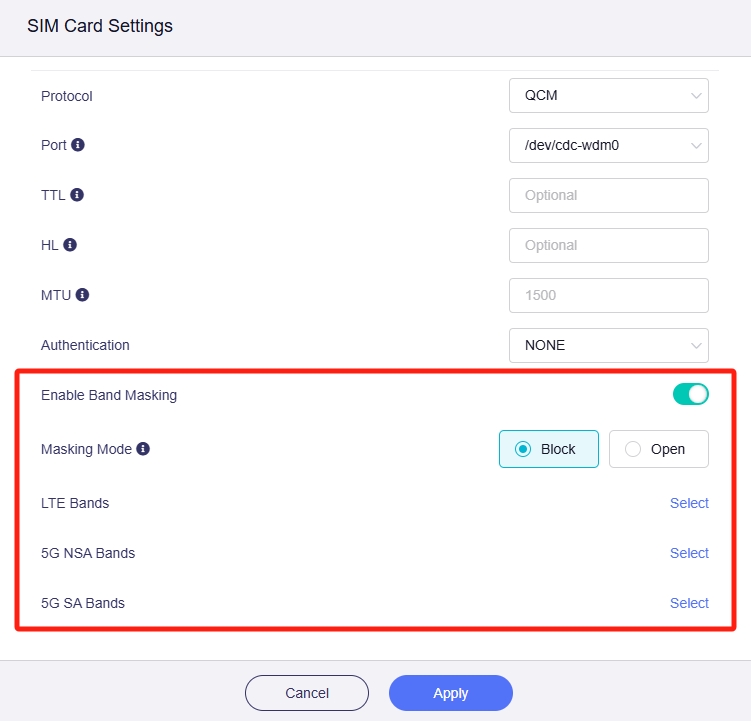
Select the Masking Mode (Block or Open), then select the LTE Bands, 5G NSA Bands, and 5G SA Bands.
SMS
Please refer to the SMS tutorial.
SMS Forwarding
Please refer to the SMS Forwarding tutorial.
Lock Tower
Supported Models
- GL-E5800 (Mudi 7)
- GL-X3000 (Spitz AX)
- GL-XE3000 (Puli AX)
- GL-X2000 (Spitz Plus)*
*The GL-X2000 (Spitz Plus) supports this feature on firmware ver.4.7 or later.
If you want to receive a high-quality signal and ensure a stable cellular connection, you can try locking tower.
Note: The locked tower must match the frequency bands supported by your carrier and device; otherwise, the connection may fail.
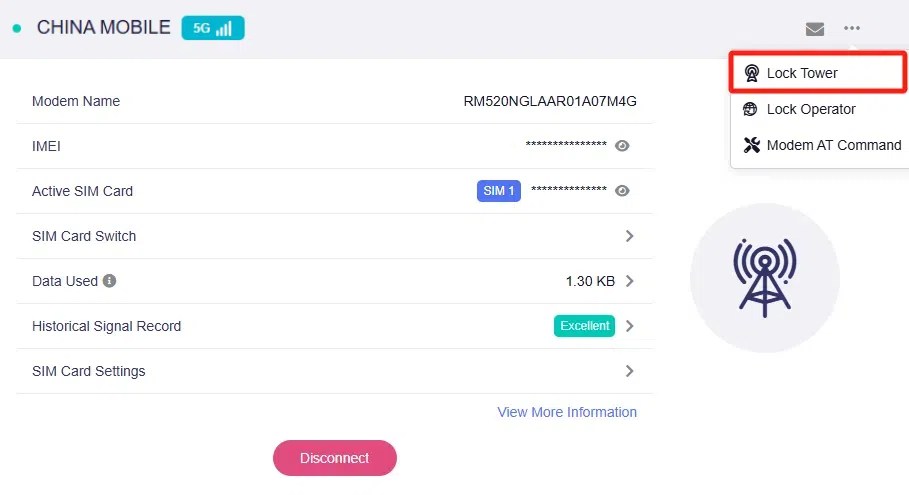
In the router's web Admin Panel, navigate to INTERNET -> Cellular. Click the three-dot icon in the upper right, then select Lock Tower.
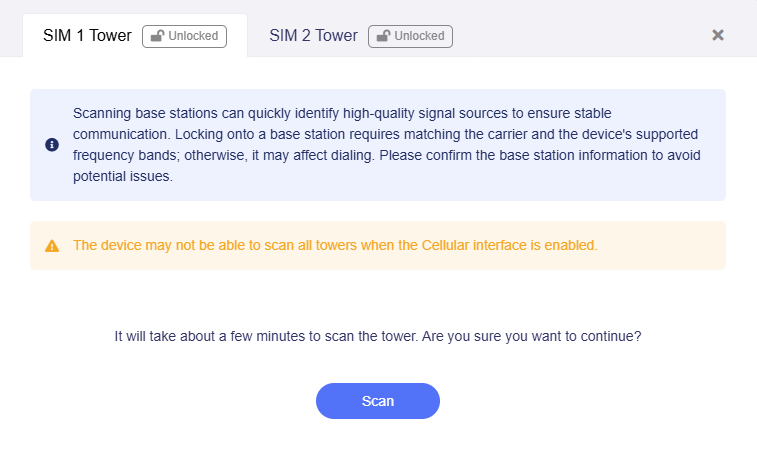
Click Scan to start scanning the cellular signal towers. It will take a few minutes. Do not refresh the page when scanning.
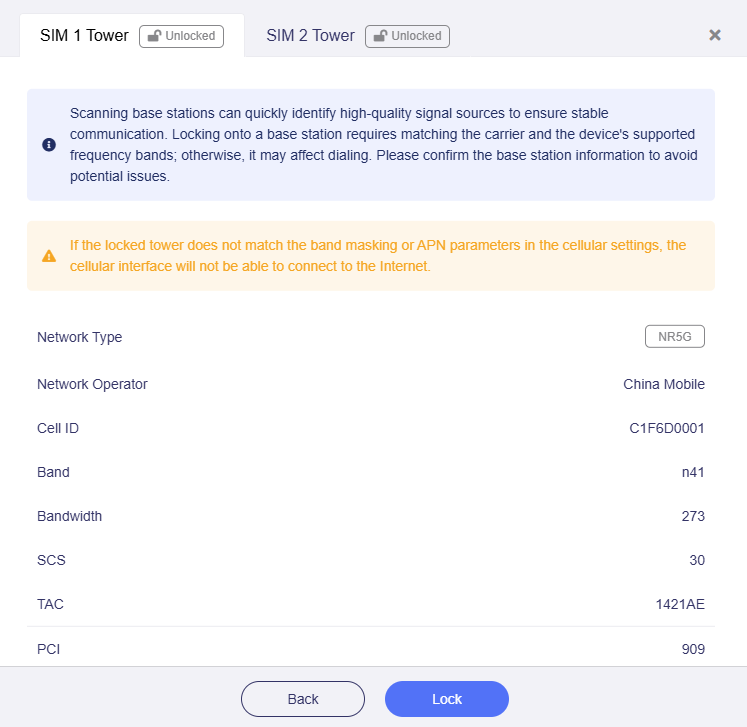
It will display the available towers.

Click a tower to view the details and lock onto it.
Note:
-
The device may not be able to scan all towers when the Cellular interface is enabled.
-
If the locked tower does not match the band masking or APN parameters in your cellular settings, the router will not be able to connect to the cellular network.
-
After locking a cell tower, if you move the router to another location, it will still attempt to reconnect to the locked tower after rebooting. This may prevent the router from connecting to the cellular network automatically at the new location. In this case, you need to either unlock the current cell tower, or manually lock it to a new tower.
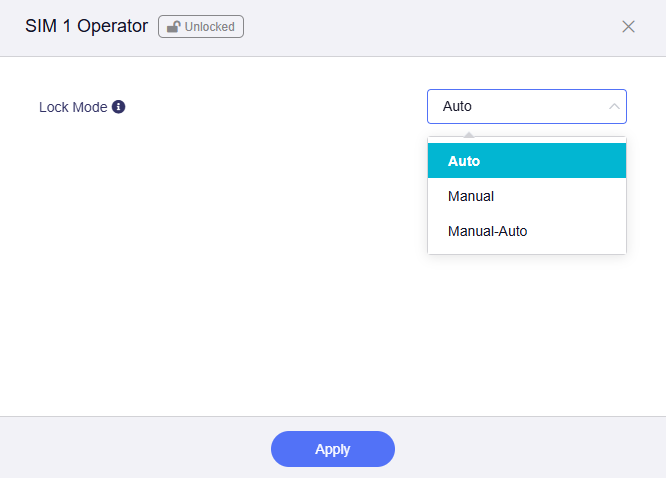
Lock Operator
This feature is available only on GL-X3000, GL-XE3000, and GL-X2000 (firmware ver.4.8 or later).
By locking to a specific mobile operator, the router will only use that operator's network, ensuring a stable connection and avoiding unintended roaming charges — especially in border areas where the device may otherwise connect to foreign networks.
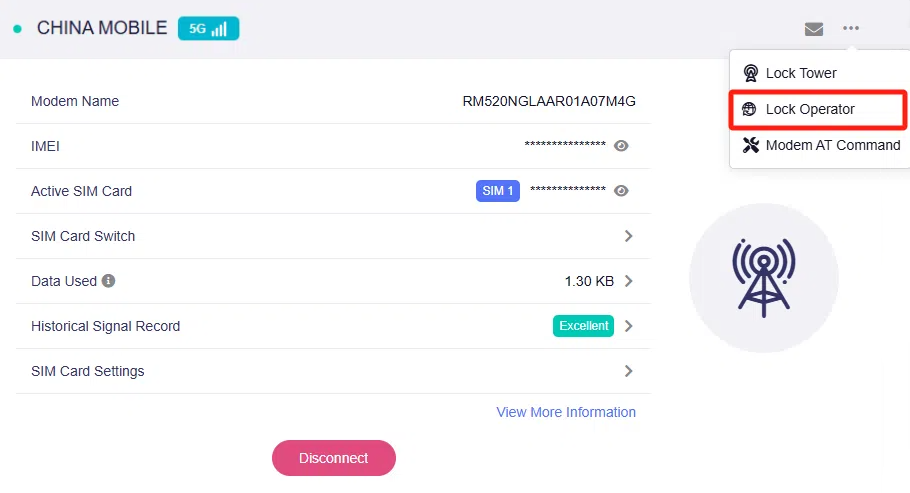
In the router's web Admin Panel, navigate to INTERNET -> Cellular. Click the three-dot icon in the upper right, then select Lock Operator.
There are three locking modes:
- Auto: Automatically connect to an available operator network.
- Manual: Manually lock onto a specific operator.
- Manual-Auto: Automatically switch to an available operator network if the manual lock fails.
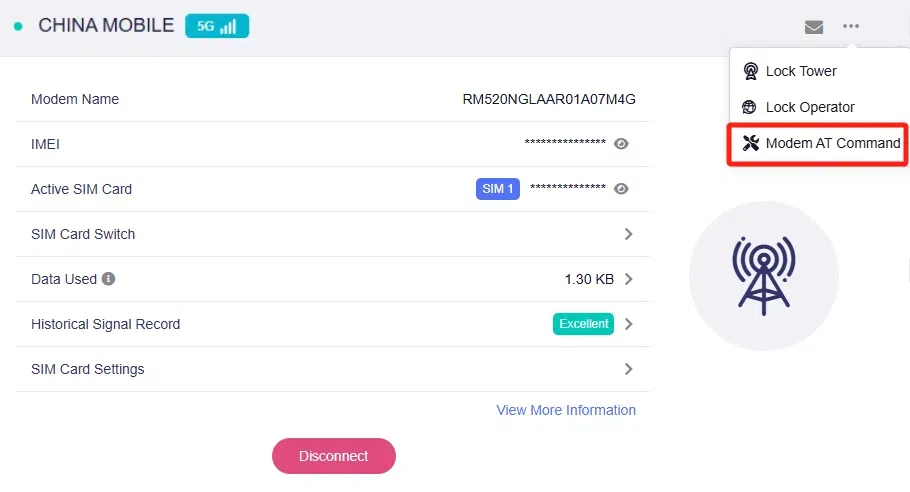
Modem AT Command
Modem AT commands are standard instructions used to communicate with the cellular modem. With this feature, you can send commands and check the modem status.
In the router's web Admin Panel, navigate to INTERNET -> Cellular. Click the three-dot icon in the upper right, then select Modem AT Command.
You will enter the AT Command page.
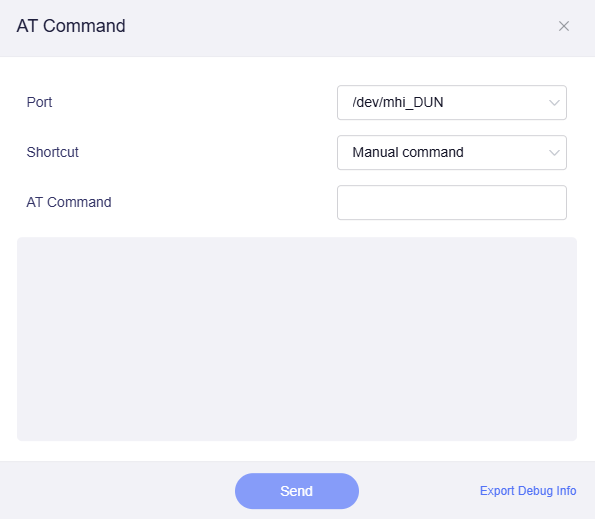
When Shortcut is set to Manual command, you can type your desired command in the AT Command field.
You can also click the Shortcut drop-down to select from a list of preset commands.

The following commands are available as presets:
- Request IMEI
- Request QCCID
- Request IMSI
- Check Signal Quality
- Reset modem
- Operator Names
- Request SIM card status
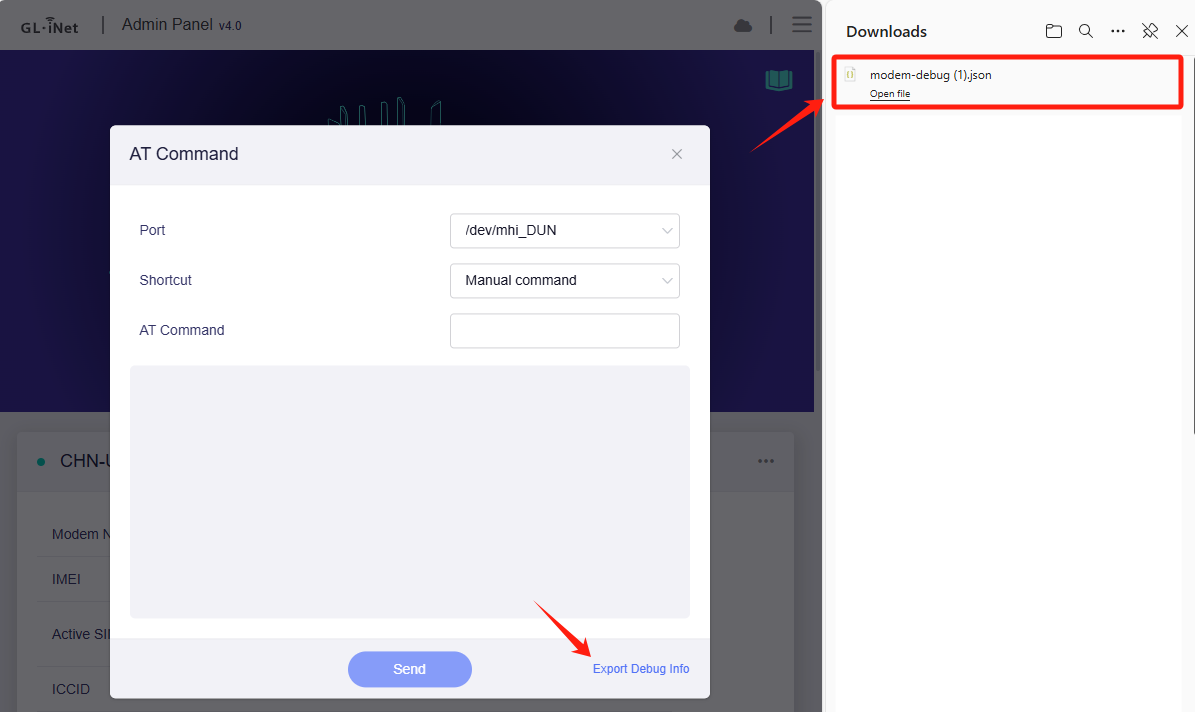
As an example, the shortcut "Request IMEI" is selected here. Click "Send", and you will get the result as shown below.

In the bottom right corner, you can click Export Debug Info to download a .json file.
Troubleshooting
If you fail to establish a cellular connection, click the error message below for relevant solutions.
No SIM / Your SIM card has not been detected
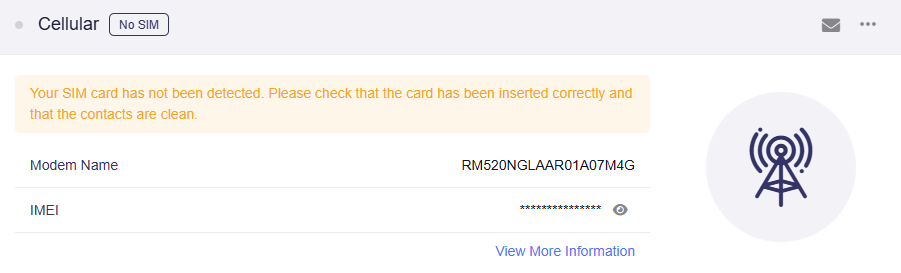
Here are some suggestions for troubleshooting.
-
Refresh the page and wait a few minutes to check if the SIM card can be detected.
-
Ensure the SIM card is installed correctly. Align the notch on the SIM card with the corresponding mark on the card slot to confirm proper insertion orientation.
-
Power off the router, remove and reinsert the SIM card, then power the router back on.
-
Try using another SIM card if available.
If the issue persists, download the logs and send them to support@gl-inet.com.
SIM card not registered / The interface is connected, but the Internet can't be accessed
This issue has two types of error messages:
-
SIM card not registered
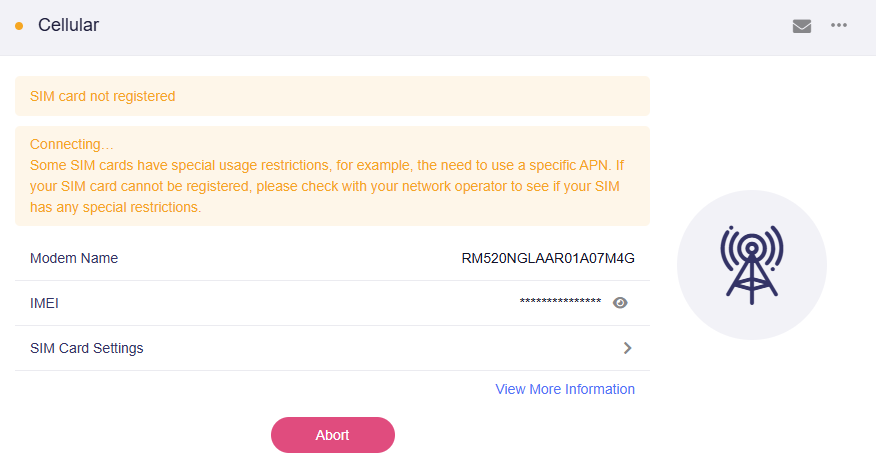
-
The interface is connected, but the Internet can't be accessed

Here are some suggestions for troubleshooting.
-
Refresh the page and wait a few minutes to check if the error disappears.
-
Click Disconnect/Abort, then click Connect to try reconnecting.
-
Restart the router.
-
Verify the SIM card status and ensure it is activated. Test the SIM card by inserting it into a smartphone to confirm it can access the internet normally with an active mobile data plan, or contact your network carrier for verification.
-
Some network carriers may require a 3G protocol for network connection. Please go to SIM Card Settings -> Protocol, select 3G, then click Apply.
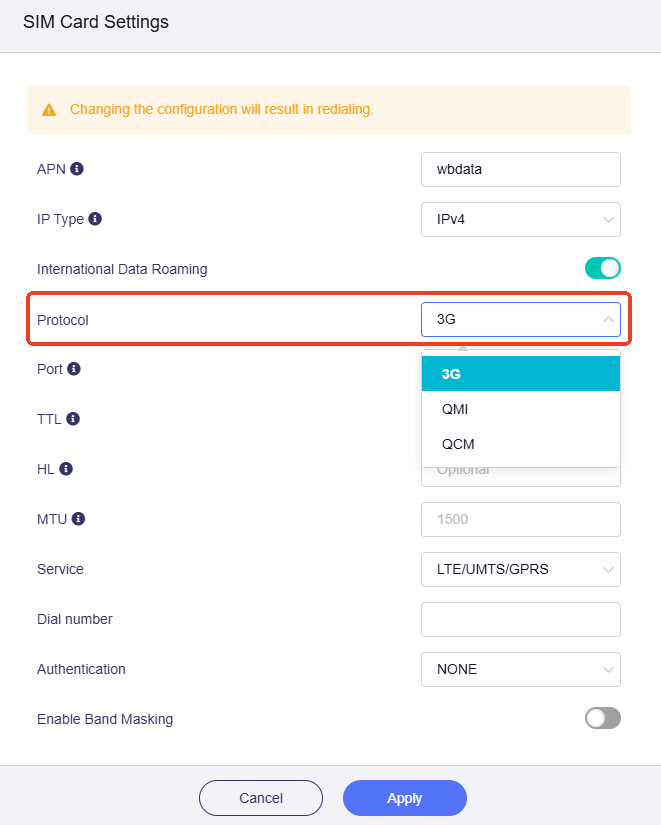
The device will reconnect automatically. Wait a few minutes to check if the connection is successful.
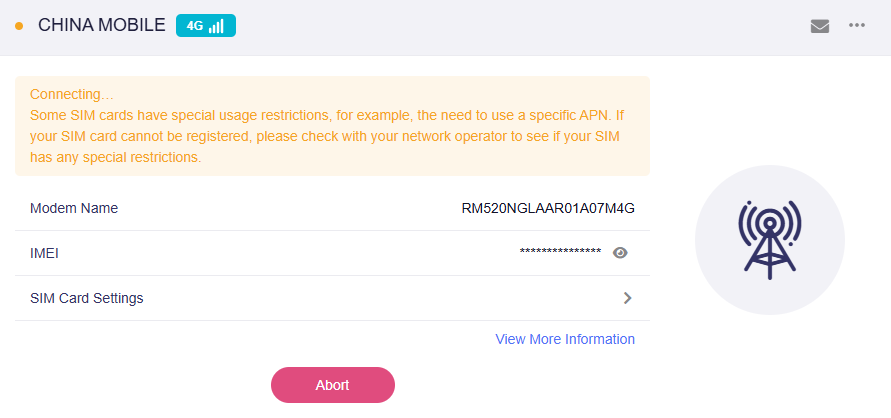
If the connection is successful, the page will display as follows.
-
Some SIM cards may have special usage restrictions (e.g., requiring a specific APN). If your SIM card fails to register, contact your carrier to check for any restrictions.
If necessary, go to SIM Card Settings -> APN, configure the correct APN on the router, then click Apply.
-
Click View More Information to check the cellular signal strength. If the signal is weak, ensure the antenna is installed correctly. Move the router to an open and unobstructed location for better signal reception.
-
Check if Band Masking or Lock Tower is enabled. If so, disable the feature and try reconnecting.
If the issue persists, download the logs and send them to support@gl-inet.com.
IoT Certification
AT&T Certification
Click the link att device certification and input the device name, you can find it.


T-Mobile Certification
Click the link t-mobile device certification and choose 5G in Filter, you can find it.

Related Articles
- Internet page
- How to set the priority of each Internet access method?
- How to set the load balance when multiple Internet access methods are used at the same time?
Still have questions? Visit our Community Forum or Contact us.