Connect to the Internet via an existing Wi-Fi by Repeater
Using Repeater means connecting the router to another existing wireless network, e.g. when you are using free Wi-Fi in a hotel or cafe.
It works in WISP (Wireless Internet Service Provider) mode by default, which means that the router will create its own subnet and act as a firewall to protect you from the public network.
Basic Steps
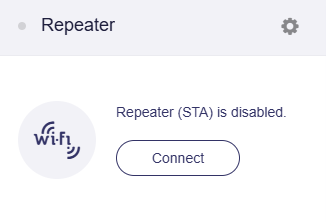
Log in to the router's web admin panel, navigate to INTERNET -> Repeater section, and click Connect.
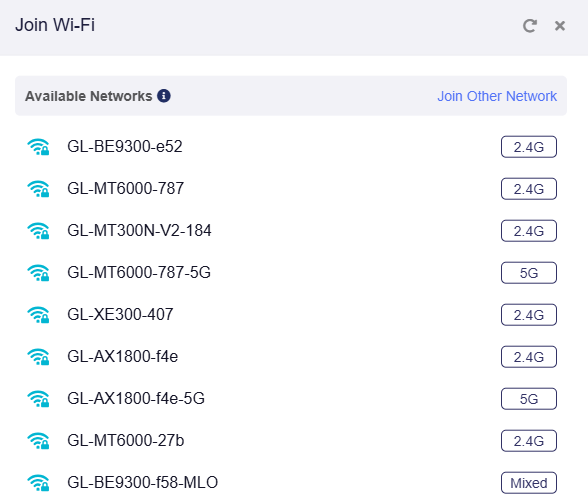
Choose the Wi-Fi network you want to connect to from the available network list.
Note
-
The page displays the Wi-Fi channels your router supports. Please ensure that the Wi-Fi network you're connecting to uses one of these channels, otherwise it may not be displayed in the available network list.
-
When searching for an iPhone Personal Hotspot, keep the iPhone screen unlocked to maintain constant Wi-Fi beacon transmission. Otherwise, the router may fail to detect this hotspot.
Enter the correct Wi-Fi password and click Apply.
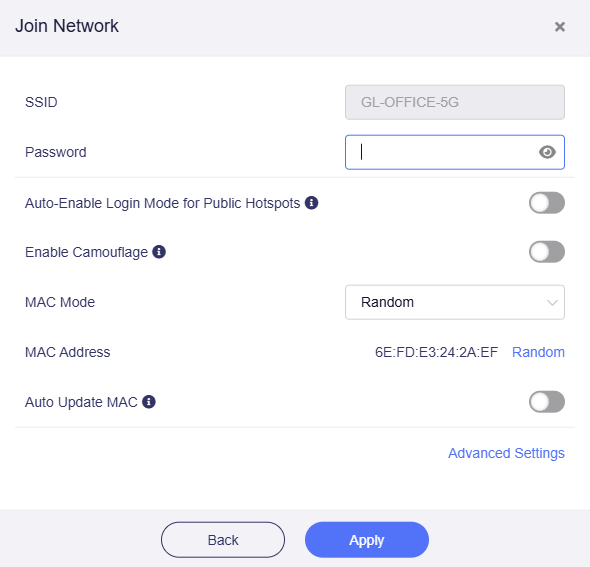
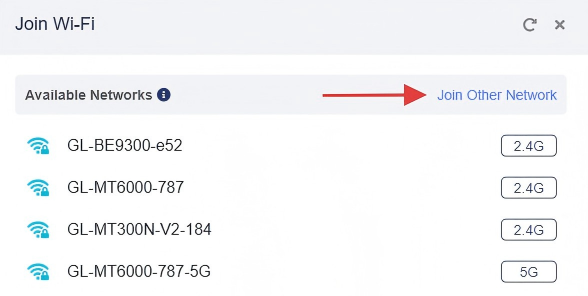
If the Wi-Fi SSID you want to connect to is not in the Available Network list, click Join Other Network in the upper-right corner, manually enter the Wi-Fi SSID and other information required. Refer to here for detailed steps.
For connecting to a public hotspot, such as those provided by hotels/airports/malls, please refer to For Public Hotspot.
For other settings, please refer to Advanced Settings.
After a while, if the password is correct, the connection will be successful.

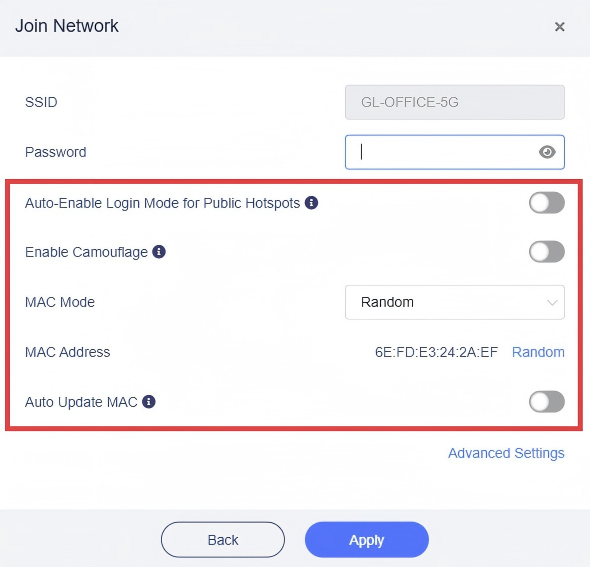
For Public Hotspot
When connecting the router to a public hotspot with a captive portal, enabling the following features can help improve the connection success rate.
-
Auto-Enable Login Mode for Public Hotspots
This feature is available since v4.6
If this option is enabled, this router will automatically enter Login Mode for Public Hotspots when it is successfully connected to a hotspot but not the Internet. In this mode, some services will be suspended while the DNS mode will be switched to automatic, which may leak your network activity to the hotspot provider (e.g. hotel or shopping mall).
Even if this option is not enabled, the router will prompt you to enter this mode when it detects a captive portal in the hotspot and fails to log in successfully.

-
Enable Camouflage
If enabled, the router will masquerade as the client device you use to access the admin panel by emulating that device’s MAC address.
-
MAC Mode
You can choose which MAC the router uses to connect to the public hotspot.
-
Factory: Uses the device's original factory-assigned MAC address.
-
Clone: Clones a client device’s MAC address for connection. If the desired MAC isn’t listed, manually enter the address you want to clone.
Note: Many modern devices use randomized MAC addresses (often called Private Wi-Fi Address or random hardware address) when connecting to Wi-Fi networks. Because of this, the MAC address displayed here may not match the device’s actual physical MAC.
-
Random: Automatically generates a random MAC address for connection.
When saving the network configuration, the MAC Mode (including any cloned/randomized MAC address) is tied to the specific SSID you save. You can manually change these settings for each SSID at any time.
-
-
Auto Update MAC: If this option is enabled, the MAC can update automatically.
Advanced Settings
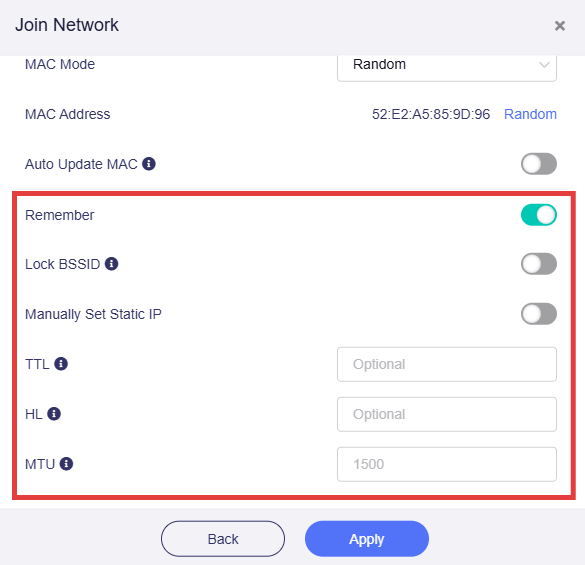
When joining the network, there are some additional options.
-
Remember: Enable this to remember the current repeated Wi-Fi network.
-
Lock BSSID: When enabled, the router will connect only to the specific access point (AP) corresponding to the selected BSSID, even when other APs share the same SSID.
-
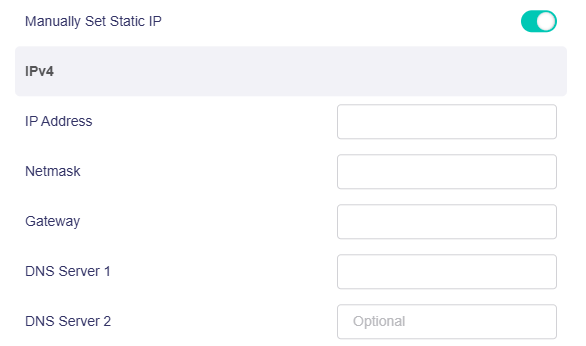
Manually Set Static IP: When enabled, you can manually configure a fixed IPv4 address, netmask, gateway, and DNS servers for the router's repeater connection, instead of obtaining these settings automatically.
-
TTL: TTL (Time To Live) sets the maximum time for packets to survive in the network, and is filled in according to the requirements of the operator. By default, the router forwards the TTL of the incoming client device minus one. If you need to camouflage, you can set a fixed value here. the TTL is valid only for IPv4.
-
HL: In IPv6, the HL (Hop Limit) field is used to limit the number of transmission hops of data packets in the network, which is equivalent to the TTL in IPv4.
-
MTU: The default value is 1500.
Repeater Options
Click the gear icon in the upper-right corner of the connected Repeater section.
The Repeater Options are displayed as follows.

-
Allow Switching to Other Saved Networks: If enabled, the router will automatically connect to other saved networks when the current connected Wi-Fi network is unavailable.
-
Band Selection: If you manually select a band, the router will only scan and connect to the Wi-Fi networks in this frequency band.
Manage Known Network
To manage known networks, click Switch Network.
You can also click Connect in the Repeater section if no network is currently connected.
On the Known Networks section, click the trash icon to delete a known network, or the gear icon to configure the network.
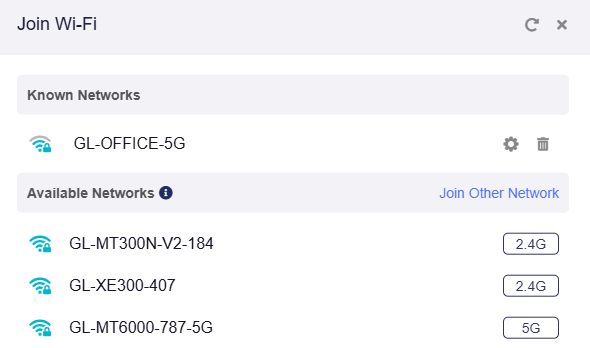
Join Other Network
If the SSID is not in the Available Networks list, or if the SSID is hidden, you can click Join Other Network.
Enter the SSID, select the Security and enter the password (if required).
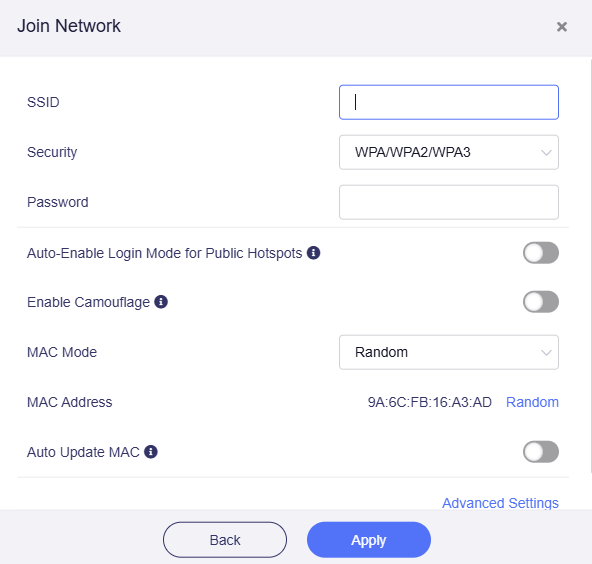
For Security settings, there are two or three options, depending on the model.
- None, which means no password is required.
- WPA/WPA2/WPA3, which is common and supported by nearly all Wi-Fi networks.
-
WPA/WPA2/WPA3 Enterprise, which requires Extensible Authentication Protocol (EAP) for authentication. A valid username and password are needed to connect (typically used in business or campus networks).
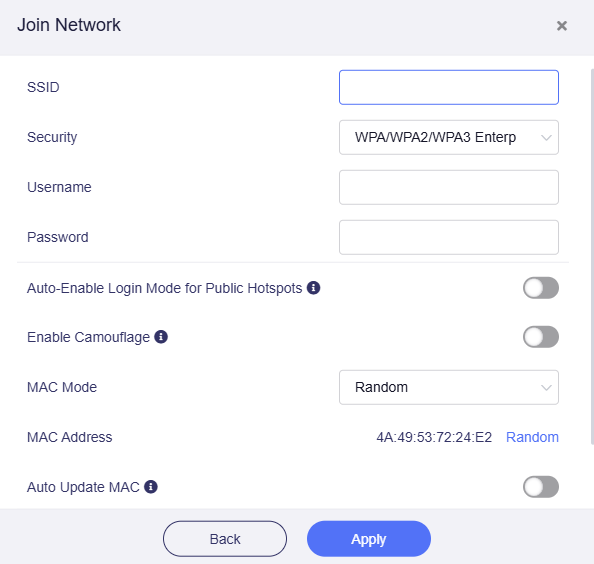
For detailed guidance on repeating EAP networks, please click here.
Reconnection
In the following cases, the router will automatically attempts to reconnect to Wi-Fi every once in a while. You can manually disable this if needed. For SSID/password errors, remove the network from Known Networks to resolve.
-
Incorrect SSID/password entered during Repeater setup.
-
Moved out of range of the upstream router after initial connection.
-
Upstream router changes SSID/password or restricts access post-connection.
The reconnection process has three distinct phases: waiting phase, scanning phase and connecting phase.
-
Waiting Phase: No issues - router waits for reconnection conditions.
-
Scanning Phase: Packet loss may occur on the scanned frequency band. New devices might face connection problems. For models GL-AXT1800/GL-AX1800, Guest Wi-Fi will be temporarily disabled.
-
Connecting Phase: Main Wi-Fi on the target band may drop for a few seconds during re-establishment.
Note: Problems typically arise in the Scanning and Connecting Phases.
Troubleshooting
When the router is connected to a Wi-Fi network as a repeater, if the Internet is unavailable, a yellow message will be displayed as shown below.
"The interface is connected, but the Internet can't be accessed."
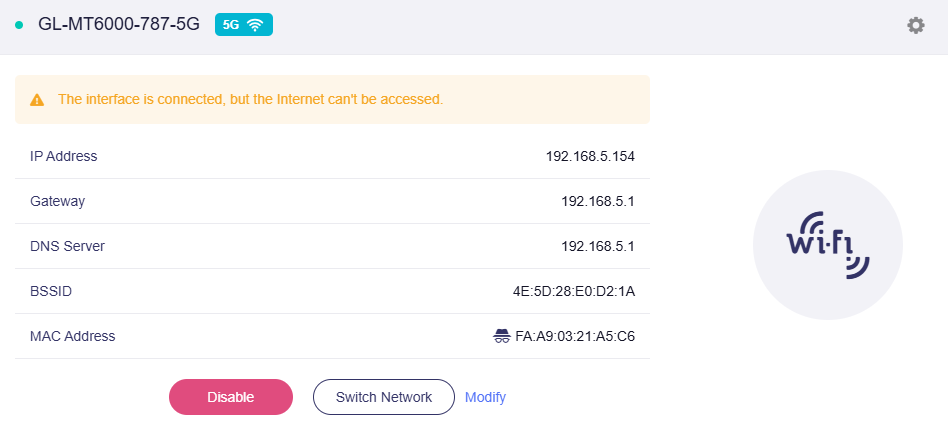
To fix this issue:
-
Check if the upstream device (i.e., the Wi-Fi network your router is connected to) has internet access.
-
Go to Multi-WAN page to check the repeater interface status.
DFS
When connecting to an upstream 5G Wi-Fi, the router's Wi-Fi will follow the upstream Wi-Fi to use or not use the DFS channel.
-
If the upstream Wi-Fi uses a DFS channel and is scannable, the router's 5G Wi-Fi will use the same channel.
-
The router's 5G Wi-Fi will switch to the non-DFS channel if the upstream Wi-Fi is not scannable or if the connection fails.
Supported Models
- GL-E5800 (Mudi 7)
- GL-MT3600BE (Beryl 7)
- GL-BE6500 (Flint 3e)
- GL-BE9300 (Flint 3)
- GL-BE3600 (Slate 7)
- GL-B3000 (Marble)
- GL-MT6000 (Flint 2)
- GL-X3000 (Spitz AX)
- GL-XE3000 (Puli AX)
- GL-MT3000 (Beryl AX)
- GL-AXT1800 (Slate AX)
Unsupported Models
- GL-MT5000 (Brume 3)
- GL-MT2500/GL-MT2500A (Brume 2)
- GL-AX1800 (Flint)
- GL-A1300 (Slate Plus)
- GL-SFT1200 (Opal)
- GL-MT1300 (Beryl)
- GL-E750/E750V2 (Mudi)
- GL-AR750S (Slate)
- GL-AR750 (Creta)
- GL-AR300M Series (Shadow)
- GL-MT300N-V2 (Mango)
- GL-XE300 (Puli)
- GL-X750 (Spitz)
- GL-X300B (Collie)
- GL-S1300 (Convexa-S)
- GL-B1300 (Convexa-B)
- GL-AP1300 (Cirrus)
- GL-MV1000/GL-MV1000W (Brume)
Related Articles
- Internet page
- How to set the priority of each Internet access method?
- How to set the load balance when multiple Internet access methods are used at the same time?
- How can I know the LAN and Wi-Fi Mac Addresses
Still have questions? Visit our Community Forum or Contact us.