How to Set Up OpenVPN Client on GL.iNet Router
OpenVPN is an open-source VPN protocol that makes use of virtual private network (VPN) techniques to establish safe site-to-site or point-to-point connections.
We recommend WireGuard over OpenVPN because it is much faster. For setting up a WireGuard Client, please check here.
Before you start, ensure you have an active subscription with a VPN service provider that supports OpenVPN manual configuration. Click here to check the OpenVPN providers compatible with GL.iNet.
Generally, you need to visit the official website of the VPN service provider you subscribed first, obtain the configuration file, and upload it to the router to set it as OpenVPN Client. If you don't know how to get the configuration file, refer to this link or ask their support.
You can set up your GL.iNet router as OpenVPN client through the web admin panel or mobile app. This article focuses on setting up OpenVPN client through the web admin panel.
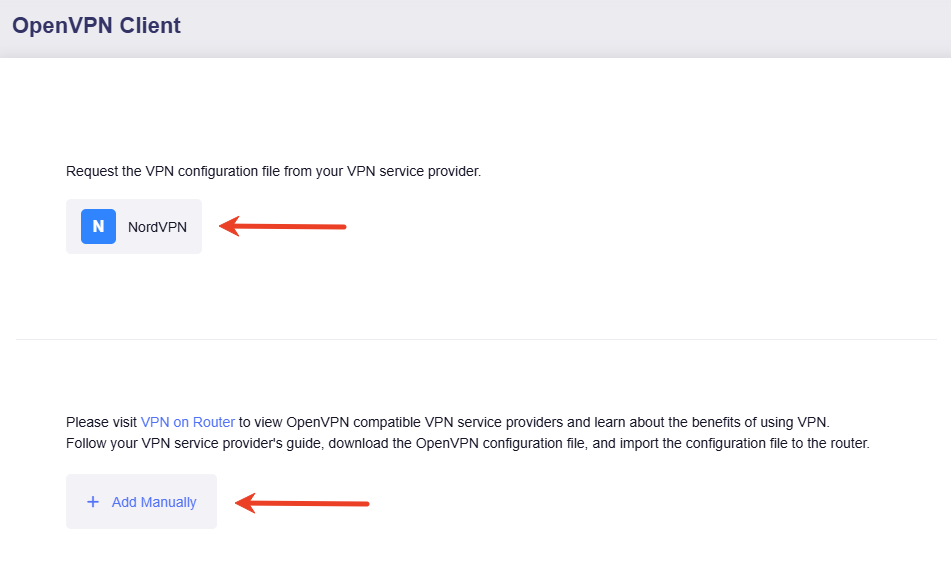
In the web Admin Panel, navigate to VPN -> OpenVPN Client.
Click the NordVPN button to log in if you have a NordVPN subscription, or click Add Manually to upload the OpenVPN configuration files.
Set Up NordVPN
NordVPN is a popular online VPN service for speed and security.
NordVPN quick setup is integrated into the admin panel of GL.iNet routers. You can acquire configuration files for all NordVPN servers online by entering your account credentials (obtained from the NordVPN Dashboard) in the router's web admin panel or mobile app, eliminating the need for manual file uploads.
-
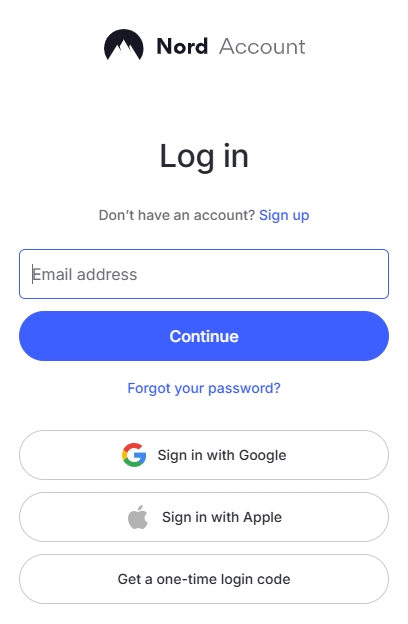
Log in to your NordVPN web account here.
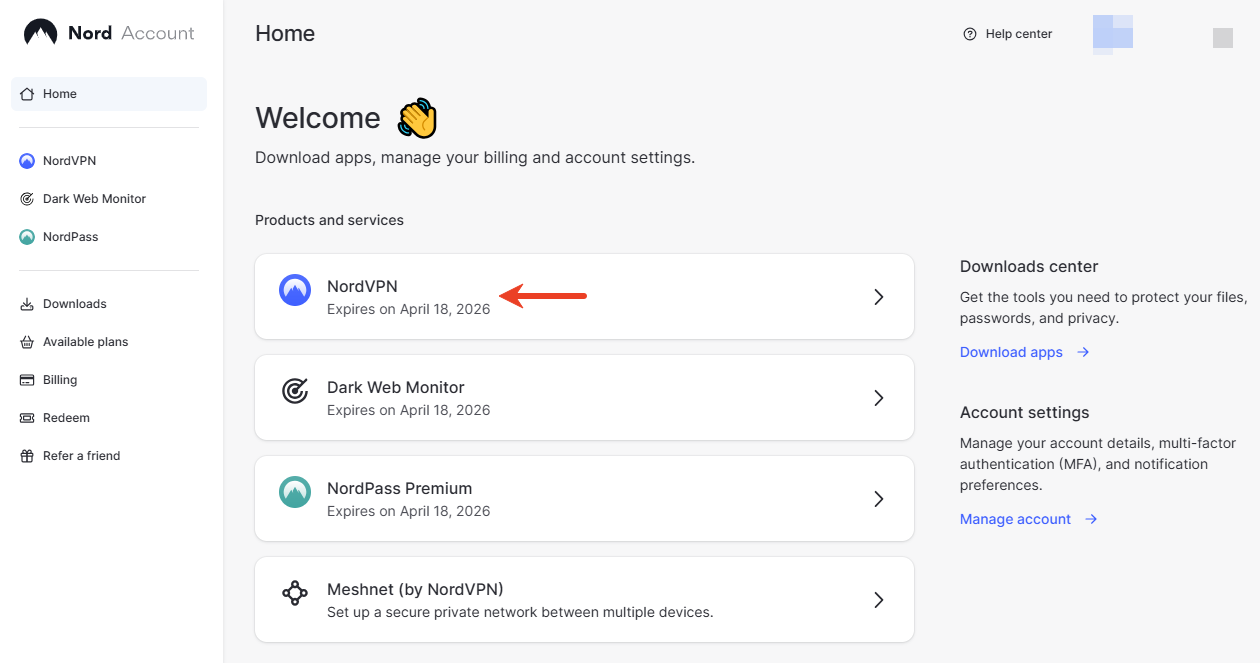
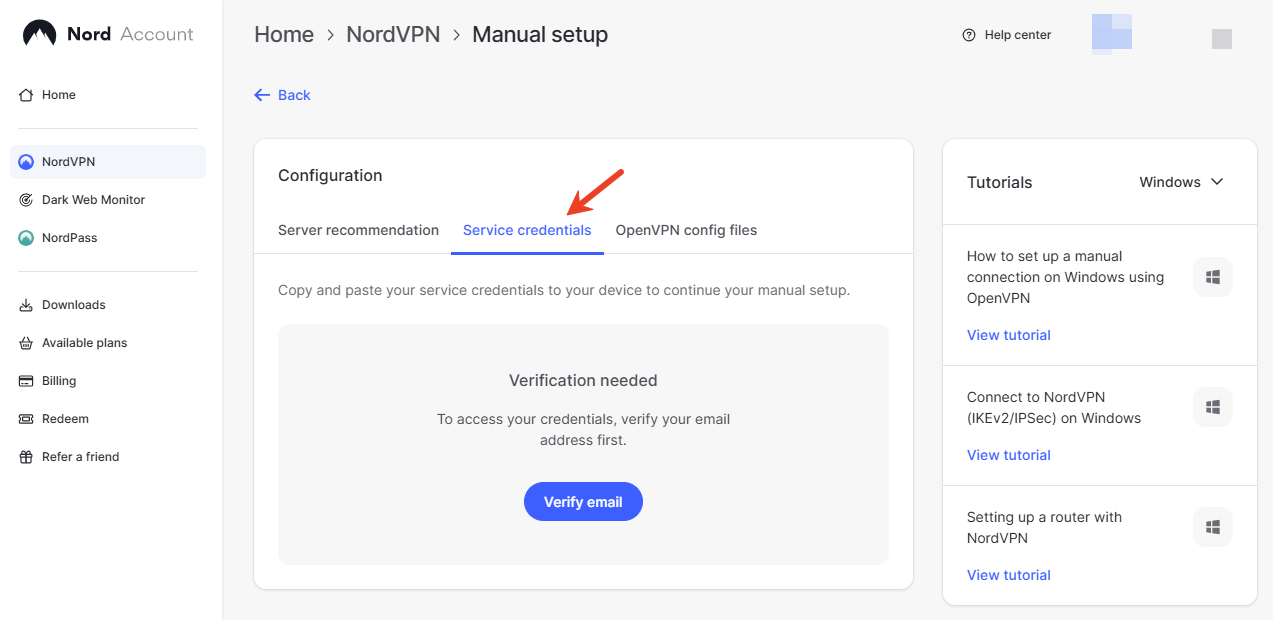
After login, on the Nord Dashboard, click NordVPN, then click Set up NordVPN manually.
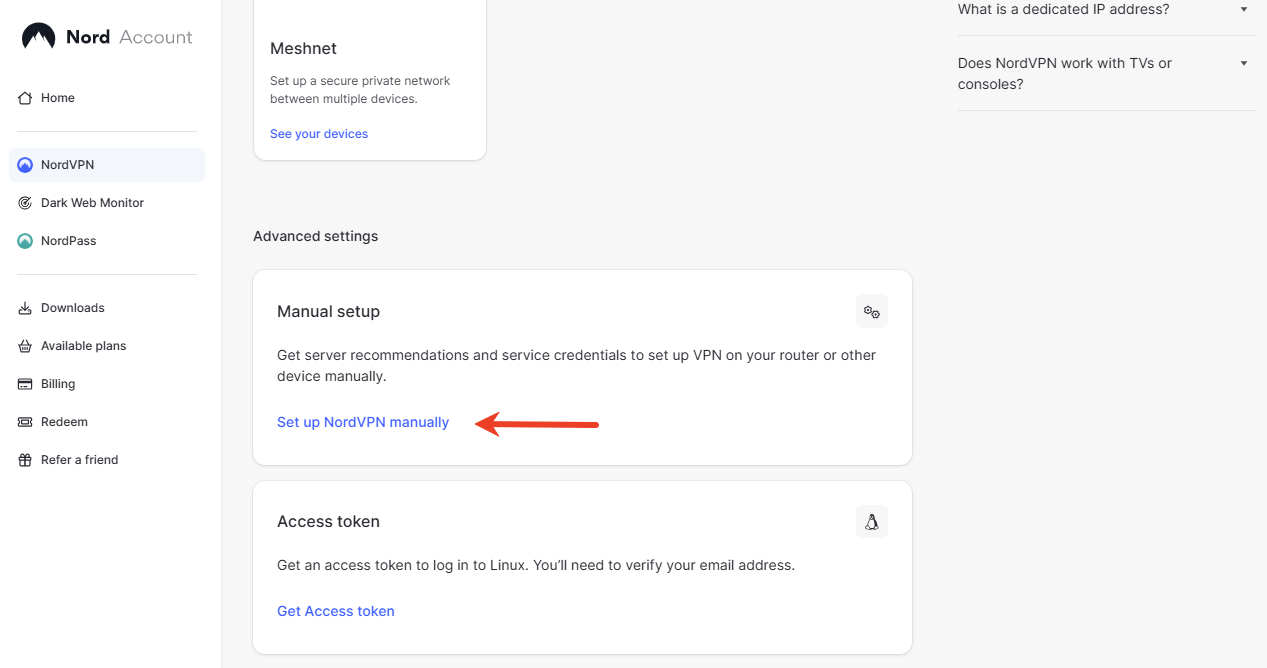
You will find the service credentials. Copy them for later use.
-
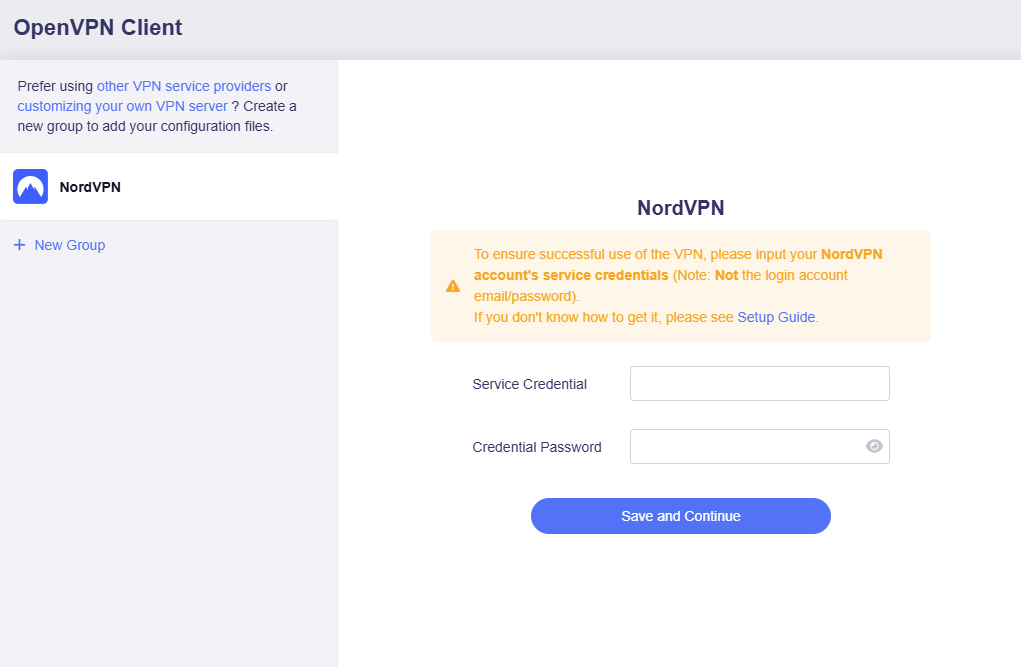
Log in to your router's web admin panel, navigate to VPN -> OpenVPN Client -> NordVPN. Input the service credentials obtained in step 1 (Note: It is NOT the login account email/password), then click Save and Continue.
-
Select protocol, max server count of each location and locations, then click Apply.
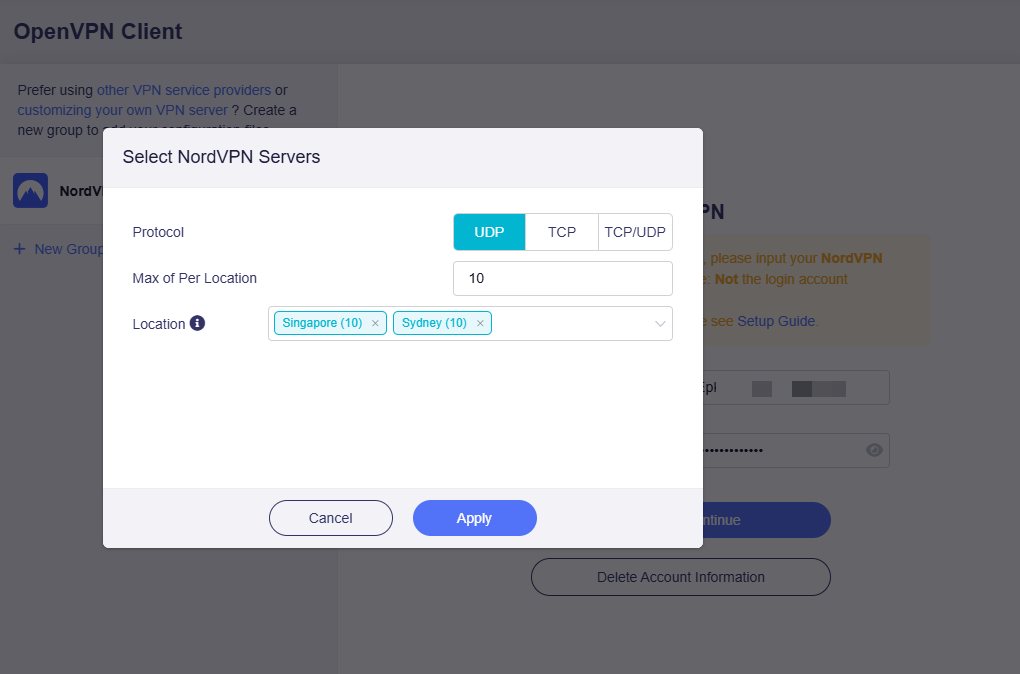
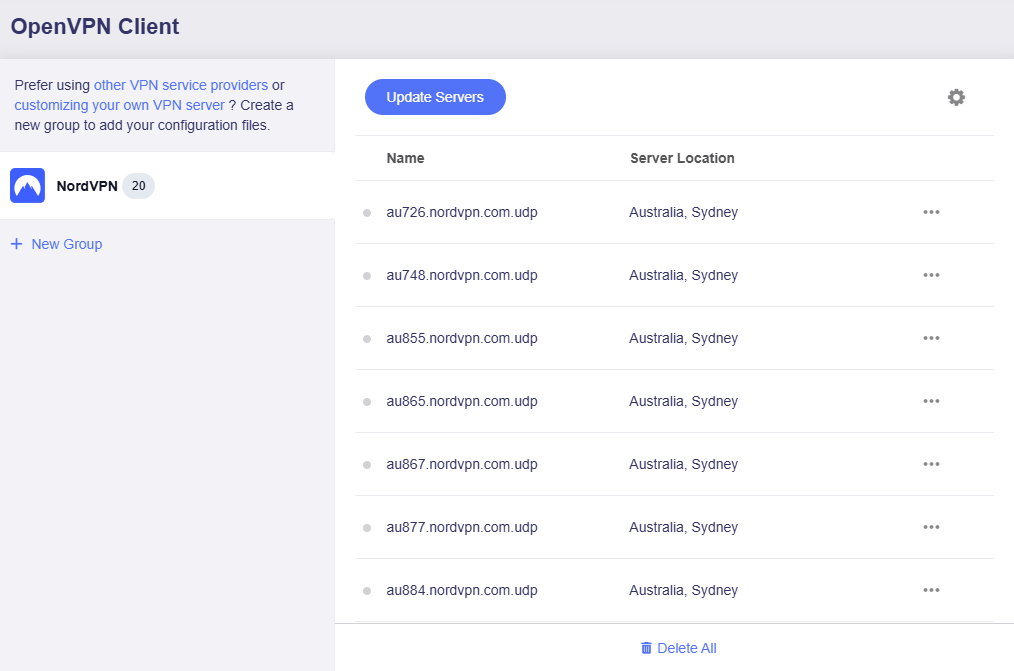
It will download configuration files.
-
Start a connection.
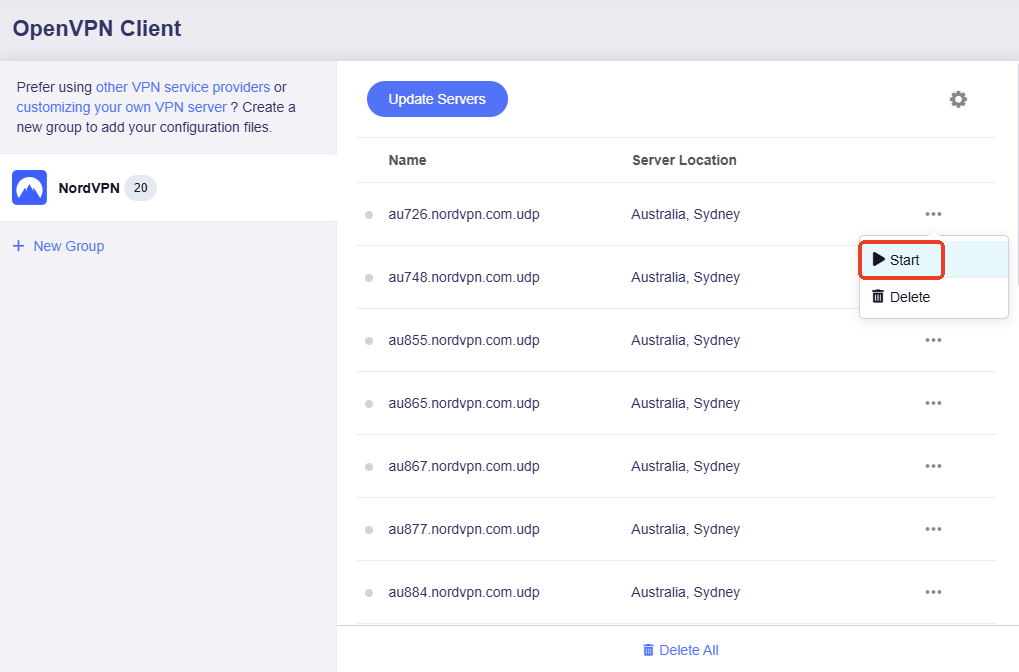
Select a preferred server, and click the three-dot icon on the right to start a connection.
-
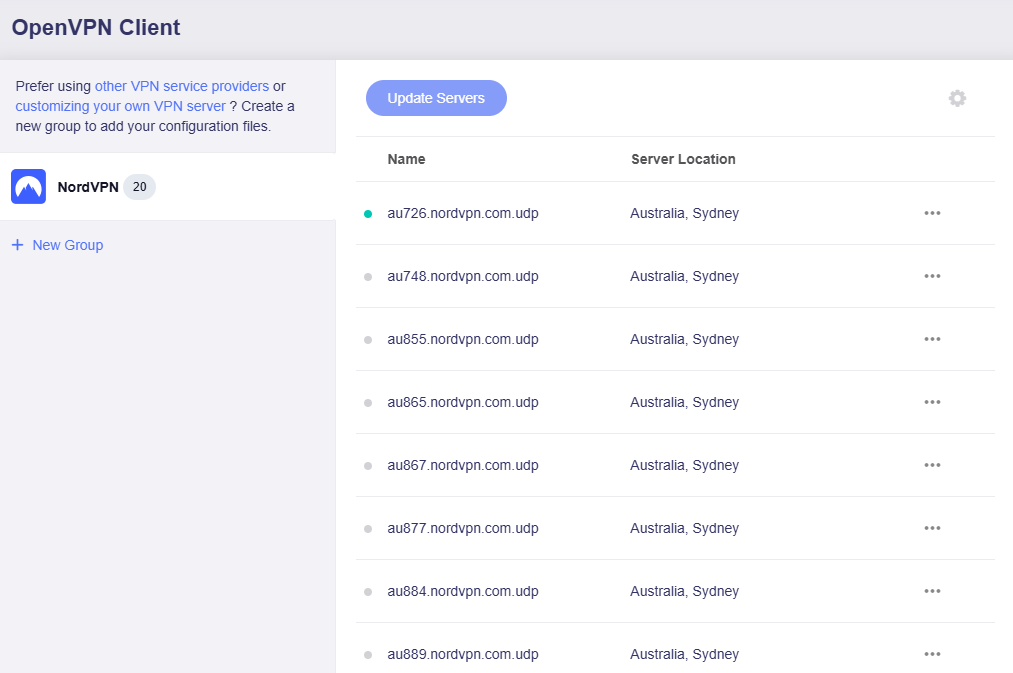
Once connected, a green dot will appear next to the configuration file.
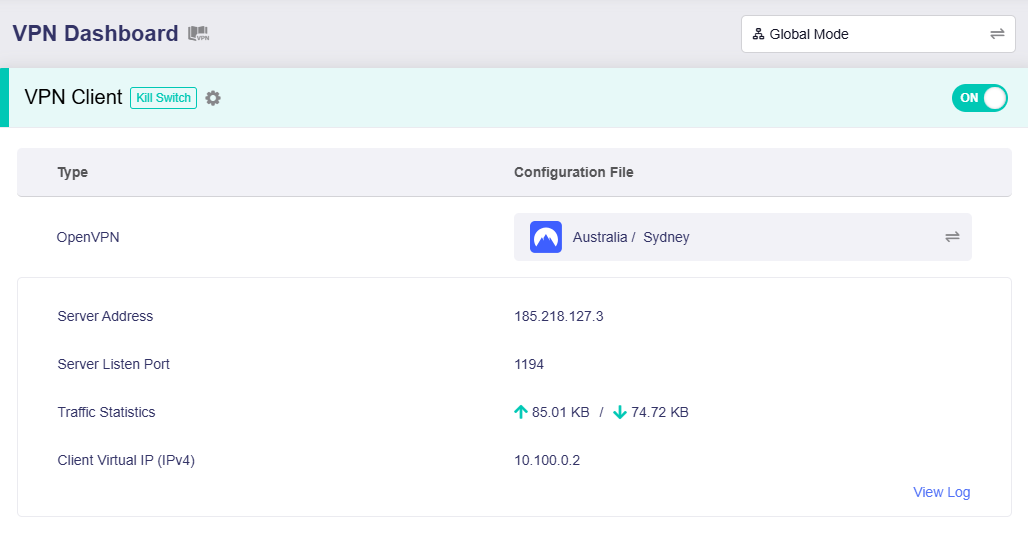
And the VPN connection details will be displayed on the VPN Dashboard.
-
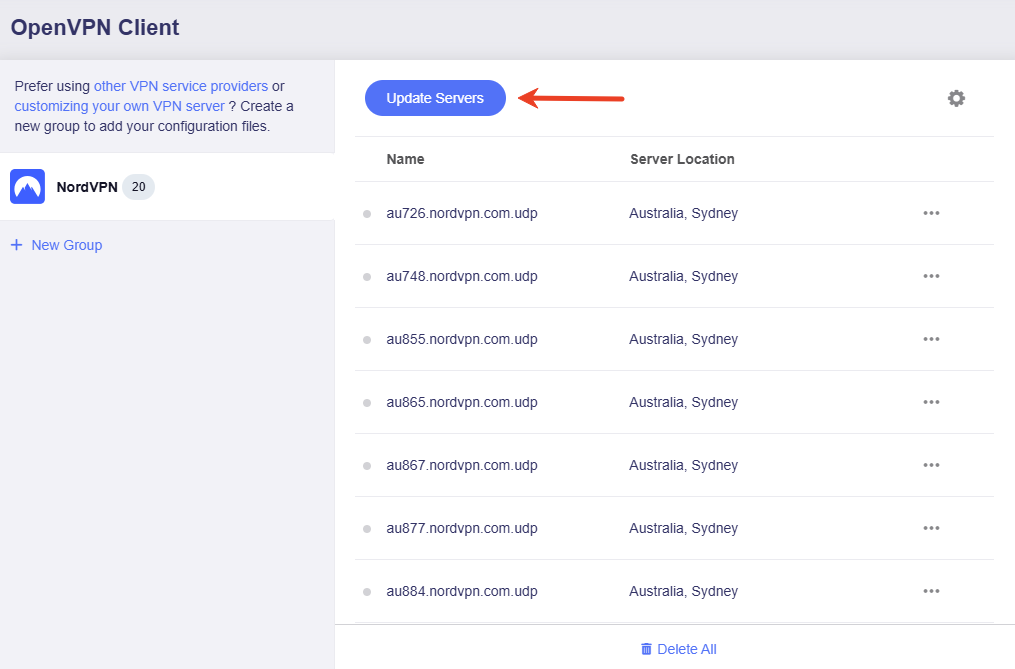
Update servers.
You can click Update Servers to obtain the latest available server list, avoiding connection failures caused by server maintenance or shutdown.
-
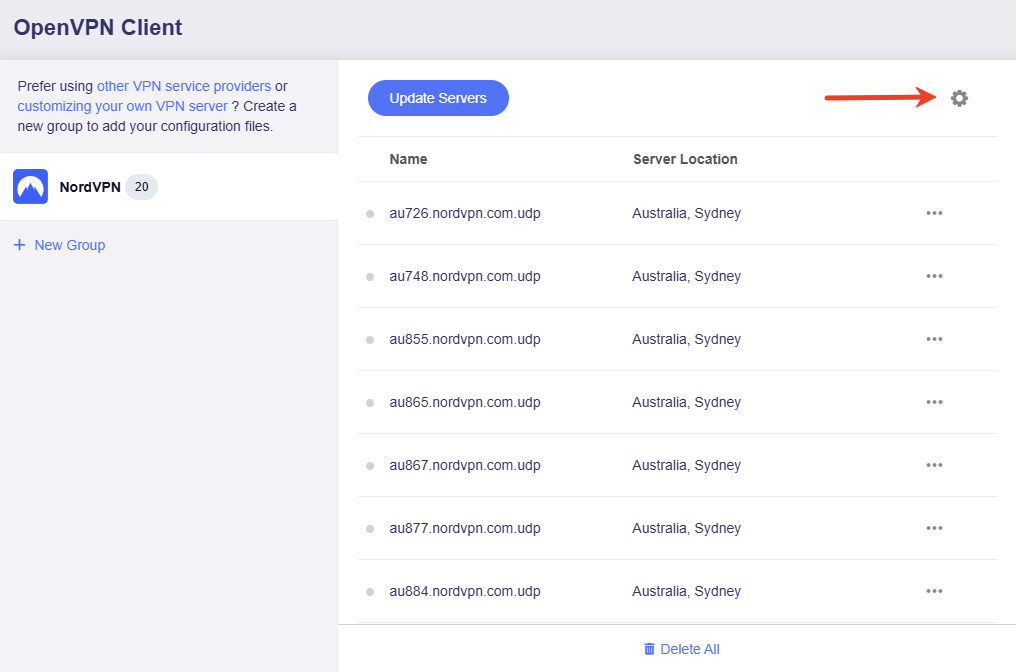
Edit credentials.
Click the gear icon to edit your login credentials.
-
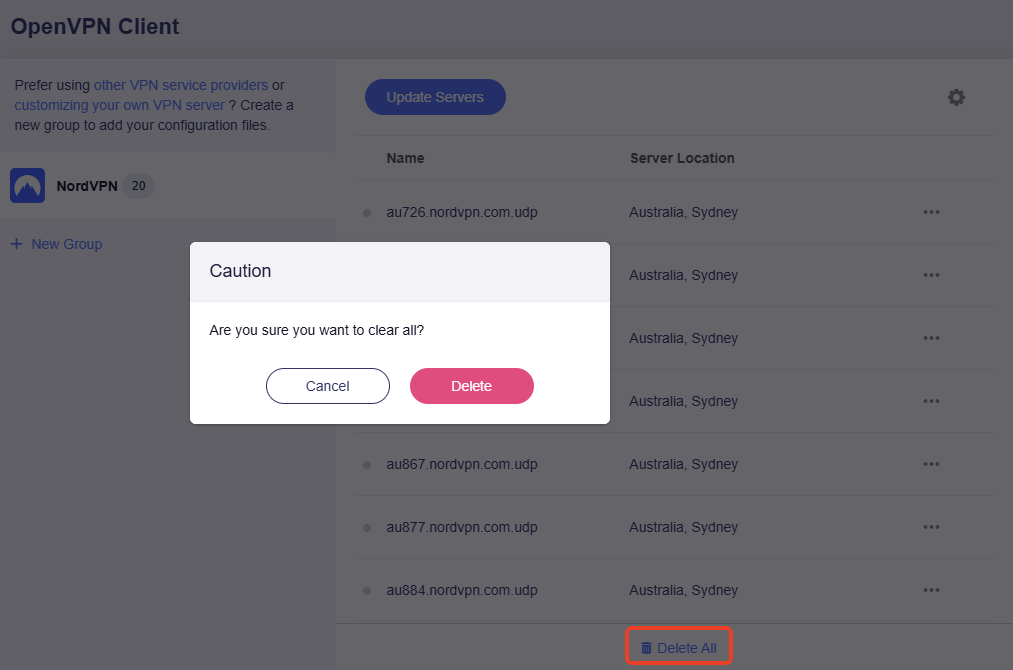
Delete all files.
You can click Delete All to delete all configuration files with one click.
Set Up OpenVPN Client Manually (for other providers)
If your OpenVPN service provider is not integrated into our admin panel, please first visit the official website of your subscribed service provider to obtain the configuration file. Next, upload it to the router to set up an OpenVPN client.
In the following steps, we will use PIA (Private Internet Access) as an example.
-
Download a configuration file from Private Internet Access official website.
-
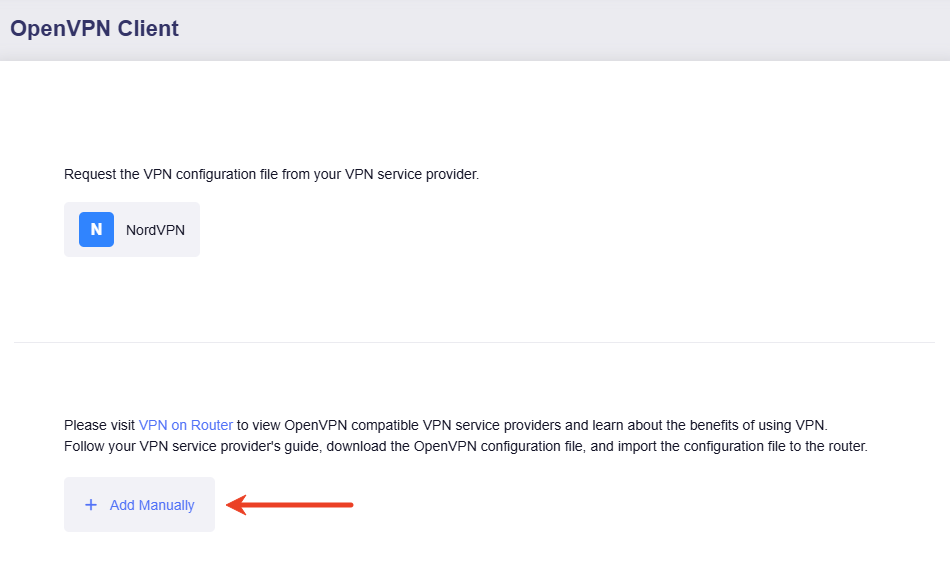
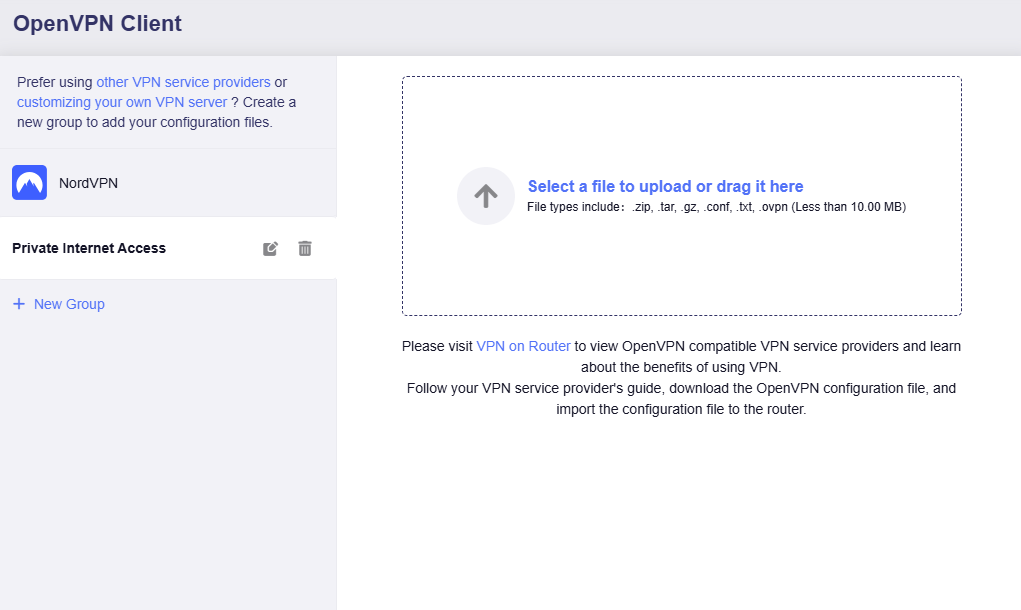
Log in to your router's web admin panel, navigate to VPN -> OpenVPN Client, and click Add Manually.
-
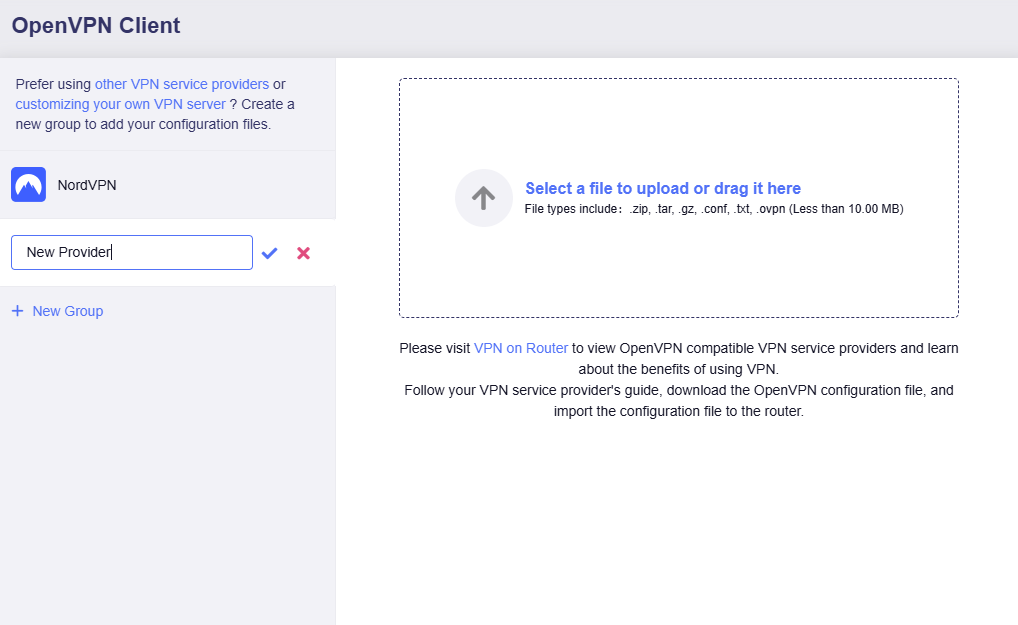
It will create a group on the left sidebar.
-
Set a descriptive name for the group (e.g., private internet access).
-
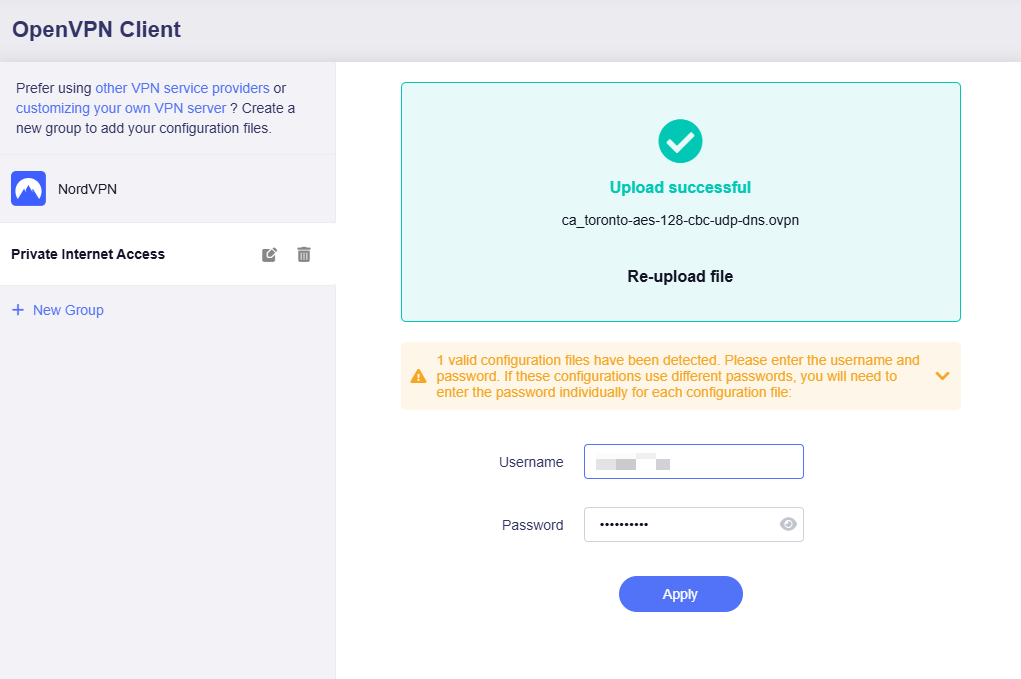
Upload your OpenVPN configuration file. Input the credentials if required, then click Apply.
-
There are 4 types of credentials for authentication:
-
No authentication.
-
Username and Password only.
-
Passphrase only.
-
Username, Password, and Passphrase.
-
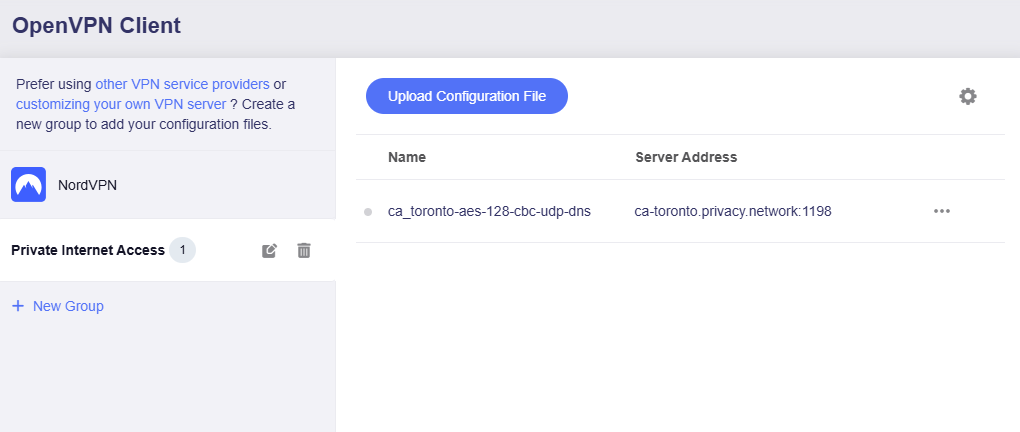
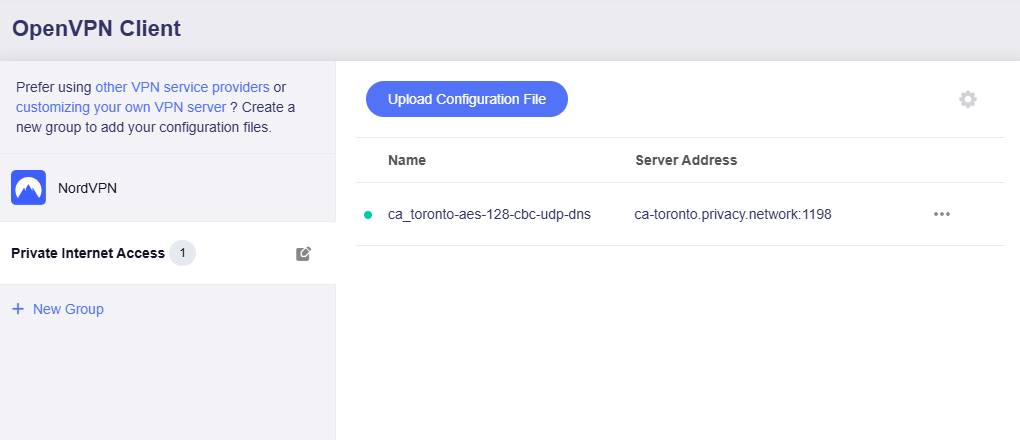
Then you will see the configuration file uploaded.
-
-
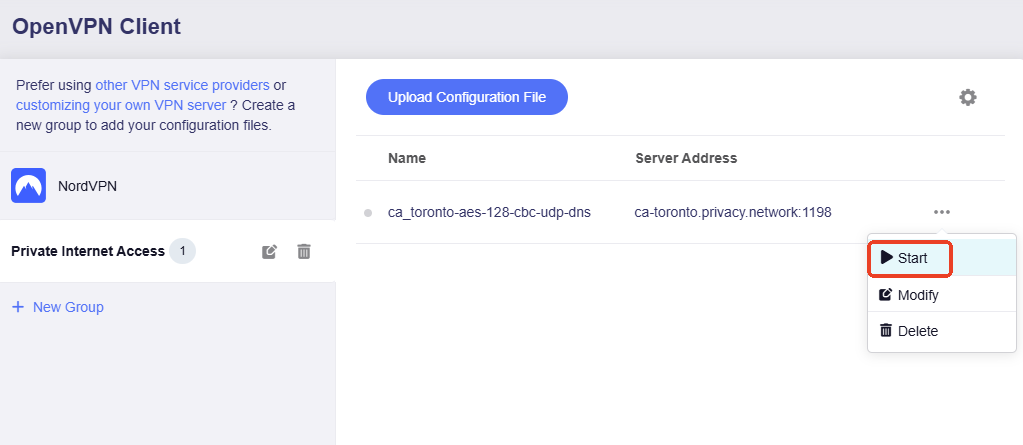
Click the three-dot icon on the right to start a connection.
-
Once connected, a green dot will appear next to the configuration file.
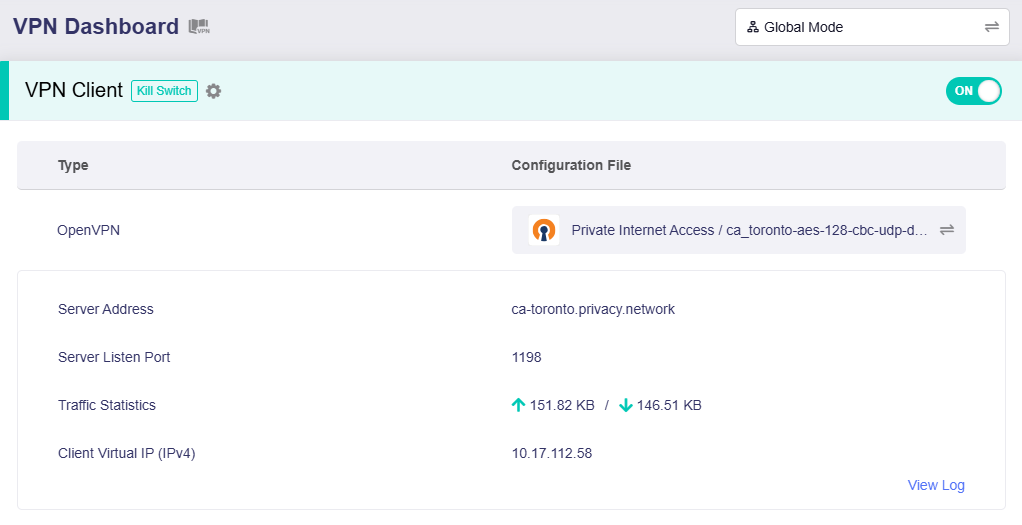
And the VPN connection details will be displayed on the VPN Dashboard.
Set Up OpenVPN Server on GL.iNet Router
If you have two GL.iNet routers, you may consider setting one as an OpenVPN server (a public IP is required), and the other as an OpenVPN client. In this way, you can establish your own VPN connection without subscribing to third-party VPN services.
For setting up OpenVPN server, please check here.
Get Configuration Files from OpenVPN Service Providers
We have tested 30+ OpenVPN service providers and documented the steps to obtain configuration files. If you are unsure how to get the configuration file, please refer to the steps below.
If the service provider you subscribed to is not listed below, please contact their support for further assistance.
NordVPN
NordVPN
-
Login to your NordVPN account
Log in to the Official Website, go to the Nord Account Dashboard, where you will find the service credentials.

After login to Nord dashboard, click NordVPN on the left side, then click Set up NordVPN manually.


Find the Service credentials. Copy them in case you need to use them for configuration uploads.

-
Choose a NordVPN server and download the configuration file
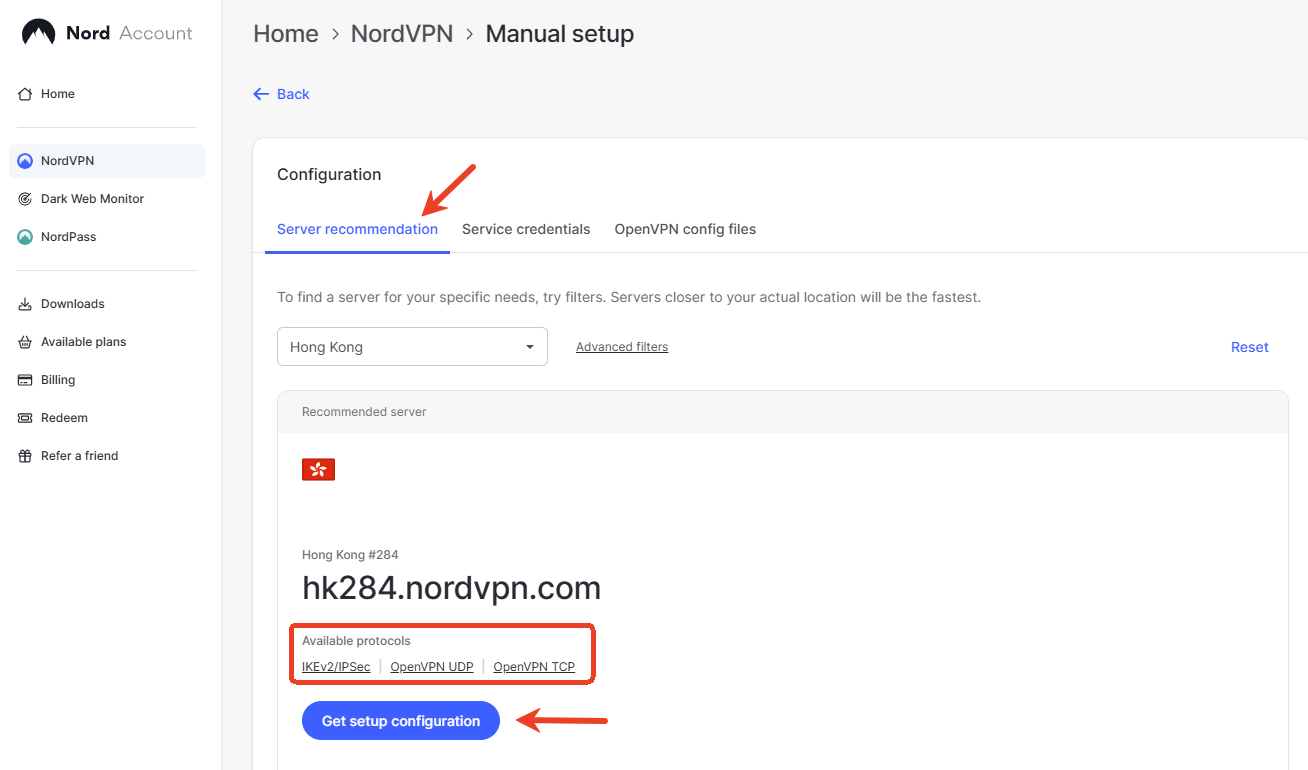
Go to Server recommendation tab. It will recommend a server base on your network and provide available protocols for you to download. Click on Get setup configuration to continue.
In the pop-up window, select OpenVPN protocol and download UDP or TCP config.
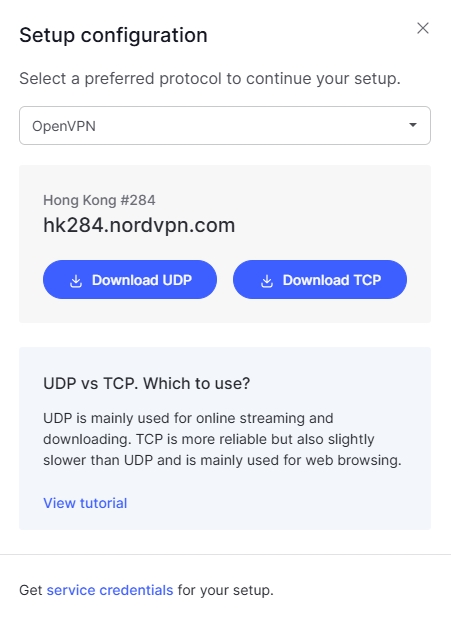
You can download all servers configs here.
Tips: if the zip file is too big to upload, you can delete some .ovpn in .zip file or upload single .ovpn file.
You can also use mobile app to setup NordVPN.
AirVPN
AirVPN
-
Login your AirVPN acoount

-
Choose Config Generator on the left and then choose Linux as your operating system. Next, choose your preferred server.

-
You will be able to see the download page of the configuration file.

Astrill
Astrill
Information quoted from Astrill official instruction
-
Generate and Download Astrill Openvpn configuration ZIP


-
Type a Description like OPENVPN_GUI.
-
Click on ADD to my certificates button.

-
Once OpenVPN certificate is added, click on Download button.

BolehVPN
BolehVPN
Login in Dashboard, download your configuration files and select the Linux_iOS inline format. Extract the zip files after completing the download.
Tips: if the zip file is too big to upload, you can delete some .ovpn in .zip file or upload single .ovpn file.
CyberGhost
CyberGhost
Information quoted from CyberGhost official instruction
-
Login your CyberGhost VPN online account.

-
Select "VPN" from the left-side menu, then click "Configure Device" and create your server configuration, as described below:


-
Now create your server configuration, as described below:
- Protocol : OpenVPN
- Country : Since native protocol connections may only be used with exactly one server you now have to choose the country you want to surf from; the server to be used in this country will be chosen by CyberGhost automatically.
- Server group : Choose the server group and the OpenVPN protocol (UDP or TCP) you want to use
OpenVPN UDP allows higher speed than the TCP version but can result in broken downloads in some cases. This is the default setting.
OpenVPN TCP allows more stable connections than the UDP version but is a bit slower. Choose this version, if you have recurrent connection issues such as sudden disconnections.
Once the desired parameters are chosen, save them with Save Configuration
-
To view the OpenVPN credentials that are generated for you on the configuration dashboard, press View Configuration.

-
After setting up your connection preferences, please take note of the following:
- Server Group : This is the address of the country (server) you want to be connected with, e.g. '12345-1-ca.cg-dialup.net'. This address changes with every country you have chosen in the step before. The actual single server to be used will be chosen automatically by CyberGhost.
- Username : A solely for this protocol generated user name. This is NOT your regular CyberGhost account user name, it's used only to authenticate with CyberGhost servers via Manual Configurations. You will need this when set up OpenVPN on GL.iNet routers.
- Password : A solely for protocol usage generated password. This is NOT your regular CyberGhost account password, it's used only to authenticate with CyberGhost servers via Manual Configurations. You will need this when set up OpenVPN on GL.iNet routers.
Once done, please download the configuration file. For that click on Download Configuration and download the config file to your computer

ExpressVPN
ExpressVPN
Information quoted from Expressvpn official instruction
-
Go to ExpressVPN website, and log in with your ExpressVPN credentials.

Enter the verification code that is sent to your email.
-
In the "Set up your devices" section, click on More.

-
Click on Manual Configuration.

-
You will see your username, password, and a list of OpenVPN configuration files.

Click the location(s) you want in order to download the .ovpn file(s).
Keep this browser window open. You will need this information for the setup later.
FastestVPN
FastestVPN
Download FastestVPN config files zip folder for OpenVPN TCP and UDP from here
Tips: If the zip file is too large to upload, delete some .ovpn files in the .zip folder, or upload a single .ovpn file.
FinchVPN
FinchVPN
-
Login your FinchVPN account.

-
Go to the Download page and click Download under FinchVPN OpenVPN Config.

-
Choose Linux

-
Choose the protocol based on your preference. Generally, you can choose the first one Port 8484 over UDP

-
Remember to tick the box to include your username and password before download the file.

HideIPVPN
HideIPVPN
-
Login your HideIPVPN account.
-
Go to Package on the left side, click the your package, make sure it is active.

-
On the VPN tab, there is VPN Login Details of username and password, this is for login when OpenVPN connection

-
Scroll down to download OpenVPN config files.

Hide.me VPN
Hide.me VPN
-
Login your Hide.me account, find the Server Locations on the left side.
-
Download the OpenVPN Configuration for Windows.

Hotspot Shield
Hotspot Shield
Note: The Hotspot Shield Router configuration files are no longer available or supported. The following steps are here for legacy purposes for those that may still have the files installed.
-
Go to https://www.hotspotshield.com/ and click on Account. Sign in if you're asked.

-
Go to https://app.hotspotshield.com/app/hotspotshield/router
Go to the Select location dropdown and pick the virtual location that the router will use. Now click on "Download file". The configuration file (config.ovpn) will be downloaded to your computer. The username and password will need to be entered when you set up the OpenVPN client on the router.

IPVANISH
IPVANISH
-
You can download all of the config files for all of the servers from here, it contain all the server config file(.ovpn) and a certificate file(.crt). The .zip file maybe a little big for some models, please delete the configuration(.ovpn) of the server that you will not use.

-
You can also download individual server configuration files here, but you will need to download ca.ipvanish.com.crt as well. Before uploading to the router, you need to compress the ca.ipvanish.com.crt and .ovpn configuration files into a .zip archive.

IVACY
IVACY
To set up an OpenVPN client using Ivacy, you will need the following:
- Your username for the OpenVPN manual configuration, shown in the "Download Configuration" prompt

- Your password (same as the one you used to sign in to your Ivacy account)
- An OpenVPN configuration file
IVPN
IVPN
-
Download the OpenVPN config files.
-
Find the Account ID on IVPN Client Area.
-
When drag the config file to Add a New OpenVPN Configuration, you will be asked to enter User Name and Password. The User Name is your Account ID that begins with letters ivpn. The password can be anything, like ivpn

Mullvad
Mullvad
-
Go to Mullvad website, and log in with your Mullvad credentials.
-
Choose OpenVPN Configuration

- Choose Linux and select your server location

OVPN
OVPN
Just login, then you can easily get the OpenVPN configurations file by click the menu below.

Choose the server and download.

The username and password are the same you login OVPN.
OysterVPN
OysterVPN
-
Access the OysterVPN server list page, click Download .ovpn file to download the configuration file.

-
The username and password for OpenVPN connection are the same as the one you use to login OysterVPN.
Tips: if the zip file is too big to upload, you can delete some .ovpn in .zip file or upload single .ovpn file.
PIA (Private Internet Access)
PIA
Download directly.
Tips: if the zip file is too big to upload, you can delete some .ovpn in .zip file or upload single .ovpn file.
PrivadoVPN
PrivadoVPN
Just login, then you can easily find the Download VPN Configuration.

Tips: if the zip file is too big to upload, you can delete some .ovpn in .zip file or upload single .ovpn file.
PrivateVPN
PrivateVPN
Download directly.
Here is the official download link. Due to a bug encountered while importing the router, the file name inside contains special characters 'Bogotá'. We have renamed it and provided the download link above. We will fix this bug in future versions.
Tips: if the zip file is too big to upload, you can delete some .ovpn in .zip file or upload single .ovpn file.
Proton VPN
Proton VPN
Proton VPN has WireGuard service, we recommend to use WireGuard, checkout here.
-
Login your Proton VPN account.
-
Click Download in the left-hand side.
-
Choose Router platform, protocol etc, find your target country to download configuration file.

-
The credential for connect OpenVPN is not the one that login Proton website's dashboard. You can find the crdential at Account -> OpenVPN/IKEv2 username

PureVPN
PureVPN
To set up an OpenVPN client using PureVPN, you will need your OpenVPN username and password and a configuration file, which you can find in your PureVPN account.
- Sign in to your PureVPN account.
- From the left sidebar, click Subscriptions.
- Scroll down to find your OpenVPN username and password.

- From the left sidebar, click Manual Configuration.
- Select a VPN location and click Download to download the configuration file.
GL.iNet routers don't support the dedicated IP feature of PureVPN, because it needs PPTP.
StarVPN
StarVPN
StarVPN has WireGuard service, we recommend to use WireGuard, checkout here.
-
Register an account with StarVPN
Head on over to their pricing plan options and choose a VPN plan that suits your needs. You can register on checkout or directly here
-
VPN Login Information
Log into the StarVPN member area dashboard. You can find your VPN username and password for each slot in the Manage Slots Section or dashboard area.

For multiple slots, the VPN configuration settings and credentials can be located in the “Manage Slots” section.

-
Download OpenVPN Configuration File
The next step, you must download the VPN server configuration files necessary so that the OpenVPN Software knows where to connect to. Download the configuration file in the members area dashboard.

Some GL.iNet routers do not support IPv6 or DNS Leak Protection, as a result you may experience an IP or connection error. Edit the ovpn configuration file and disable IPv6 by performing these simple tasks.

StreamVPN
StreamVPN
-
Login with your StreamVPN account and then you will be able to see your subscription information. Click Install & Guides.

-
Click VPN Router, it will download a .zip archive file called
StreamVPN.zip.
Note: Only the configuration file name contains "Primary" work.
StrongVPN
StrongVPN
-
Login with your StrongVPN account and then you will be able to see VPN Accounts Summary. Click Account Setup Instructions.

-
Find the Manual setup section, follow the steps to get configuration.

Surfshark
Surfshark
-
Find your login details
Surfshark service credentials are different from your Surfshark account credentials, namely your email address and your password. You'll need Surfshark service credentials to connect to the VPN using the manual OpenVPN configuration method in the router.
Login the Official Website, go to this page, where you will find all of the details required for a manual connection.

-
Choose a Surfshark server
Select the Locations tab, where you will see all of the Surfshark servers.

It will ask to choose TCP or UDP. Click here to see the difference.

You can download all configs here directly.
Tips: if the zip file is too big to upload, you can delete some .ovpn in .zip file or upload single .ovpn file.
VPNGate
VPNGate
The OpenVPN configuration files are listed on the VPN Gate website according to the server location.
-
Click OpenVPN Config file under the column OpenVPN.

-
You will see the download page.

VPN Unlimited(KeepSolid)
VPN Unlimited(KeepSolid)
Information quoted from VPN unlimited official instruction
Start out by logging in to your User Office, press Manage for the VPN Unlimited service, and follow a few simple steps:
-
Select a device
Pick a device from the list or create a new one. If you are out of free slots, delete an old device or buy extra slots.

-
Choose the desired server location
VPN Unlimited offers a large variety of servers, namely 400+ in 70+ locations. In this case, let it be Germany.
-
Select the VPN protocol
selece OpenVPN protocol.

-
Create a configuration
Press Generate and you will get all the data required to set up a VPN connection.

VyprVPN
VyprVPN
VyprVPN offers the OpenVPN files here: Where can I find the OpenVPN files? – VyprVPN Support
The provided zip file contains two folders with the .ovpn files. One called OpenVPN160 one OpenVPN256. Just delete the OpenVPN160 folder from the zip file then upload it to GL.iNet router as usual.
Windscribe
Windscribe
-
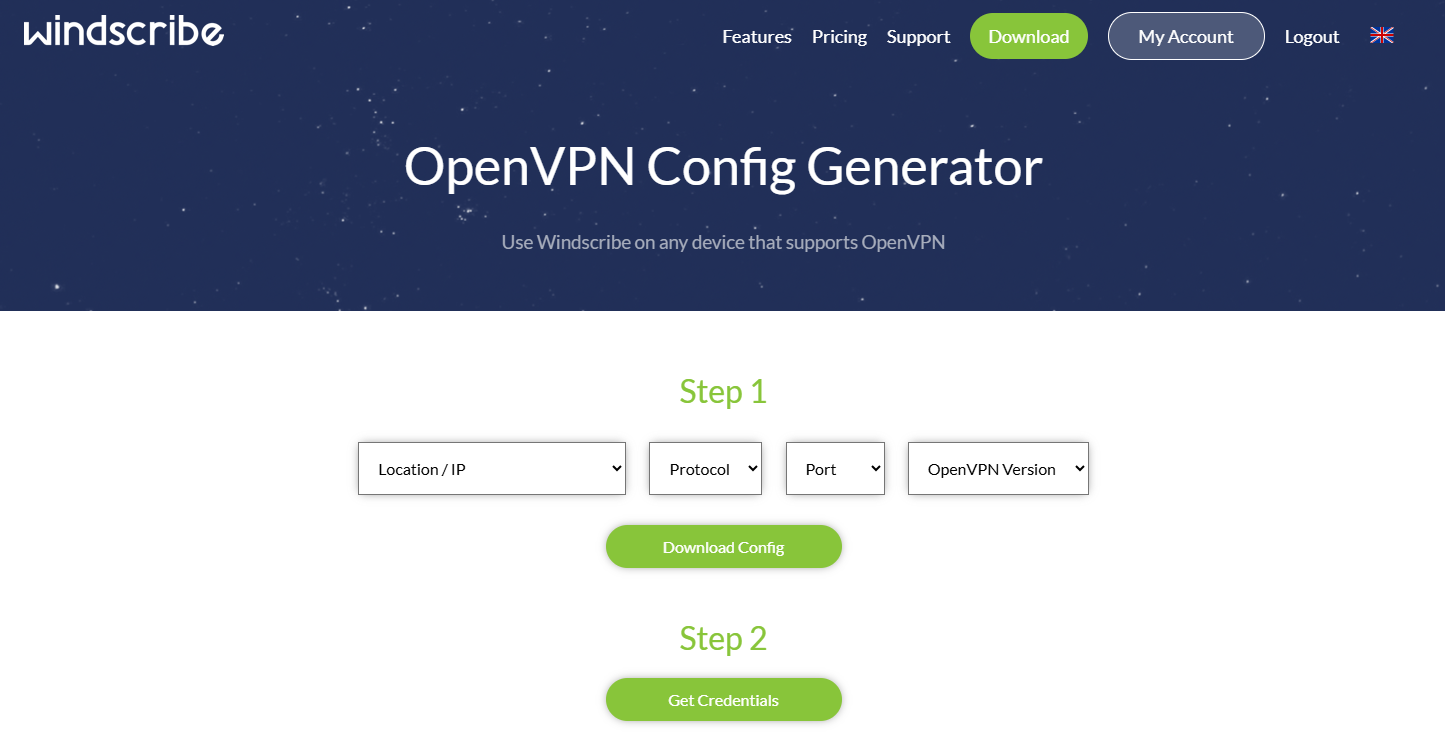
Log in to your Windscribe membership account here, then access the OpenVPN Config Generator.
-
Select the server location, protocol (UDP/TCP), port (e.g., 1194) you'd like to use, and OpenVPN version (preferably the newer one), then click Download Config. You will then get a file with the suffix ".ovpn" downloaded to your local device.
-
Click the Get Credentials button on the same page. You will then receive the corresponding credentials, which will be used later in the router's web admin panel when uploading the config file to the router for authentication. Copy the credentials or keep this webpage open.
-
Then follow this guide to continue.
ZoogVPN
ZoogVPN
Sign in its official website, then access the OpenVPN configuration files page, you will find all the servers here. Download the configuration file in the TCP column or UDP column.

Then follow the guide to setup OpenVPN Client on GL.iNet router, the username and password are the same as the ones used to log into ZoogVPN website.
Still have questions? Visit our Community Forum or Contact us.


