Set Up WireGuard Client on GL.iNet Routers
Note: This guide applies to firmware v4.7 and later. For earlier versions, please refer here.
WireGuard® is an extremely simple yet fast and modern VPN that utilizes state-of-the-art cryptography. It aims to be faster, simpler, leaner, and more useful than IPsec, while avoiding the massive headache. It intends to be considerably more performant than OpenVPN.
To set up WireGuard client on a GL.iNet router, watch this video or refer to the steps below.
GL.iNet routers offer built-in WireGuard support for the following VPN providers. If you have an active subscription, simply enter your service credentials on the WireGuard Client page to finish setup quickly.
Select the corresponding WireGuard service provider below to quickly locate the step-by-step instructions.
- Set Up AzireVPN
- Set Up Hide.me
- Set Up IPVanish
- Set Up Mullvad
- Set Up NordVPN
- Set Up PIA (Private Internet Access)
- Set up PureVPN
- Set Up Surfshark
- Set Up Windscribe
If you subscribe to other WireGuard service provider, download a configuration file from their website, then upload the file to your router for VPN connection.
Set Up AzireVPN
AzireVPN is privacy-minded VPN service providing secure, modern and robust tunnels such as WireGuard.
Watch this video to set up AzireVPN on GL.iNet routers via the web Admin Panel or mobile app.
Or follow the steps below to set up AzireVPN via web Admin Panel.
In the web Admin Panel, go to VPN -> WireGuard Client -> AzireVPN.
-
Enter your AzireVPN Username and Password (i.e., the credentials you use to sign in to AzireVPN), then click Save and Continue. It will generate configuration files for each server.

-
Start a connection.
Select your preferred server, and click the three-dot icon on the right to start a connection.

Once connected, a green dot will appear next to the configuration file.

You can also check the VPN connection details on the VPN Dashboard.
-
Update servers.
You can click Update Servers to obtain the latest available server list, avoiding connection failures caused by server maintenance or shutdown.

-
Edit credentials or logout.
Click the gear icon to edit your login credentials or log out.

-
Go renew.
If you click Go Renew, you will be redirected to the official website to renew your subscription.

-
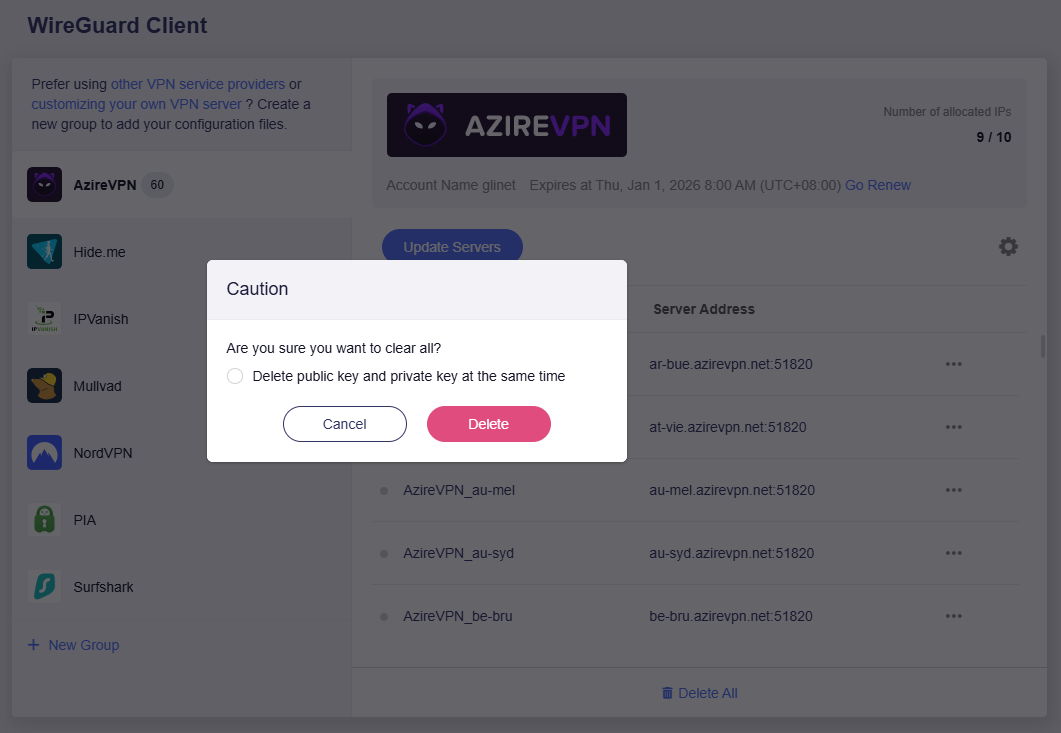
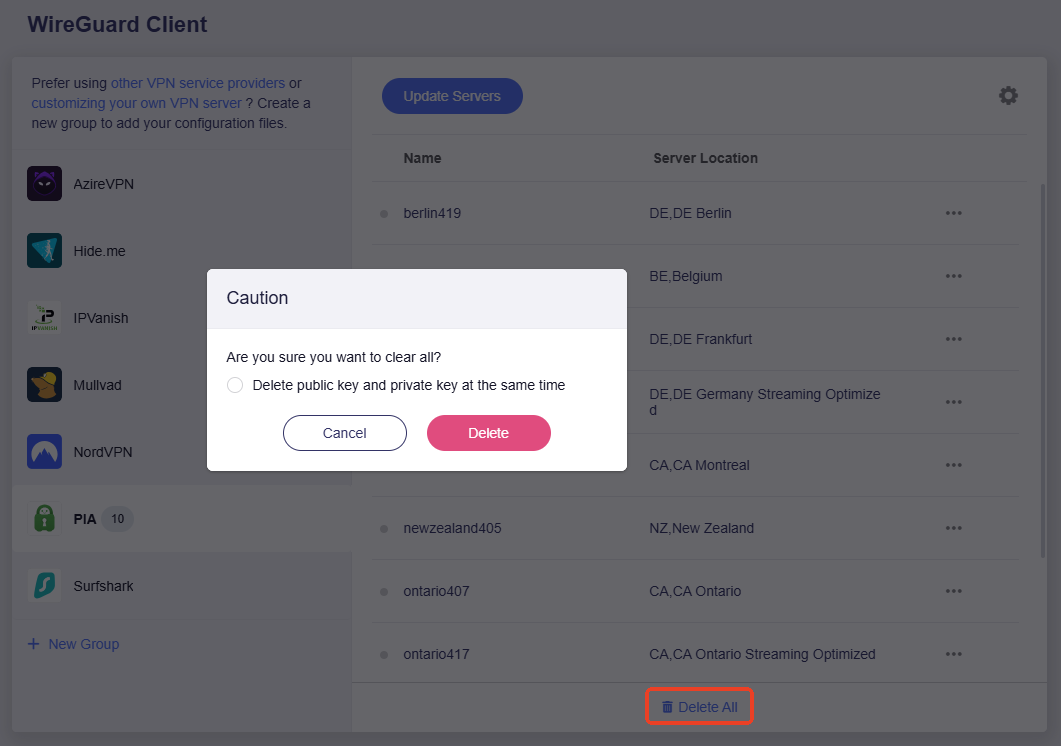
Delete All.
You can click Delete All to delete all configuration files with one click, and choose whether to delete the private and public keys simultaneously.
Set Up Hide.me
In the web Admin Panel, go to VPN -> WireGuard Client -> Hide.me.
-
Enter your Hide.me Username and Password (i.e., the credentials you use to sign in to Hide.me), then click Save and Continue. It will generate configuration files for each server.

-
Start a connection.
Select your preferred server, and click the three-dot icon on the right to start a connection.

Once connected, a green dot will appear next to the configuration file.

You can also check the VPN connection details on the VPN Dashboard.
-
Update servers.
You can click Update Servers to obtain the latest available server list, avoiding connection failures caused by server maintenance or shutdown.

-
Edit credentials or logout.
Click the gear icon to edit your login credentials or log out.

-
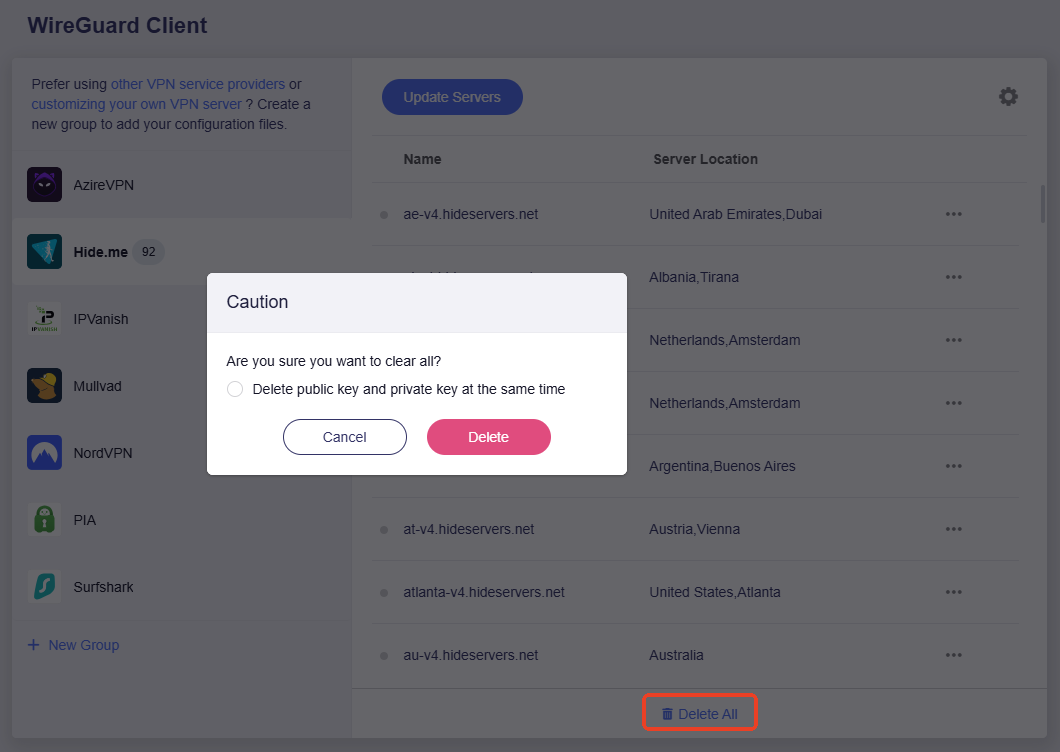
Delete All.
You can click Delete All to delete all configuration files with one click, and choose whether to delete the private and public keys simultaneously.
Set Up IPVanish
In the web Admin Panel, go to VPN -> WireGuard Client -> IPVanish.
-
Enter your IPVanish Username and Password (i.e., the credentials you use to sign in to IPVanish), then click Save and Continue. It will generate configuration files for each server.

-
Select servers.
Select the server(s) you want to connect to, and click Apply.

-
Start a connection.
Select your preferred server, and click the three-dot icon on the right to start a connection.

Once connected, a green dot will appear next to the configuration file.

You can also check the VPN connection details on the VPN Dashboard.
-
Update servers.
You can click Update Servers to obtain the latest available server list, avoiding connection failures caused by server maintenance or shutdown.

-
Edit credentials or logout.
Click the gear icon to edit your login credentials or log out.

-
Delete All.
You can click Delete All to delete all configuration files with one click, and choose whether to delete the private and public keys simultaneously.

Set Up Mullvad
Mullvad is a VPN service that helps keep your online activity, identity, and location private.
In the web Admin Panel, go to VPN -> WireGuard Client -> Mullvad.
-
Enter your Mullvad Account (16-digit number), then click Save and Continue. It will generate configuration files for each server.

-
Select servers.
Select the server(s) you want to connect to, and click Apply.

-
Start a connection.
Select your preferred server, and click the three-dot icon on the right to start a connection.

Once connected, a green dot will appear next to the configuration file.

You can also check the VPN connection details on the VPN Dashboard.
-
Update servers.
You can click Update Servers to obtain the latest available server list, avoiding connection failures caused by server maintenance or shutdown.

-
Edit credentials or logout.
Click the gear icon to edit your login credentials or log out.

-
Go renew.
If you click Go Renew, you will be redirected to the official website to renew your subscription.

-
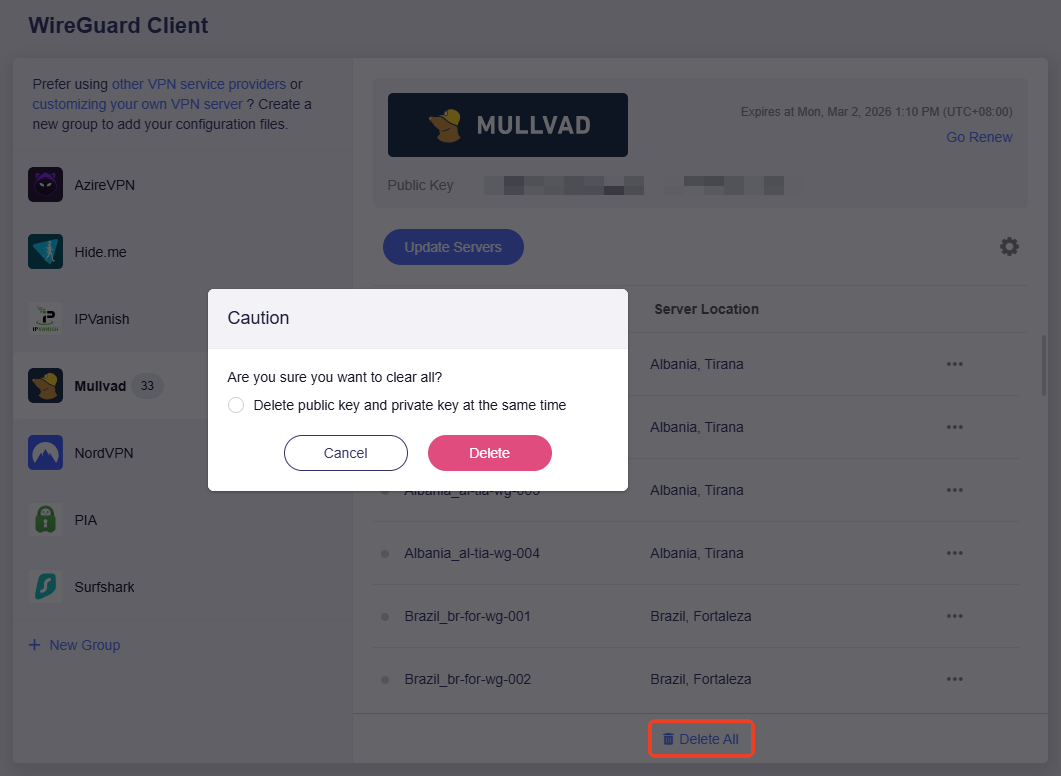
Delete All.
You can click Delete All to delete all configuration files with one click, and choose whether to delete the private and public keys simultaneously.
Set Up NordVPN
NordVPN is an online VPN service that combines speed and security.
-
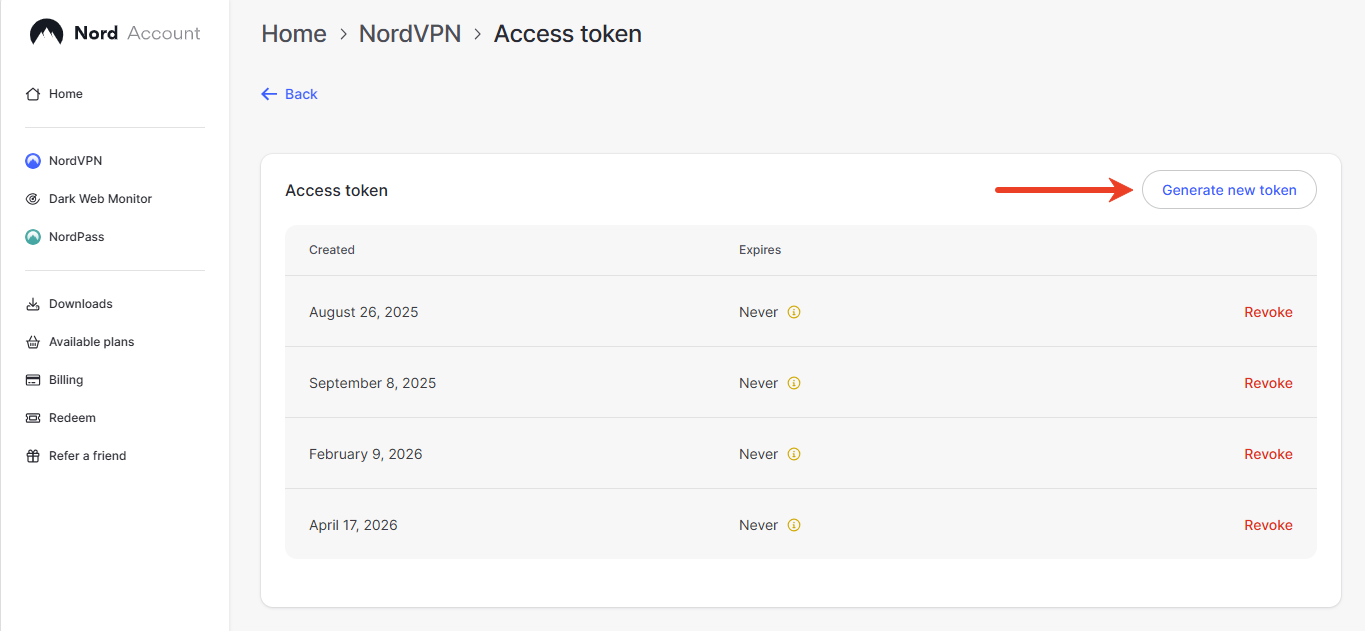
Click here to log in to your NordVPN web account.

After logging in to the Nord dashboard, click NordVPN in the left menu, find the Access Token section, then click Get Access token.
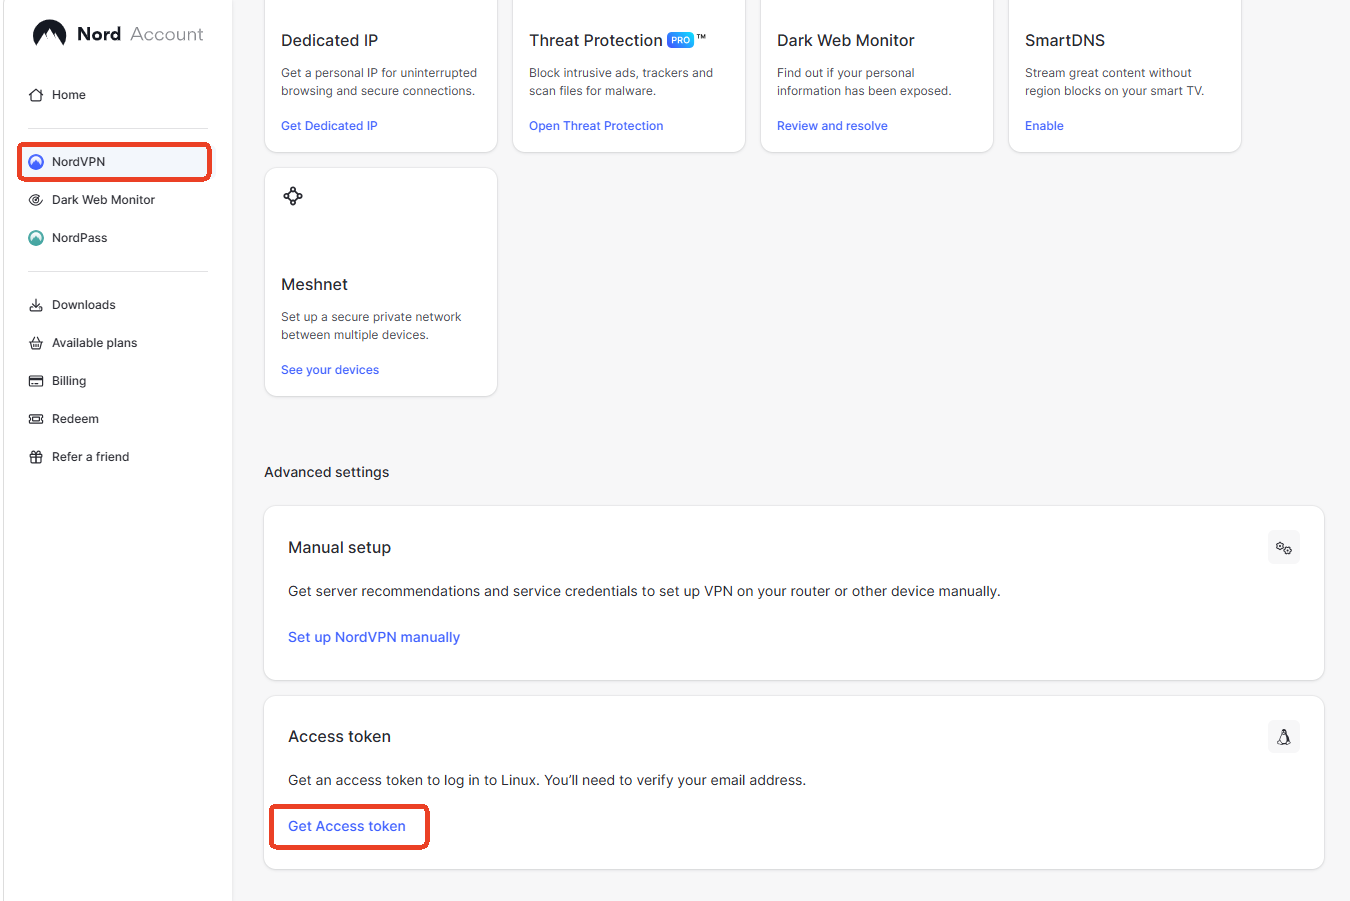
On the next page, click Generate new token.
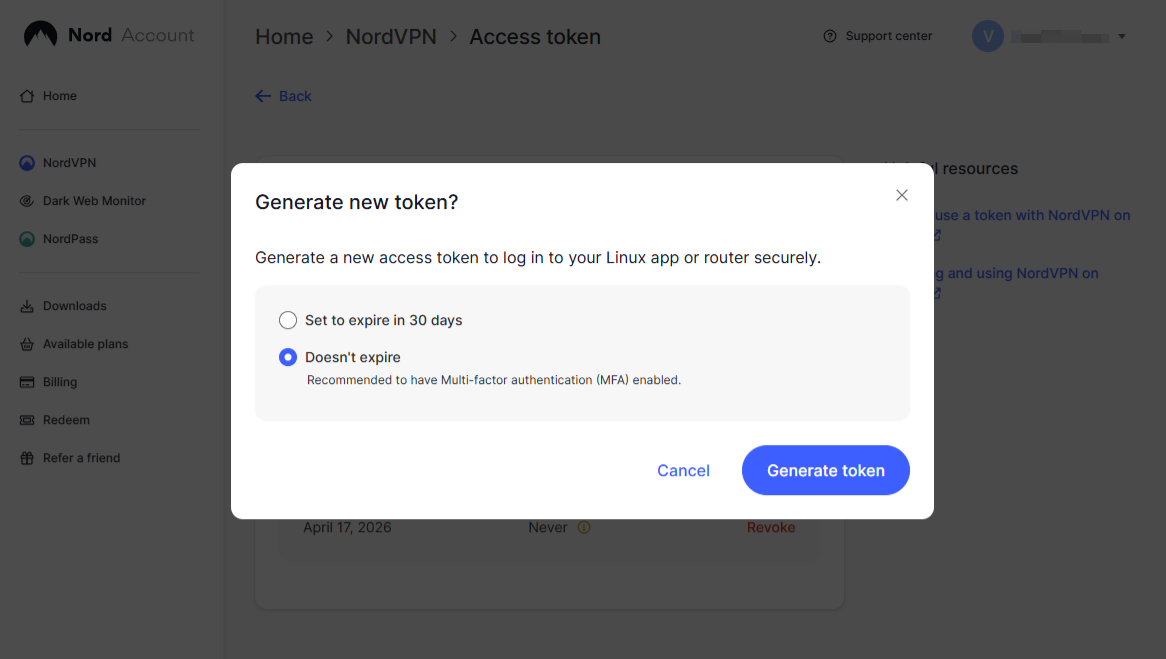
In the pop-up window, select token expiration date, then click Generate token.
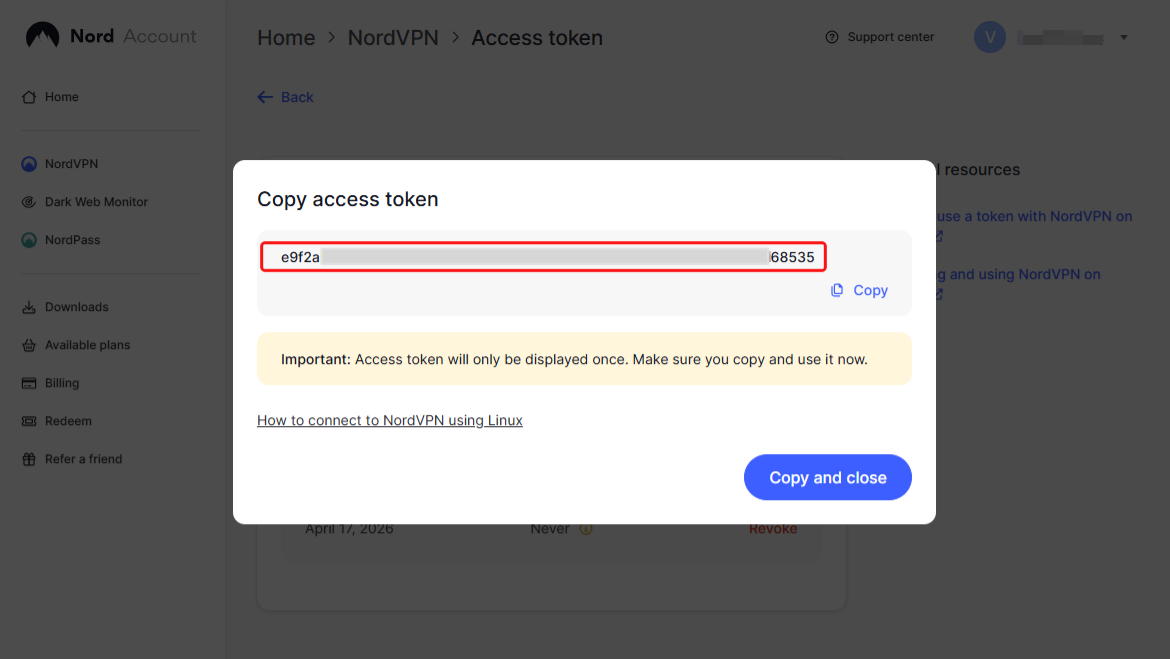
You will then get the access token, as shown below. Copy the token for later use.
Note: The access token is only displayed once. Make sure you copy and use it now. After closing this window, the token will no longer be visible. If you fail to save it, you will need to generate a new one.
-
Log in to the router's web Admin Panel, and go to VPN -> WireGuard Client -> NordVPN.
Enter Token, then click Save and Continue. It will generate configuration files for each server.

-
Select servers.
Select the server(s) you want to connect to, and click Apply.

-
Start a connection.
Select your preferred server, and click the three-dot icon on the right to start a connection.

Once connected, a green dot will appear next to the configuration file.

You can also check the VPN connection details on the VPN Dashboard.
-
Update servers.
You can click Update Servers to obtain the latest available server list, avoiding connection failures caused by server maintenance or shutdown.

-
Edit credentials or logout.
Click the gear icon to edit your login credentials or log out.

-
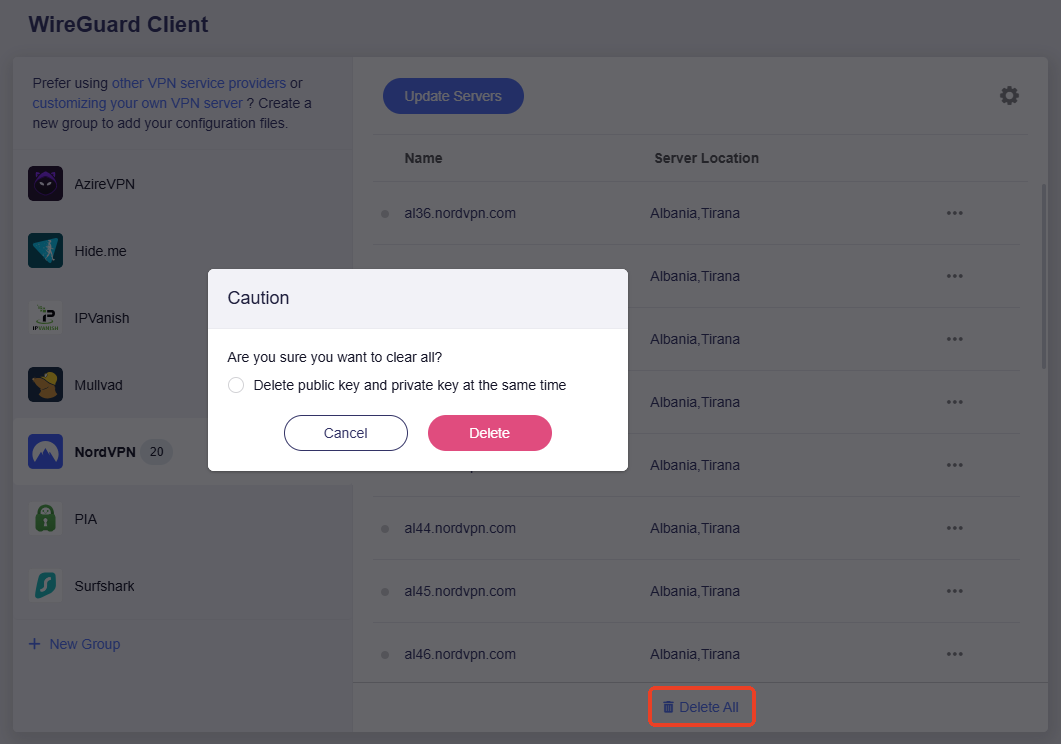
Delete All.
You can click Delete All to delete all configuration files with one click, and choose whether to delete the private and public keys simultaneously.
Set Up PIA (Private Internet Access)
In the web Admin Panel, go to VPN -> WireGuard Client -> PIA.
-
Enter your PIA Username and Password (i.e., the credentials you use to sign in to PIA), then click Save and Continue. It will generate configuration files for each server.

-
Select servers.
Select the server(s) you want to connect to, and click Apply.

-
Start a connection.
Select your preferred server, and click the three-dot icon on the right to start a connection.

Once connected, a green dot will appear next to the configuration file.

You can also check the VPN connection details on the VPN Dashboard.
-
Update servers.
You can click Update Servers to obtain the latest available server list, avoiding connection failures caused by server maintenance or shutdown.

-
Edit credentials or logout.
Click the gear icon to edit your login credentials or log out.

-
Delete All.
You can click Delete All to delete all configuration files with one click, and choose whether to delete the private and public keys simultaneously.
Set Up PureVPN
-
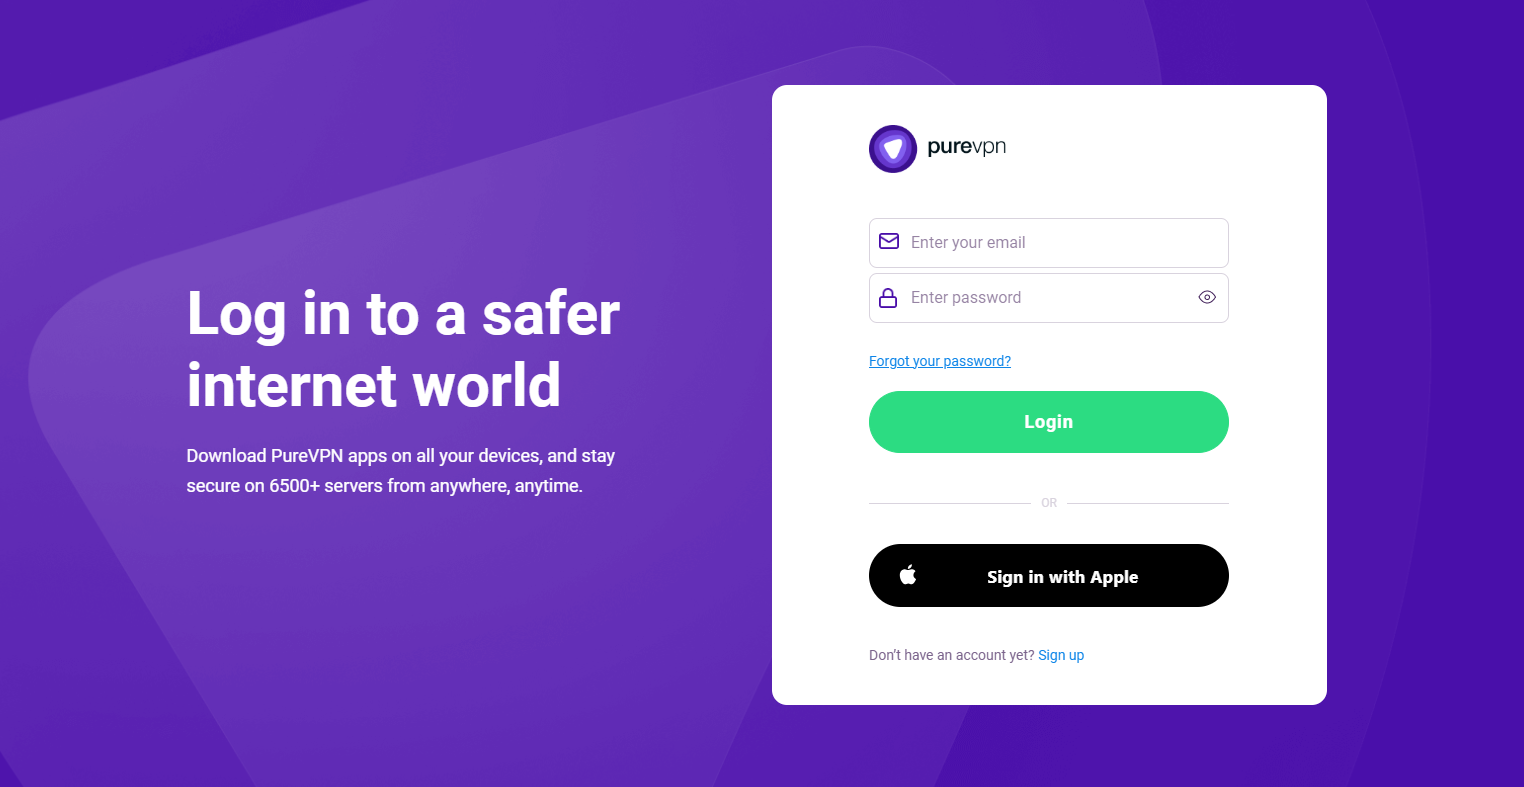
Click here to log in to your PureVPN dashboard.
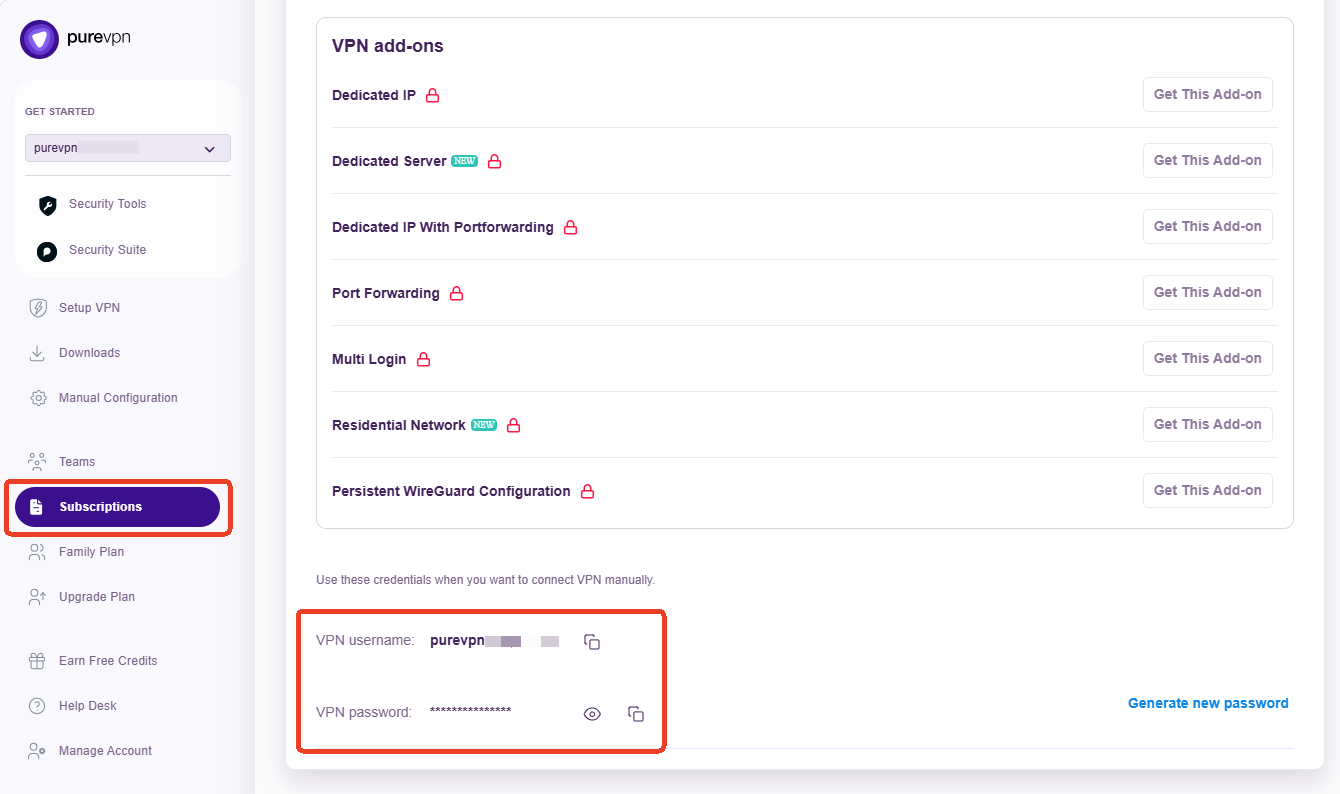
After logging in, click Subscriptions in the left menu, scroll to the bottom to find your credentials. Copy the username and password for later use.
-
Log in to the router's web Admin Panel, and go to VPN -> WireGuard Client -> PureVPN.
Enter the copied Username and Password, then click Save and Continue.

It will generate all available configuration files.

-
Start a connection.
Select your preferred server, and click the three-dot icon on the right to start a connection.

Once connected, a green dot will appear next to the configuration file.

You can also check the VPN connection details on the VPN Dashboard.
-
Update servers.
You can click Update Servers to obtain the latest available server list, avoiding connection failures caused by server maintenance or shutdown.

-
Edit credentials or logout.
Click the gear icon to edit your login credentials or log out.

-
Delete All.
You can click Delete All to delete all configuration files with one click, and choose whether to delete the private and public keys simultaneously.

Set Up Surfshark
In the web Admin Panel, go to VPN -> WireGuard Client -> Surfshark.
-
Enter your Surfshark Username and Password (i.e., the credentials you use to sign in to Surfshark), then click Save and Continue. It will generate configuration files for each server.

-
Select servers.
Select the server(s) you want to connect to, and click Apply.

-
Start a connection.
Select your preferred server, and click the three-dot icon on the right to start a connection.

Once connected, a green dot will appear next to the configuration file.

You can also check the VPN connection details on the VPN Dashboard.
-
Update servers.
You can click Update Servers to obtain the latest available server list, avoiding connection failures caused by server maintenance or shutdown.

-
Edit credentials or logout.
Click the gear icon to edit your login credentials or log out.

-
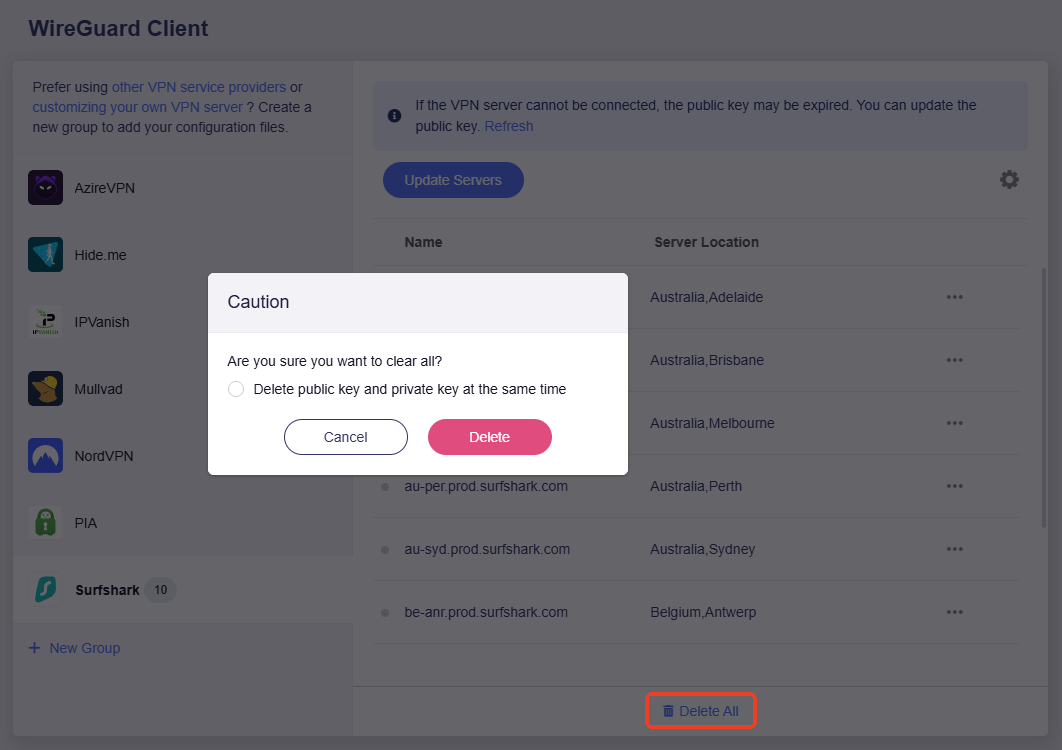
Refresh.
You can click Refresh to update the public key when the VPN server cannot be connected.

-
Delete All.
You can click Delete All to delete all configuration files with one click, and choose whether to delete the private and public keys simultaneously.
Set Up Windscribe
In the web Admin Panel, go to VPN -> WireGuard Client -> Windscribe.
-
Enter your Windscribe Username and Password (i.e., the credentials you use to sign in to Windscribe), then click Save and Continue. It will generate configuration files for each server.

-
Select servers.
Select the server(s) you want to connect to, and click Apply.

Then you will get a list of configuration files corresponding to the selected server.

-
Start a connection.
Select your preferred server, and click the three-dot icon on the right to start a connection.

Once connected, a green dot will appear next to the configuration file.

You can also check the VPN connection details on the VPN Dashboard.
-
Update servers.
You can click Update Servers to obtain the latest available server list, avoiding connection failures caused by server maintenance or shutdown.

-
Edit credentials or logout.
Click the gear icon to edit your login credentials or log out.

-
Refresh.
You can click Refresh to update the public key when the VPN server cannot be connected.

-
Delete All.
You can click Delete All to delete all configuration files with one click, and choose whether to delete the private and public keys simultaneously.

Set Up WireGuard Client Manually (for other providers)
If you subscribe to other WireGuard service provider, download a configuration file from their website, then follow the steps below to set up the WireGuard Client. If you don't know how to download the configuration files, refer to this guide or contact their support.
In the web Admin Panel, go to VPN -> WireGuard Client.
-
Click Add Manually.

-
It will create a group on the left sidebar.

-
Set a descriptive name for the group (e.g., azirevpn). Then upload a configuration file (supported formats: zip, tar, gz, conf, txt) or manually add configuration details (in text form).

-
Upload a configuration file.
Click on the upload area to upload your WireGuard configuration file, then click Apply.


-
Manually add configuration.
Click on Manually Add Configuration at the bottom of the upload area.

Set a descriptive name, and paste the configuration into the text box. Then click Apply.
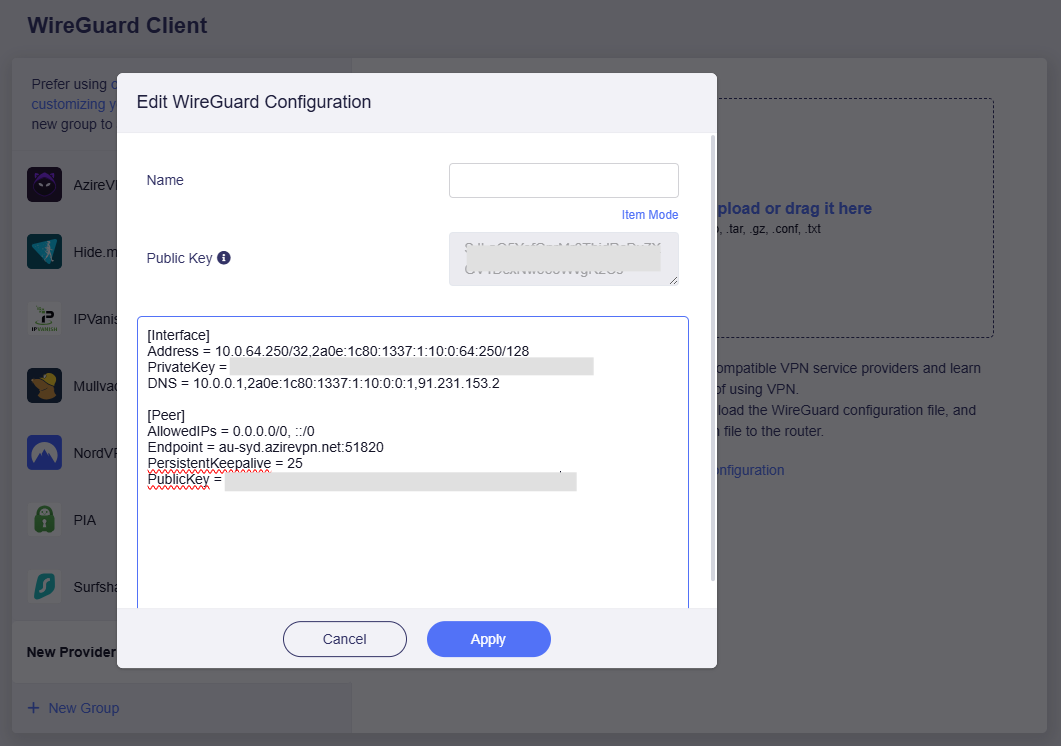 (Text Mode)
If you want to verify each item, you can switch to the Item mode and check the config details. Then click Apply.
 (Item Mode)
-
-
Click the three-dot icon on the right side to start the connection.

Once connected, a green dot will appear next to the configuration file.
You can also check the VPN connection details on the VPN Dashboard.
Set Up WireGuard Client via Mobile App
You can also set up a WireGuard client via the mobile app.
The mobile app integrates some WireGuard service providers, such as AzireVPN, Mullvad VPN, OVPN, StrongVPN, and PIA VPN. You can easily set up a WireGuard client by entering the login credentials of the WireGuard service you subscribed to.
Install the app and follow the on-screen instructions to set up as needed.
Set Up WireGuard Server on GL.iNet Router
Do not want to subscribe to third-party VPN services? You may purchase two GL.iNet routers – set one as WireGuard server and the other as WireGuard server.
This is especially suitable for scenarios where your home network's ISP provides a Public IP, and you want to connect to your home network via VPN when away from home to ensure security and access to internal network resources. This eliminates the cost and hassle of continuously subscribing to commercial VPN services.
For WireGuard server setup, please check here.
WireGuard® is a registered trademark of Jason A.Donenfeld.
Still have questions? Visit our Community Forum or Contact us.