Mudi 7 (GL-E5800) User Guide
Product overview
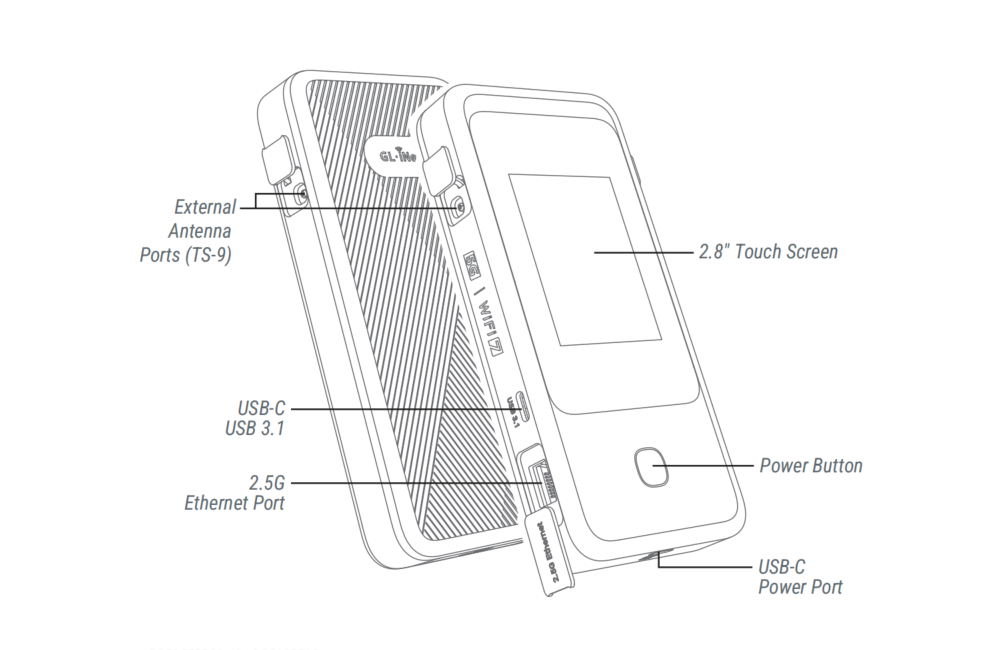
Mudi 7 is a portable 5G NR Wi-Fi 7 travel router built for road warriors and business travelers, delivering reliable, private networks to secure data against cyber threats. It features 5G hyper-speed, dual SIM auto-switching (failover), and Wi-Fi 7 (320MHz channels and 4K QAM) for stable, fast connectivity, supporting fast downloads, 4K streaming, lag-free video conferencing even in crowded areas.
Equipped with a touchscreen, the Mudi 7 allows you to monitor real-time data usage, signal strength, connected devices, and client speed, and adjust settings with simple taps for intuitive, hassle-free control.
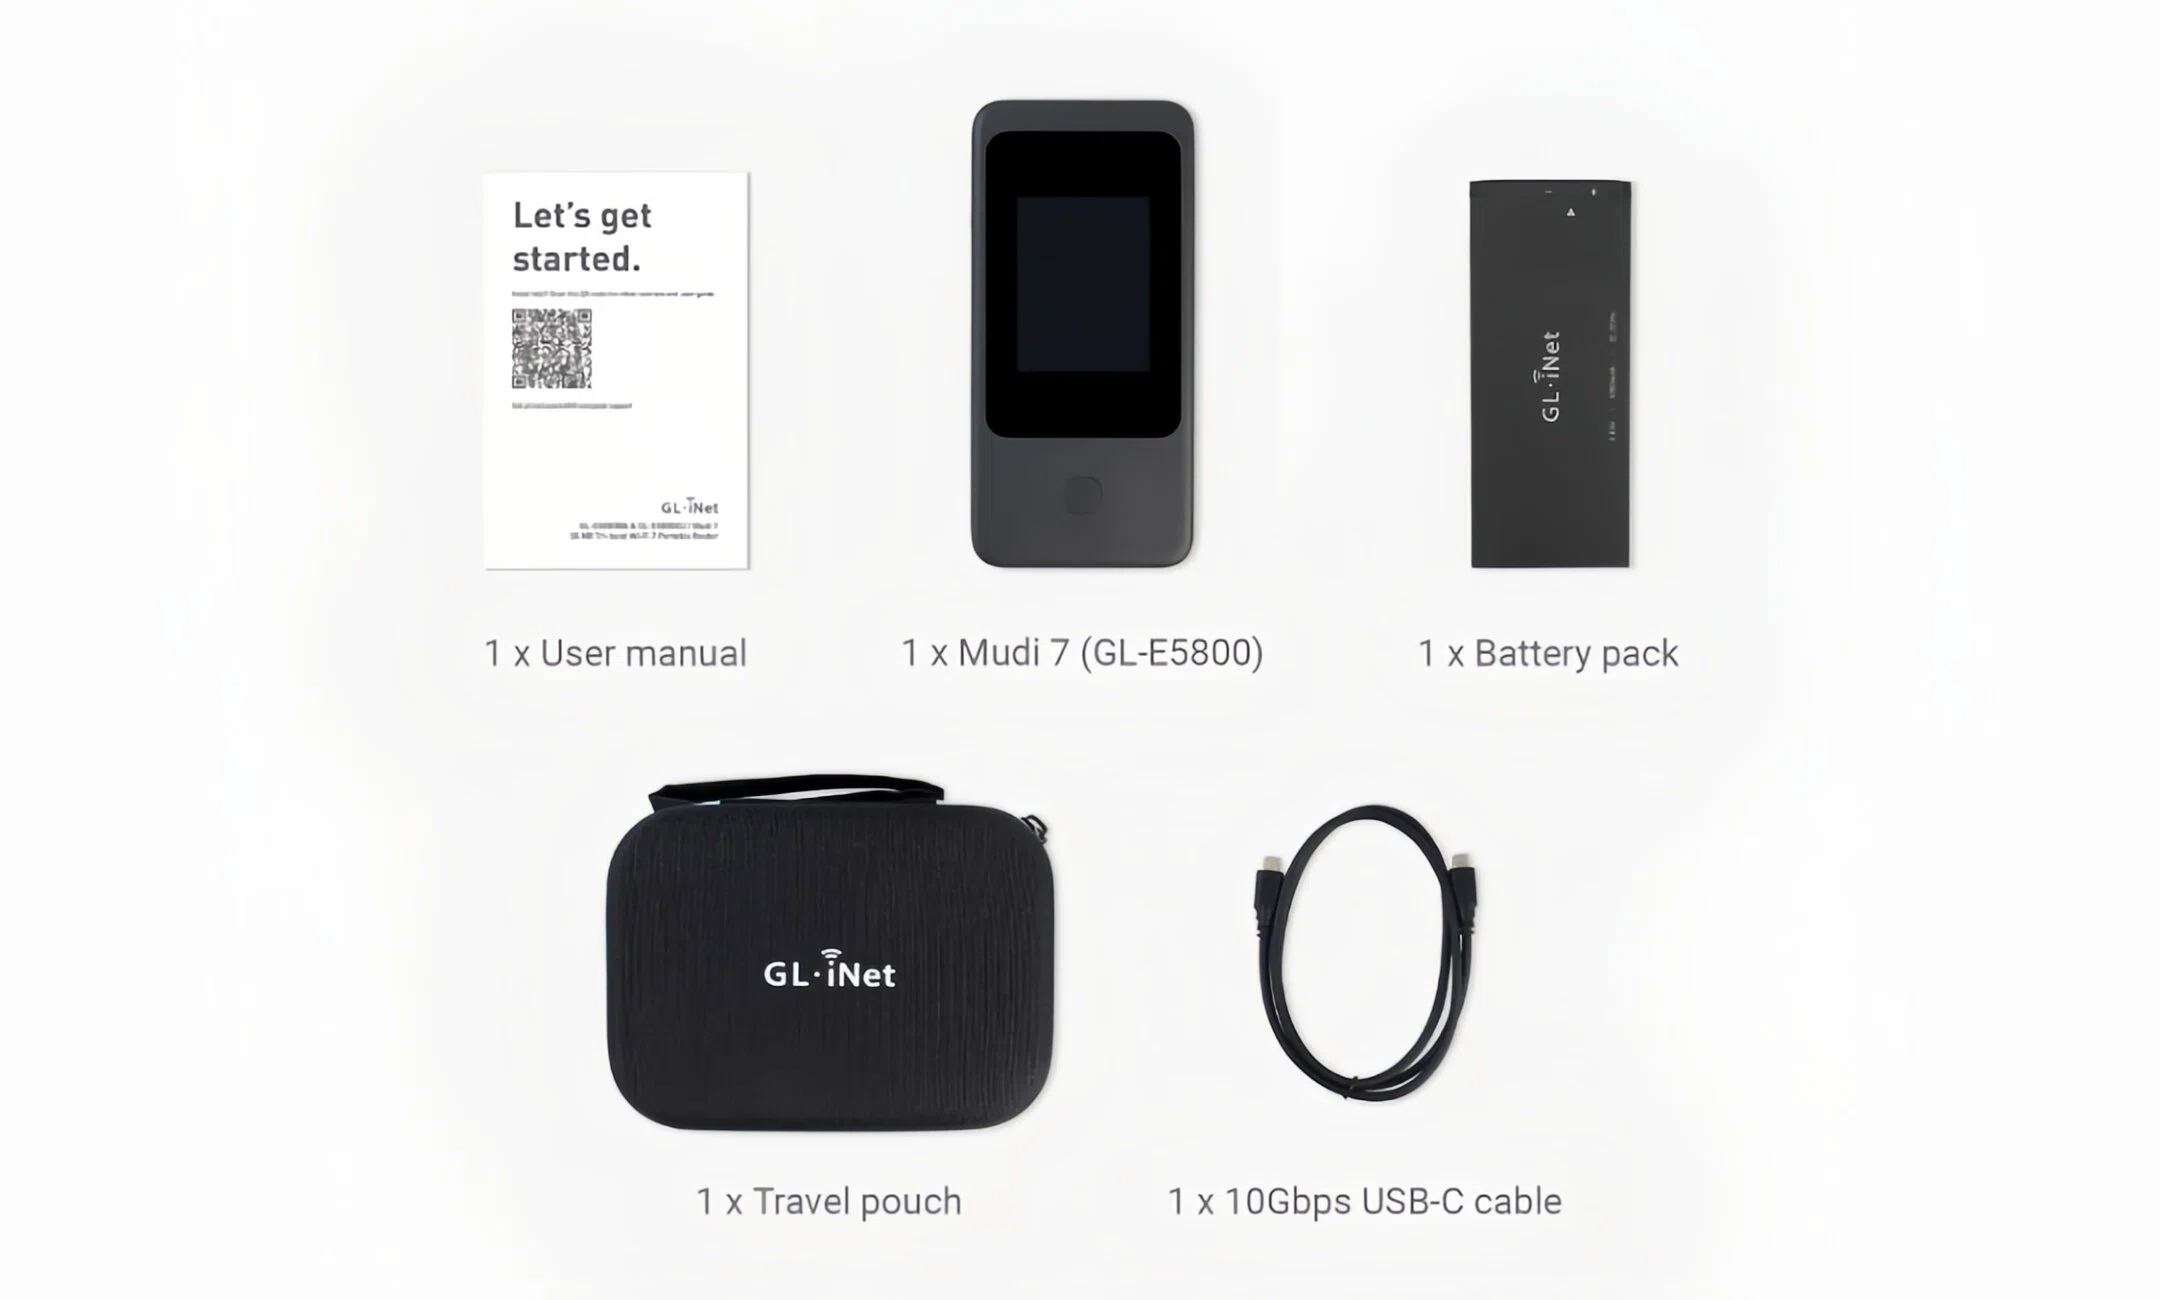
Package contents
- 1 x Mudi 7 (GL-E5800)
- 1 x Battery Pack
- 1 x 10Gbps USB-C Cable
- 1 x Travel Pouch
- 1 x User Manual
Check out Mudi 7's unboxing video below.
How to set up Mudi 7
Watch this setup video or follow the steps below.
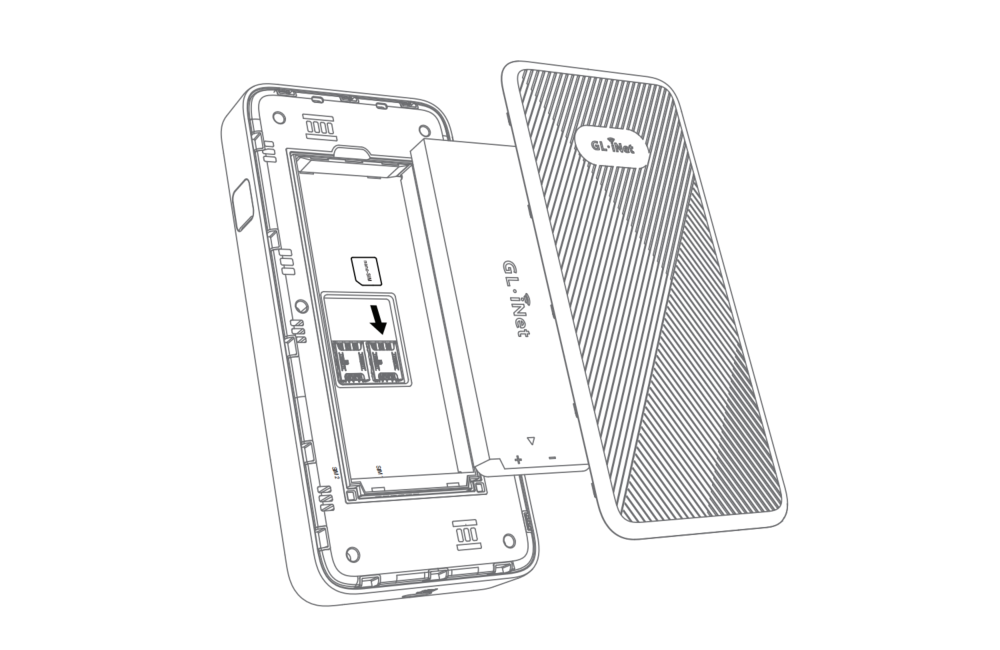
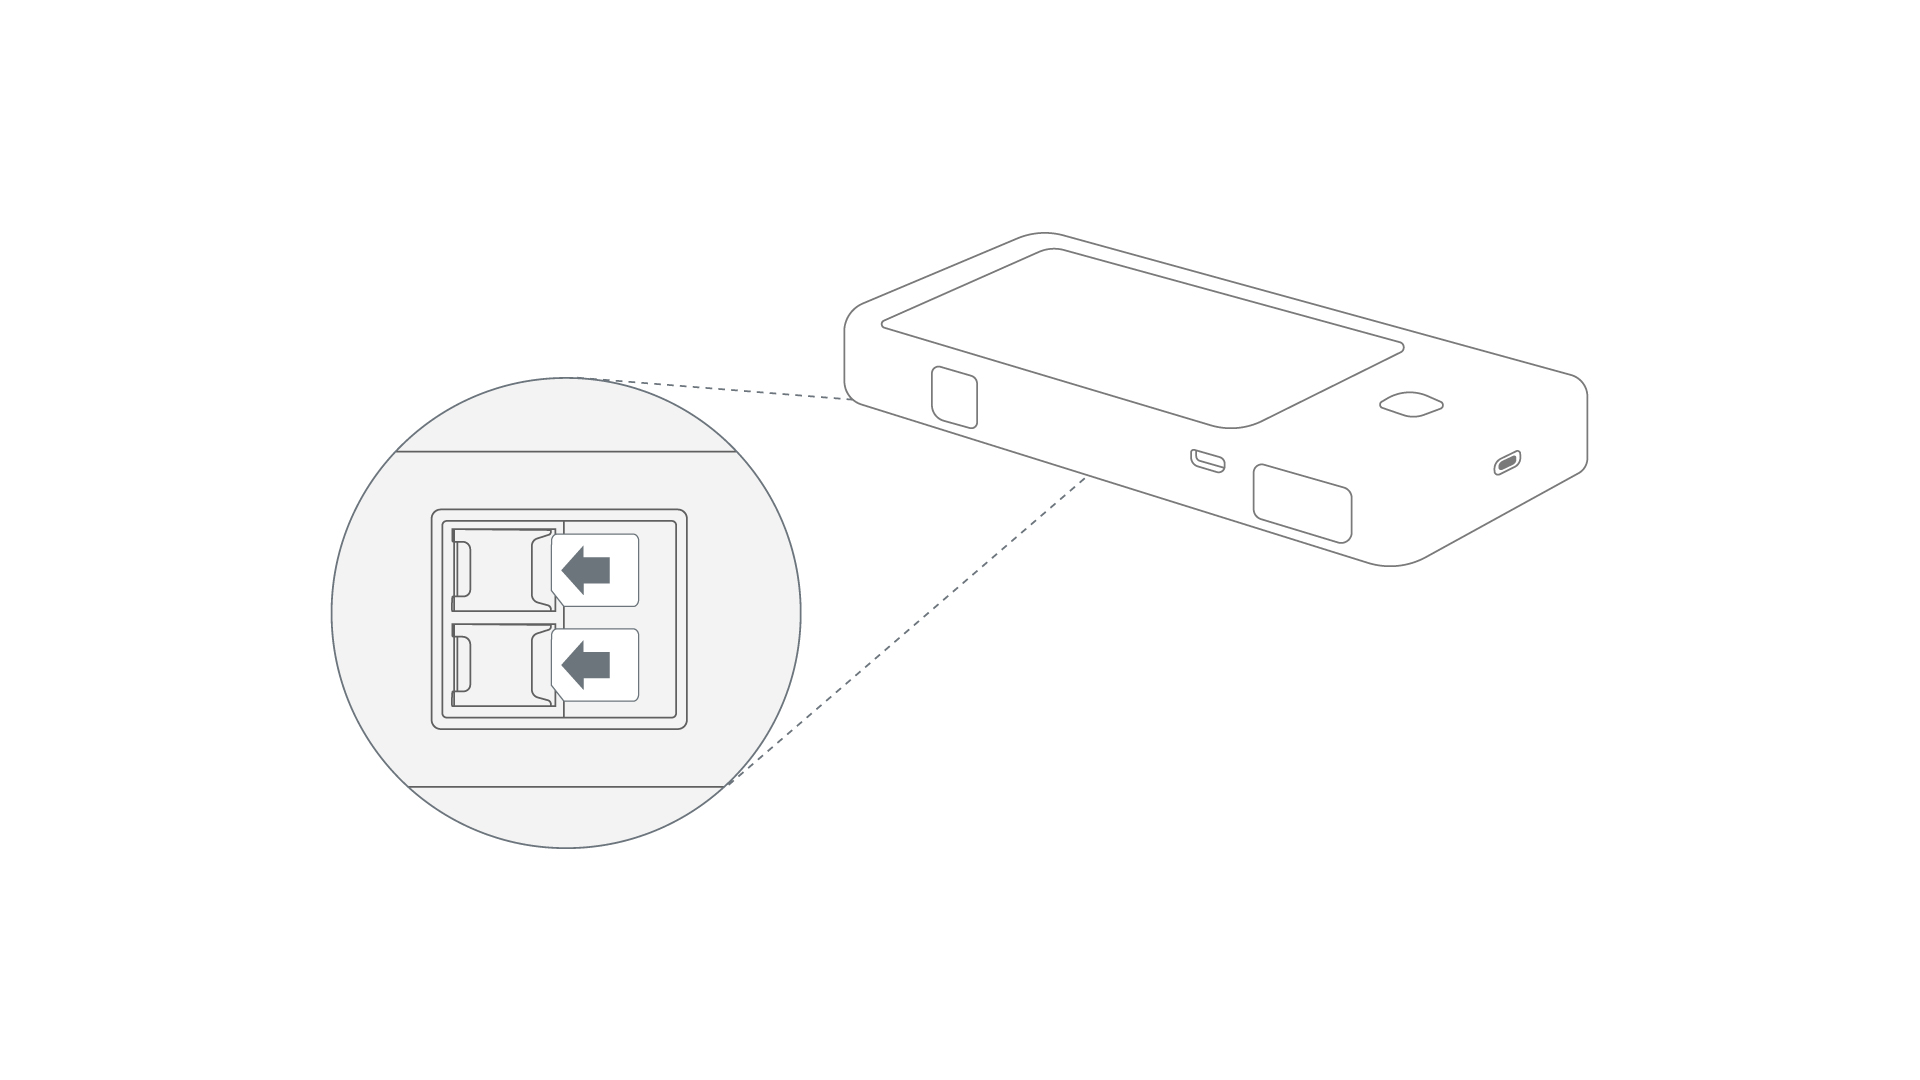
1. Install SIM card
Install Nano-SIM card(s) on your Mudi 7. If you prefer using eSIM, skip this and turn to step 2.
First, remove the battery cover, then take out Mudi 7's battery.
Second, insert the Nano-SIM card(s). If using only one card, prioritize SIM 1.
Finally, put the battery and the cover back.
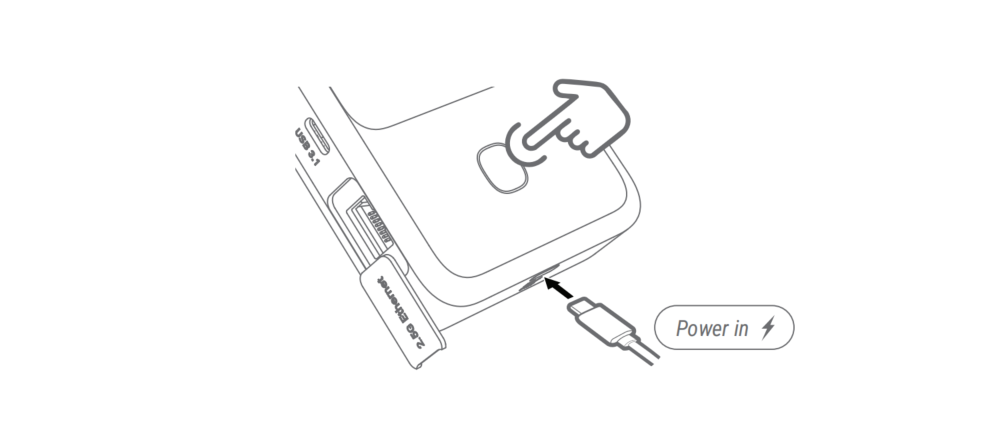
2. Power on
Press and hold the Power button for 3 seconds, or plug in a power adapter.
3. Basic settings
Follow the on-screen instructions to configure basic settings, including screen passcode, admin password, Wi-Fi name, Wi-Fi password and frequency bands.
Tip: The default admin password is the last 9 characters of the device's S/N, followed by a # character. You may use the default password or set a custom one.
4. Internet setup
Configure your Mudi 7 using one of the supported internet connection methods: Cellular, Ethernet, Repeater, Tethering, and USB Ethernet. If you want to use the Multi-WAN feature, please set up more than one internet connection.
Mudi 7 comes with a built-in eSIM and dual Nano‑SIM slots. You can connect to the Internet by purchasing an eSIM package (no physical SIM card required), or insert your Nano‑SIM cards to access the 5G mobile network.
-
eSIM: On the touchscreen, go to Cellular -> Active SIM Card, enable eSIM, then upload your eSIM profile through the web Admin Panel, or purchase it in the eSIM Profile Store.
-
Nano‑SIM: Remove the back cover of Mudi 7, take out the battery, insert your Nano-SIM card into the slot, then install the battery.
Once successfully connected to the internet, the signal bars and cellular status will appear in the top right corner of the touchscreen. You can also check the connection details on the web admin panel.
Please refer to Connect to the Internet via cellular for detailed instructions.
Note
- The built-in eSIM and SIM 2 are mutually exclusive and cannot be activated at the same time. The eSIM is disabled by default. If you enable the eSIM, SIM 2 will not work even if a SIM card is inserted.
- Since Mudi 7 comes with a built-in eSIM, a SIMPoYo eSIM physical card will be recognized as a regular SIM card without eSIM functionality on Mudi 7.
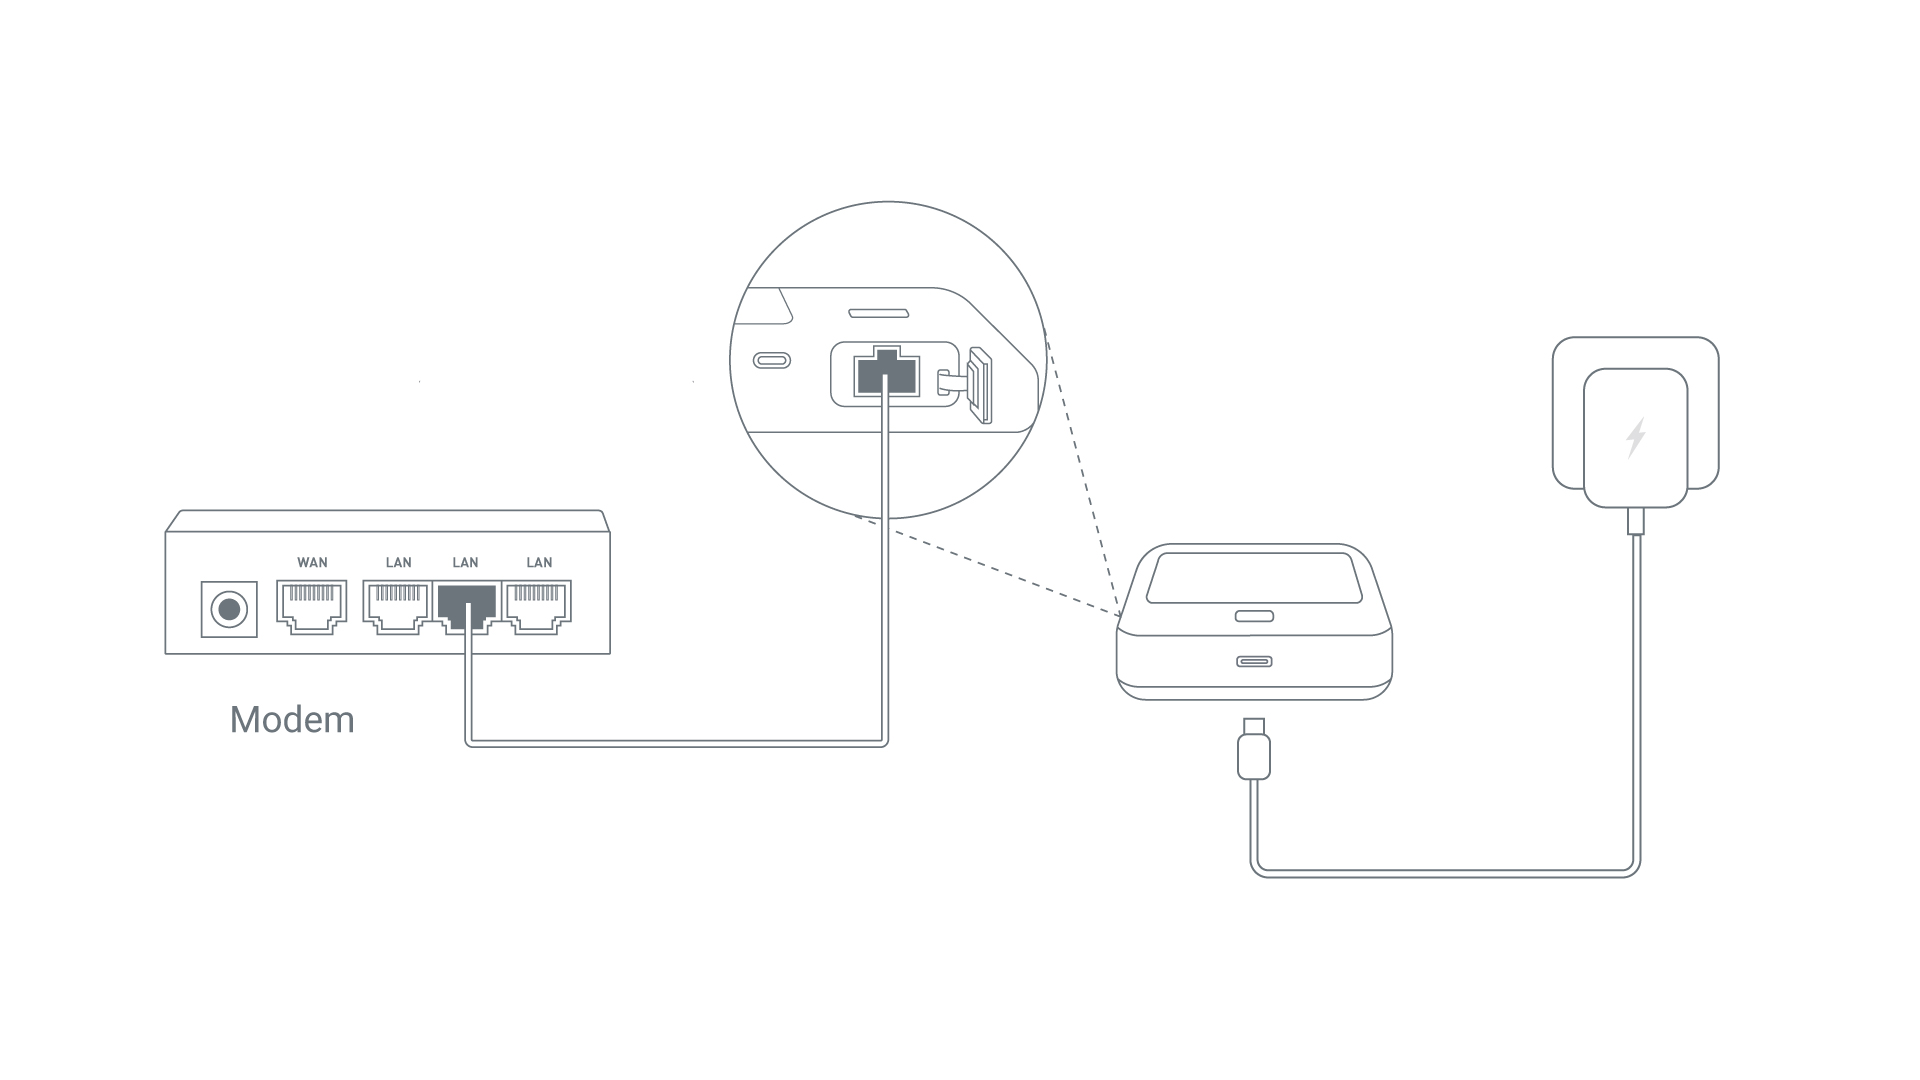
- Connect Mudi 7's Ethernet port to an upstream network source (e.g., ISP modem, network switch, or Ethernet jack on the wall) via an Ethernet cable.
-
On the touchscreen or web admin panel, go to Network -> Ethernet Ports, set the port role to WAN, and click Apply.
-
Once successfully connected to the internet, an Ethernet port icon will appear in the top right corner of the touchscreen. You can also check the connection details on the web admin panel.
Please refer to Connect to the Internet via an Ethernet cable for detailed instructions.
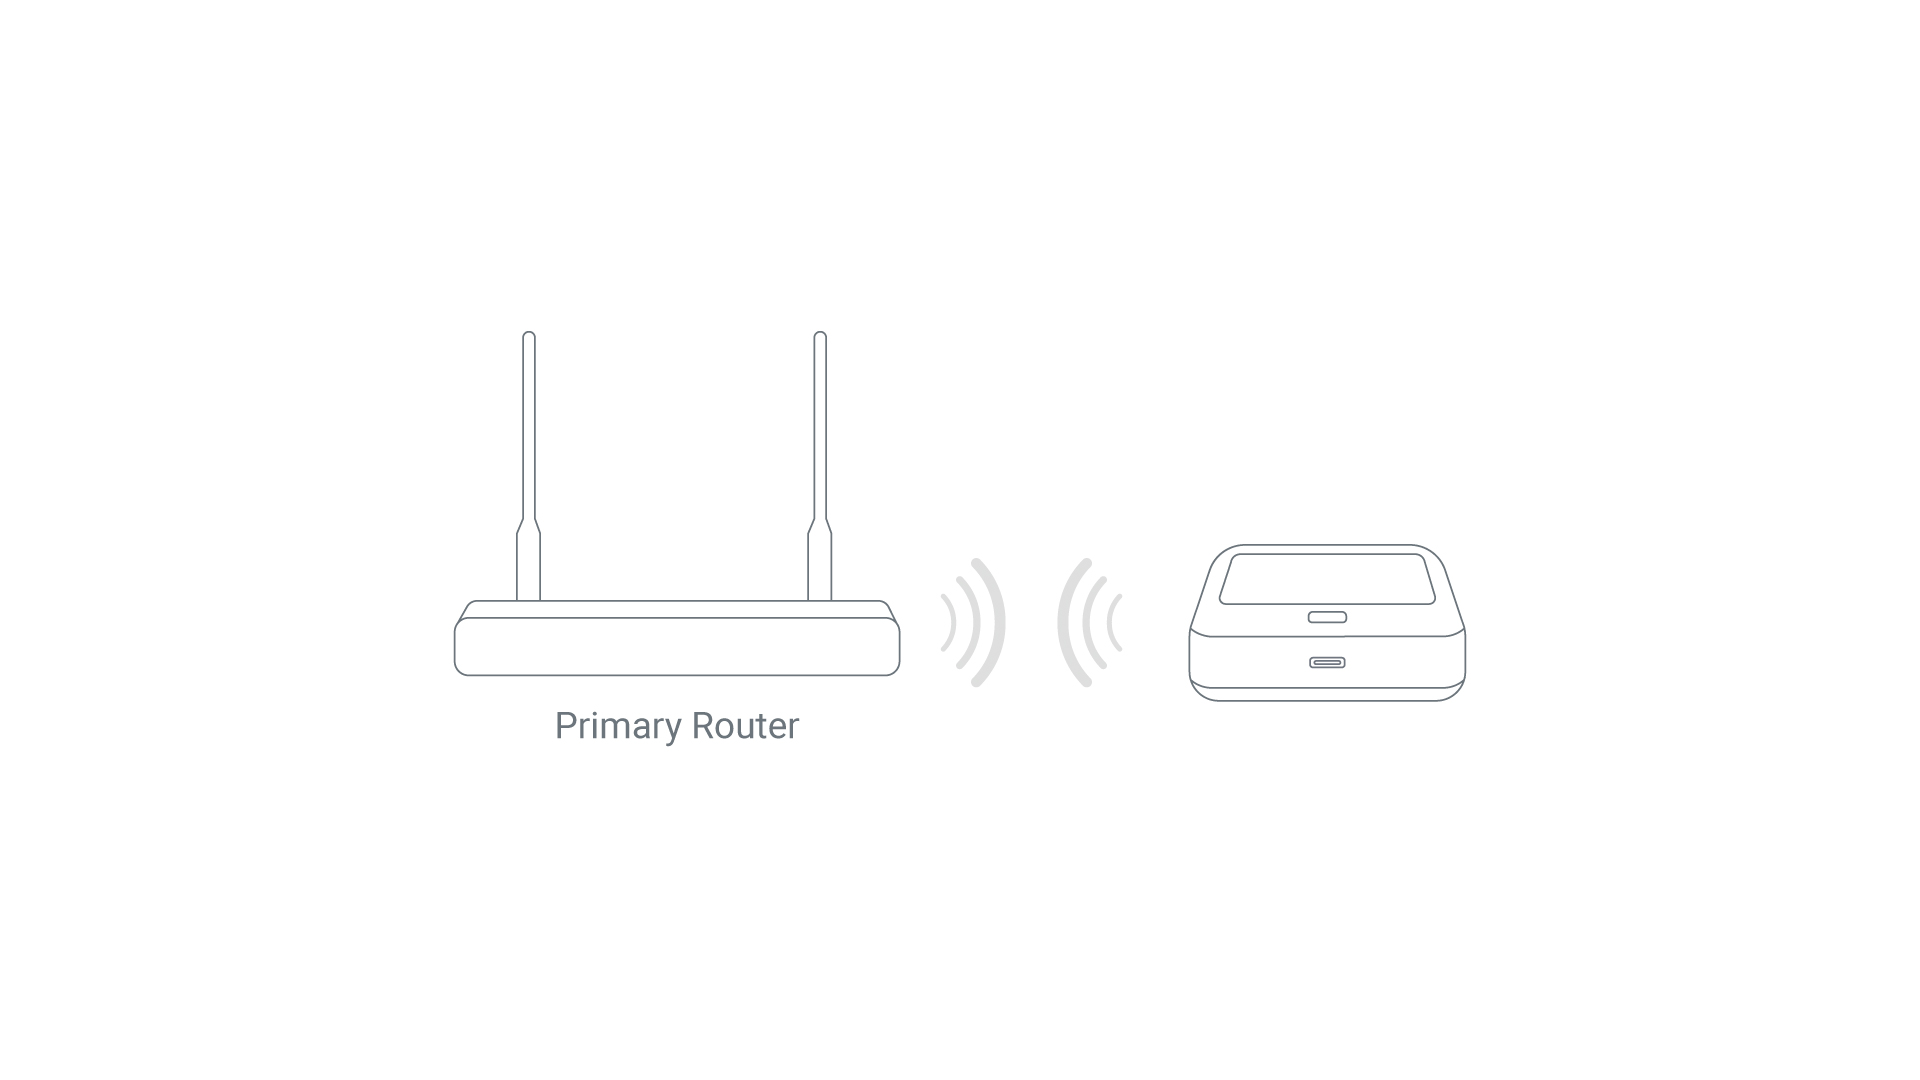
- On the touchscreen or web admin panel, go to Internet -> Repeater and click Connect. Mudi 7 will start scanning for available Wi-Fi networks.
- Select the Wi-Fi network you want Mudi 7 to extend.
- Enter the password and click Apply.
- Once successfully connected to the internet, a Wi-Fi icon will appear in the top right corner of the touchscreen. You can also check the connection details on the web admin panel.
Please refer to Connect to the Internet via an existing Wi-Fi network for detailed instructions.
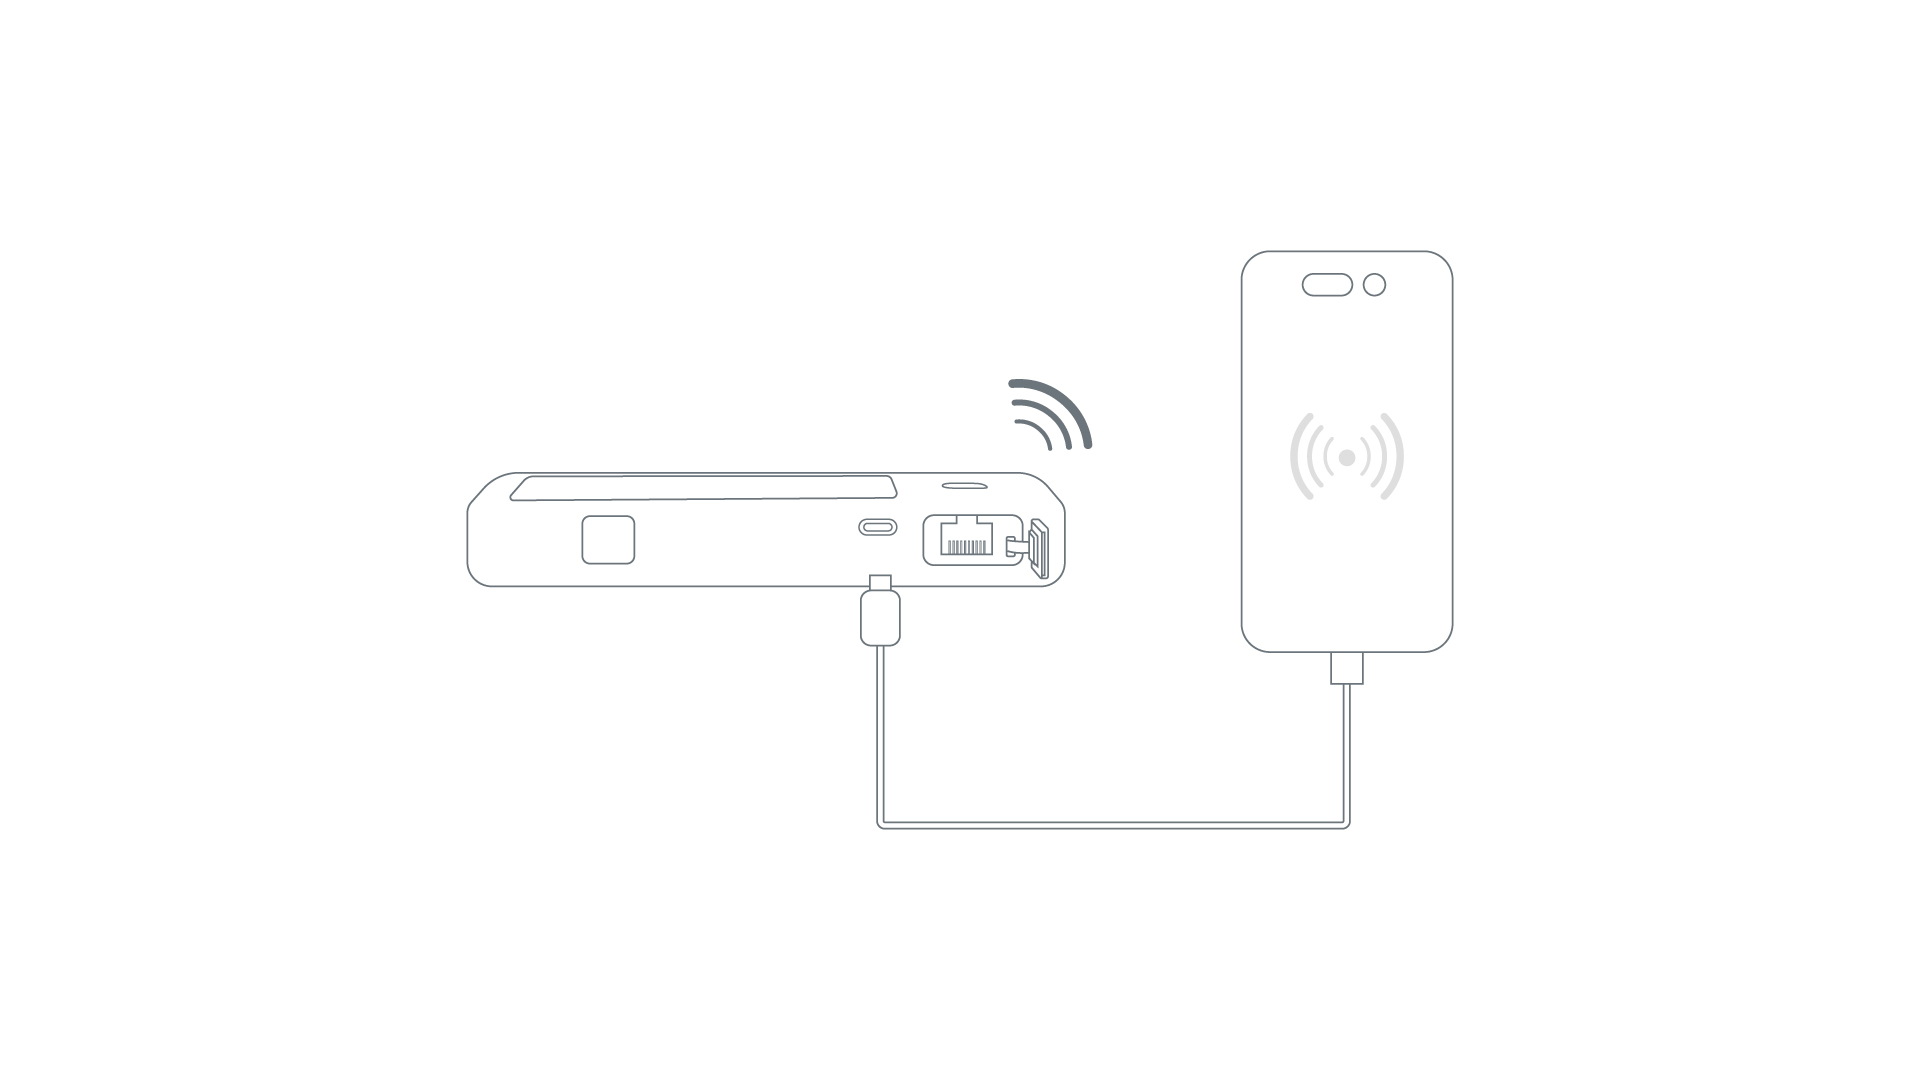
- Connect your mobile device (e.g., smartphone or USB dongle) to Mudi 7's USB-C port via a USB cable.
- On your mobile device, go to Settings and enable USB Tethering. If you use iPhone, tap Trust This Device if prompted.
- Mudi 7 will then automatically connect to your device. If it does not connect, repeat the above steps, or log in to the web admin panel and check the Tethering connection on the INTERNET page.
- Once successfully connected to the internet, a chain link icon will appear in the top right corner of the touchscreen. You can also check the connection details on the web admin panel.
Please refer to Connect to the Internet via USB tethering for detailed instructions.
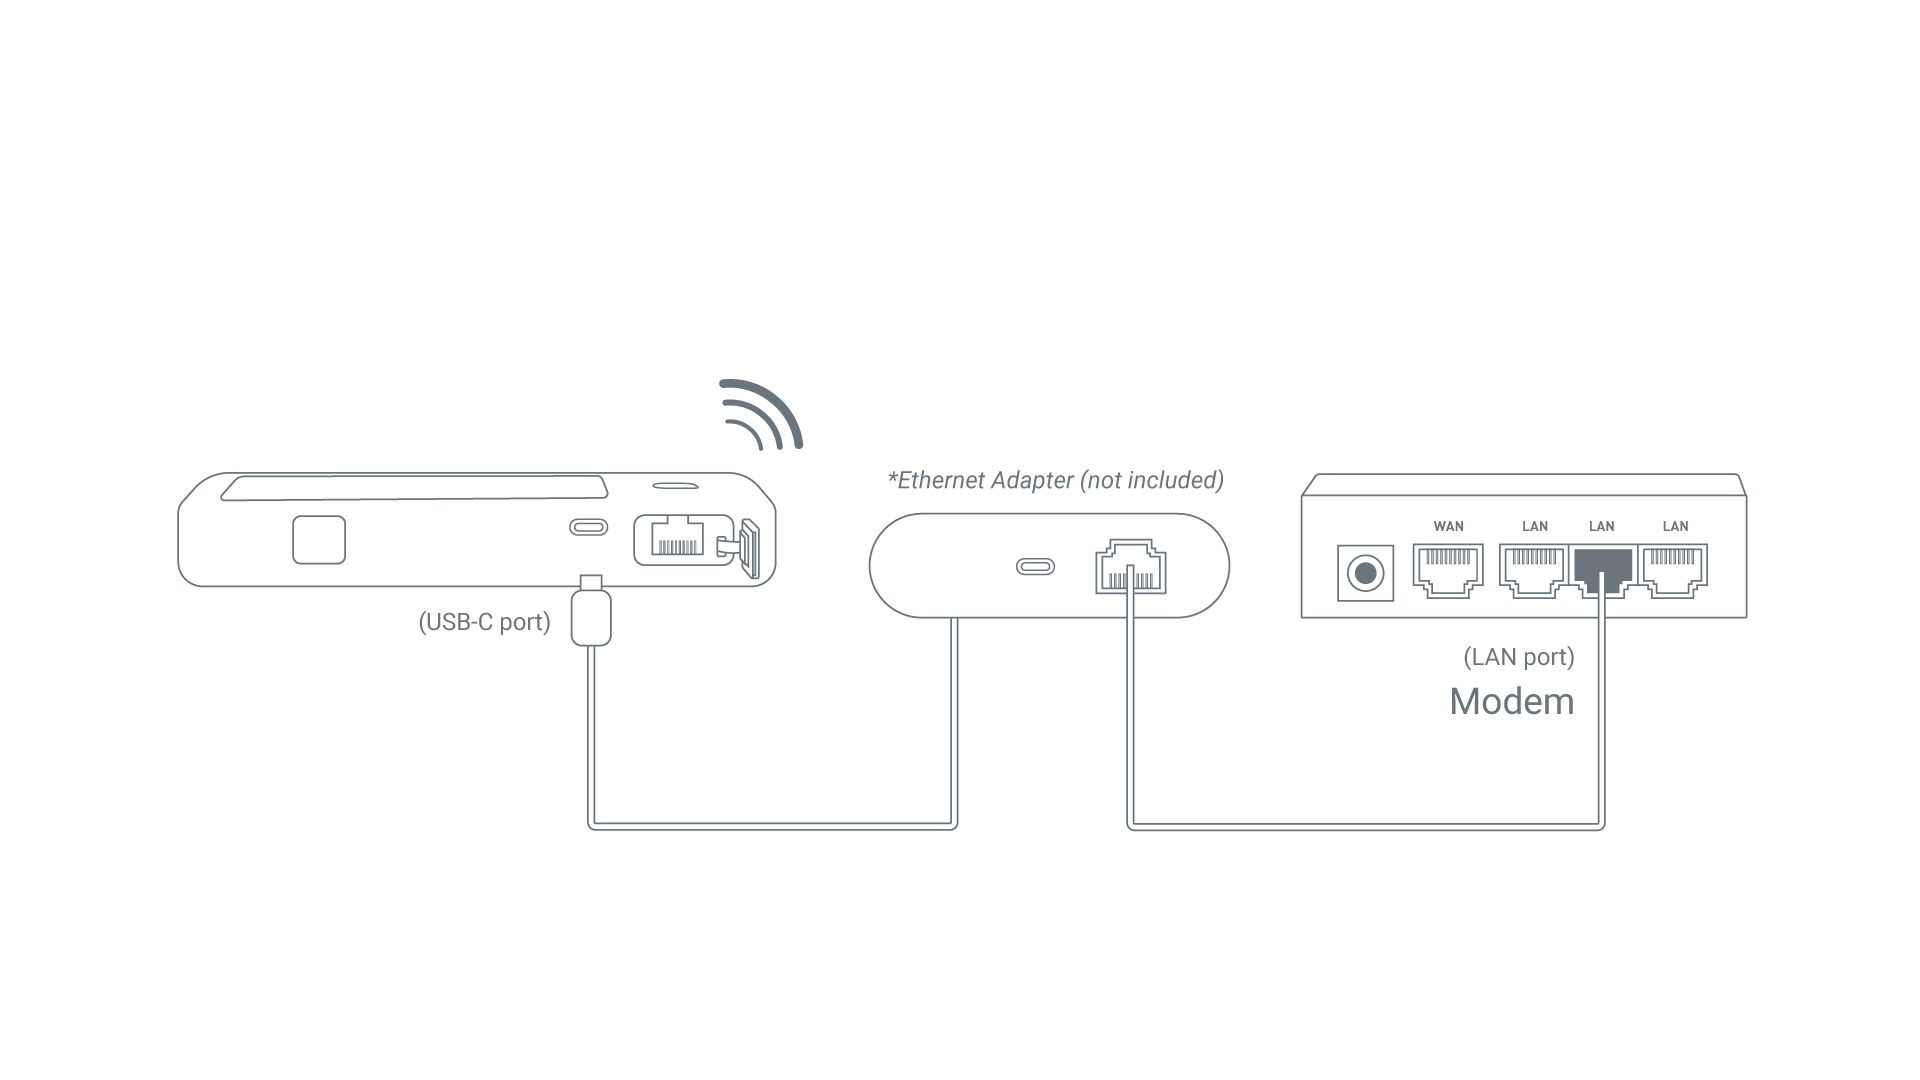
Mudi 7 is equipped with an OTG-enabled USB-C port, allowing you to add a second Ethernet port for Dual-Ethernet WAN. This requires a separately sold USB‑C‑to‑Ethernet adapter.
*USB OTG (On-The-Go) is a USB standard that enables compatible devices like routers to switch between host and peripheral roles, allowing direct data transmission and power interaction without a separate host device.
- Connect an upstream network source (e.g., ISP modem, network switch, or Ethernet jack on the wall) to Mudi 7's USB-C port via a USB C-to-Ethernet adapter.
-
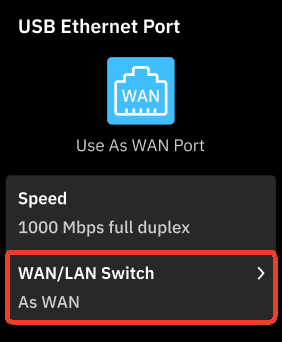
On the touchscreen or web admin panel, go to Network -> Ethernet Ports -> USB Ethernet Port, set the port role to WAN, and click Apply.
-
Mudi 7 will then automatically connect to your device. If it does not connect, repeat the above steps, or log in to the web admin panel and check the USB Ethernet connection on the INTERNET page.
- Once successfully connected to the internet, a USB icon and an Ethernet port icon will appear in the top right corner of the touchscreen. You can also check the connection details on the web admin panel.
Repair & Reset
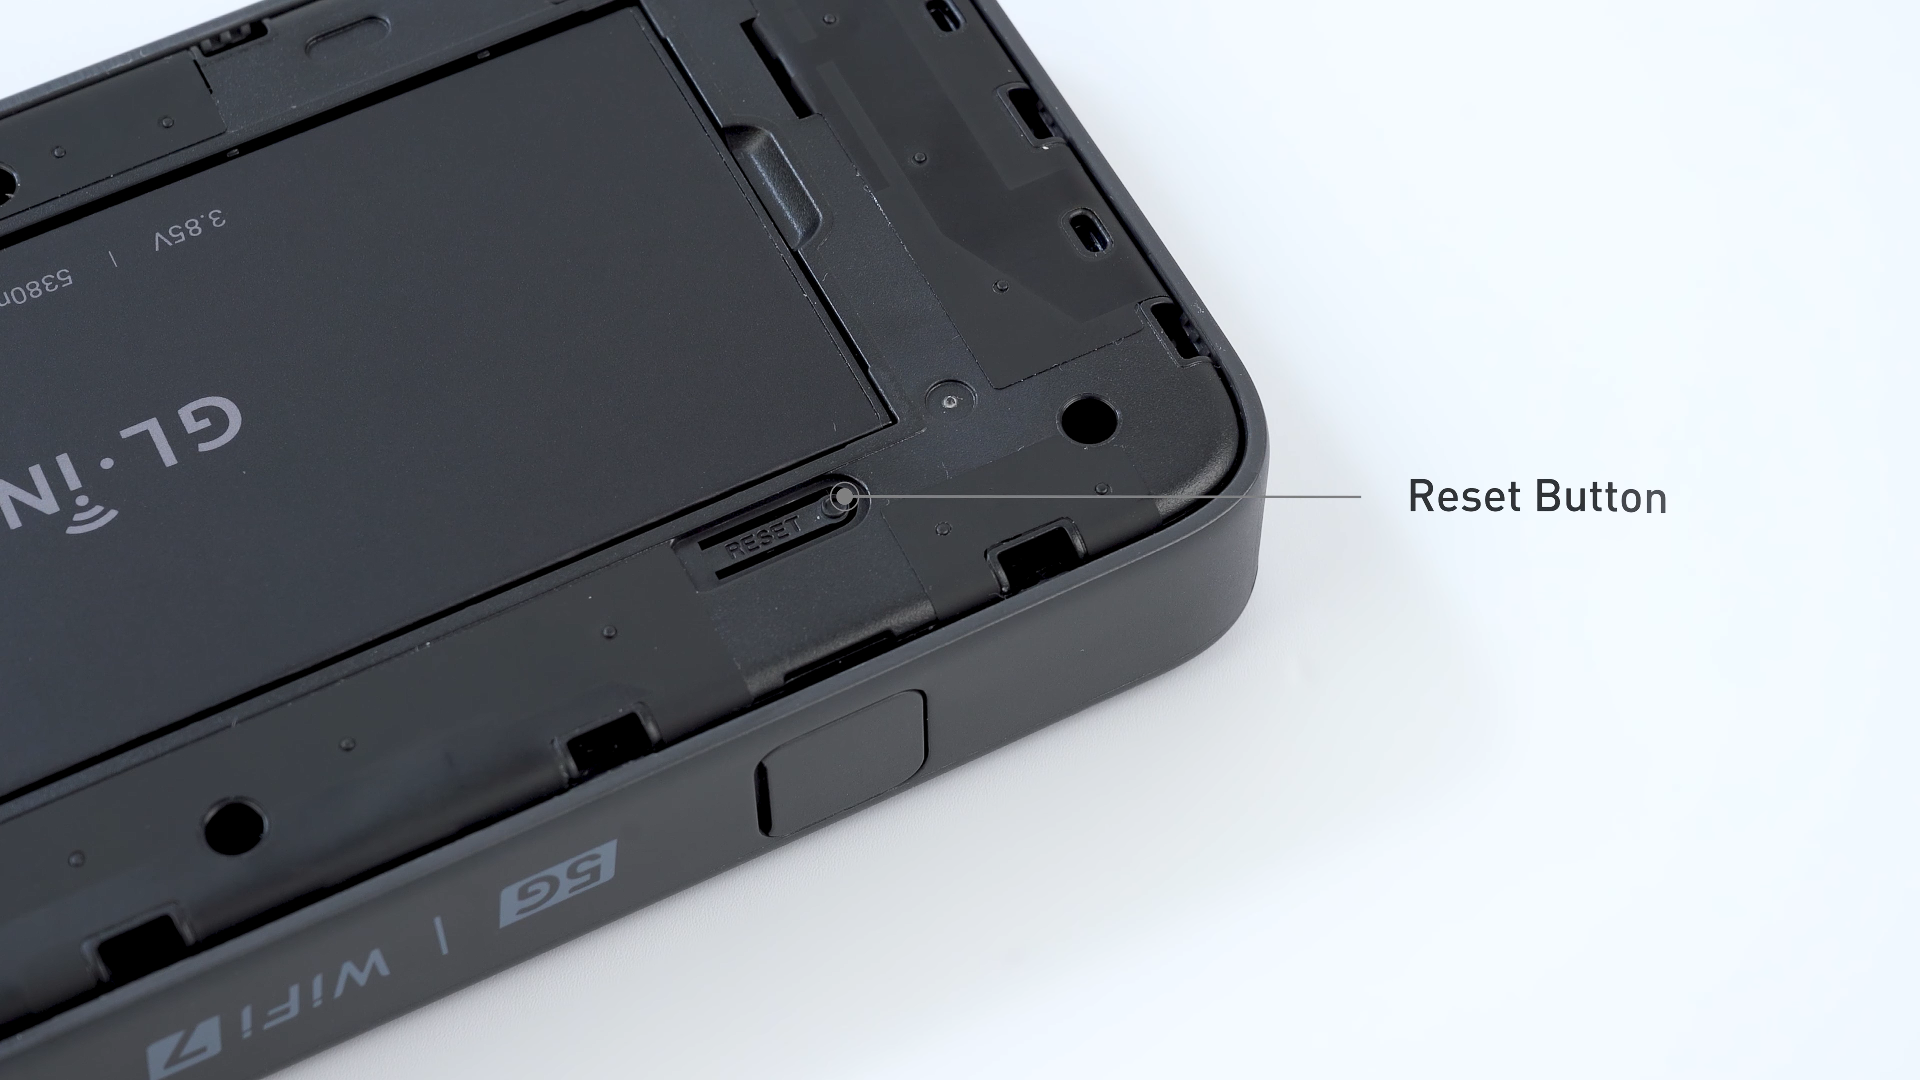
You can restore network connectivity or reset Mudi 7 to factory defaults by a physical reset button.
Note: Before performing a reset, ensure Mudi 7 has fully booted up. Do NOT press the reset button immediately after power-up, as this may trigger U-Boot failsafe mode.
Remove the back cover, and you will find the reset button as shown below.
Network Repair
Press and hold the reset button for 4 seconds, then release to repair your network. When holding the button, pay attention to the on-screen prompts and operate as instructed.
This will restart the network interface, while preserving Wi-Fi settings, VPN configurations (disabled), system settings, etc.
Note:
-
If Wi-Fi has been disabled, a soft reset will restore Wi-Fi to its default enabled state.
-
A soft reset can also be used to quickly switch the device from non-router mode to router mode.
Device Reset
Press and hold the reset button for 10 seconds, then release to perform a hard reset. When holding the button, pay attention to the on-screen prompts and operate as instructed.
This will clear all your settings. Please proceed with caution.
Log in to web Admin Panel
You can log into the Mudi 7 web Admin Panel to configure or check more settings.
First, connect a device (e.g., computer, laptop or smartphone) to the Mudi 7 via Wi-Fi, an Ethernet cable, or a USB cable.
-
Wi-Fi
- QR code: Use your device to scan the QR code on the Mudi 7 screen. Then click "Join" on your device to connect.
- Manual Connect: On your device, go to Settings -> WLAN, locate the Wi-Fi network name of Mudi 7 in the available networks list, and enter the password to join the network. (You can find the default network name and password printed on the label.)
-
Ethernet
Connect your device to the Ethernet port (default LAN) of Mudi 7 via an Ethernet cable.
-
USB
Connect your device to the USB-C port of Mudi 7 via a USB cable. The OTG-enabled USB-C port allows you to access the Mudi 7's WebGUI in the next step.
Then open a web browser and enter 192.168.8.1 in the address bar to access the login page. Select your language, set your admin password, and click Apply.
You will then be logged into the Mudi 7 web Admin Panel.
Below is an overview of the features in the Mudi 7 web Admin Panel.
Wireless
The Wireless page allows you to configure settings for the 6 GHz, 5 GHz, and 2.4 GHz Wi-Fi networks, including enabling Wi-Fi, setting TX power, specifying the Wi-Fi name (SSID), enabling randomized BSSID, selecting Wi-Fi security mode and password, configuring SSID visibility, choosing the Wi-Fi mode, bandwidth, and channel.
To set up Wireless, refer to Wireless.
Note: There are some differences in the wireless settings of the Mudi 7 compared with those of other GL.iNet Wi-Fi 7 routers.
- Due to chipset hardware constraints, the 5 GHz and 6 GHz Wi-Fi cannot be enabled simultaneously.
- When Repeater is enabled, the Guest Network will be automatically disabled.
- As required by regulations, switch Wi-Fi to Outdoor mode when using it outdoors. This may reduce the coverage range. You can switch the Usage Environment (Indoor or Outdoor) at the top of the Wireless page.
Clients
The Clients page displays information about connected devices. For each client, it shows the name, IP and MAC addresses, download and upload speeds, total traffic, and provides the ability to block the client or perform other actions.
To set up Clients, refer to Clients.
Cloud services
GL.iNet GoodCloud cloud management service provides an easy and simple way to remotely access and manage GL.iNet routers.
To set up GoodCloud, refer to GoodCloud.
AstroWarp is an advanced networking platform designed to provide seamless remote networking and remote device management. Built specifically for GL.iNet router integration, AstroWarp supports comprehensive device management across entire networks, enabling both upper and lower device control. With a focus on network-wide management and future support for hardware-level control, AstroWarp offers a more robust and dependable solution for managing devices and maintaining secure, stable networks.
To set up AstroWarp, refer to AstroWarp.
VPN
A VPN (virtual private network) creates a secure, encrypted traffic between your device and the VPN server. It provides an added layer of privacy and security (VPN client) and allows you to access a remote network (VPN server). Mudi 7 supports OpenVPN and WireGuard.
Mudi 7 (and other GL.iNet routers) support the OpenVPN protocol which offers strong security. To set up OpenVPN, follow these tutorials:
Mudi 7 (and other GL.iNet routers) support the WireGuard protocol which offers great speeds and convenience. To set up WireGuard, follow these tutorials:
Network
Multi-WAN is a networking feature that allows you to set up your router with multiple internet connections (e.g., ethernet, repeater, tethering, cellular, and USB ethernet) at the same time. If your current internet connection fails, the router will automatically switch to another internet connection. This ensures smooth and uninterrupted internet access.
To set up multi-WAN, refer to Multi-WAN.
LAN, or Local Area Network, is a network that connects computers and devices within a limited geographical area, such as a home or office. It enables high-speed data transfer and resource sharing, allowing devices to communicate with each other efficiently.
To set up LAN, refer to Lan.
It allows you to set a subnet within the IPv4 private address ranges 192.168.0.0/16, 172.16.0.0/12, or 10.0.0.0/8, specify the gateway and netmask IP addresses, and configure security settings like AP isolation for the guest network.
To set up guest network, refer to Guest Network.
The DNS page allows you to set custom DNS servers, enable DNS rebinding attack protection and override DNS settings of all clients, allow custom DNS to override VPN DNS, and configure the DNS server settings mode to automatic or manually specify DNS servers from the Ethernet connection.
To set up DNS, refer to DNS.
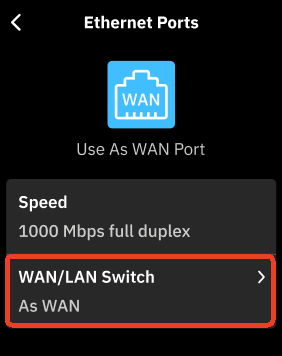
The Ethernet Port page allows you to set the Ethernet port role (i.e., using it as WAN/LAN), switch the MAC mode and MAC address for the WAN interface, and display the negotiated port rate.
Mudi 7 comes with a single Ethernet port, default to LAN. You can switch it to WAN port on the touchscreen or the web admin panel if required.
To manage Ethernet ports, refer to Ethernet Port.
IPv6, short for Internet Protocol version 6, is the most recent version of the Internet Protocol designed to replace IPv4. It provides a vastly larger address space, allowing for a virtually unlimited number of unique IP addresses, which is essential for accommodating the growing number of devices connected to the internet.
To set up IPV6, refer to IPV6.
IGMP snooping is a network optimization technique used in Ethernet switches to manage and control multicast traffic.
To set up IGMP snooping, refer to IGMP Snooping.
Network mode refers to the configuration that determines how a device connects to a network and communicates with other devices.
To set up network mode, refer to Network Mode.
Note: Mudi 7 supports Router, Access Point, and Extender mode. It does not support WDS mode.
Drop-in gateway extends the functionality of your main router, including AdGuard Home, encrypted DNS, and VPN client.
To set up drop-in gateway, refer to these links:
Network acceleration can reduce CPU load and speeds up traffic packet forwarding.
To set up network acceleration, refer to Network Acceleration.
Flow Control
Parental Control is designed to help you manage and control your children's devices. It includes limiting their screen time and restricting their access to certain content.
To set up parental control, refer to Parental Control.
Security
Port forwarding allows remote servers and devices on the internet to access devices on a private network.
To set up port forwarding, refer to Port Forwarding.
The Management Control allows you to configure various security settings to protect your network and router from unauthorized access. This page includes the following options:
- Local Access Control: Manage and restrict access to the router's interface from devices connected to your local network.
- Remote Access Control: Configure and restrict access to the router's interface from remote locations over the internet, enhancing security against external threats.
- Open Ports on Router: Control which ports are open on the router, limiting potential vulnerabilities and unauthorized access.
These settings help you maintain a secure network environment, safeguarding both your router and connected devices.
Please refer to Security for detailed instructions.
The NAT Mode page allows you to enable or disable Full Cone NAT and SIP ALG functionality.
To set up NAT settings, refer to NAT Mode.
Applications
A plug-in is a software component that adds specific features or functionalities to an existing computer program, allowing for customization and enhancement of its capabilities.
To set up plug-ins, refer to Plug-ins.
Dynamic DNS (DDNS) automatically detects and updates the IP address associated with a domain in real-time. It is most useful for users who need a static IP address for accessing a remote network.
To set up Dynamic DNS, refer to Dynamic DNS.
Network storage refers to a centralized data storage solution that allows multiple users and devices to access and share files over a network.
To set up network storage, refer to Network Storage.
AdGuard Home is a network-wide ad and tracker blocking solution that acts as a DNS server to filter unwanted content across all devices connected to a home network.
To set up AdGuard Home, refer to AdGuard Home.
ZeroTier is a software-defined networking solution that enables users to create secure, virtual networks over the internet, connecting devices as if they were on the same local network.
To set up ZeroTier, refer to ZeroTier.
Tailscale is a VPN service that allows you to access your devices and applications anywhere.
To set up Tailscale, refer to Tailscale.
Tor, short for The Onion Router, is a privacy-focused network that enables anonymous communication over the internet. It routes internet traffic through a series of volunteer-operated servers (nodes) to obscure the user's location and usage, making it difficult to trace online activities.
To set up Tor, refer to Tor.
System
The Overview page provides a comprehensive snapshot of your router's current status and performance metrics. On this page, you can view:
- CPU Average Load: Monitor the average load on your router's CPU, helping to assess performance and identify potential bottlenecks.
- Memory Usage: Check how much of your router's memory is in use, aiding in the management of resources.
- LED Control: Toggle the router's LED lights on or off, allowing for customization of the device's visual indicators.
- Flash Usage: View the utilization of the router's flash storage, ensuring there's sufficient space for firmware and configuration data.
- Device Info: Access detailed information about your router's system, including uptime, hostname, model, architecture, OpenWrt version, kernel version, device ID, device MAC and device S/N.
- External Storage: Check the status of any external storage devices connected to the router, such as USB drives or TF cards.
These features provide essential insights and controls, helping you to effectively manage and monitor your router's operation.
Please refer to Overview for detailed instructions.
The Admin Password page allows you to set or change the password for the router's administrative interface.
The admin password must meet the following requirements:
- Minimum 10 characters and maximum 63 characters.
- Letters (case senstive), numbers and symbols
! @ # $ % ^ & * ( ) _ + - = , . > < | ? / \ [ ] { } : ; " ' ` ~are allowed. - At least two of uppercase letters, lowercase letters, numbers, and symbols are required.
The Upgrade page is used to update your router's firmware to the latest version, ensuring enhanced performance, security, and new features. This page offers two options for upgrading:
- Firmware Online Upgrade: Automatically check for and install the latest firmware version directly from the manufacturer's server, simplifying the update process.
- Firmware Local Upgrade: Manually upload a firmware file from your computer to update the router, providing control over the upgrade version and timing.
These options allow you to keep your router up-to-date with the latest improvements and fixes.
Please refer to Upgrade for detailed instructions.
The Scheduled Tasks page allows you to configure your router to reboot automatically at specified intervals, helping to maintain optimal performance and stability.
Please refer to Scheduled Tasks for detailed instructions.
Note: Mudi 7 does not support LED display schedule and Wi-Fi status schedule.
The Display Management page lets you manage the touchscreen display and its related settings.
- Wallpaper: Customize the wallpaper and wake display style.
- Brightness: Adjust the touchscreen brightness. Use the slider or enter a percentage to fit different lighting conditions.
- Personalised Signature: Add a custom text to the touchscreen to show your unique style or for quick identification.
- Auto Lock: Set the time delay for the screen to auto-lock when there is no activity. The range is 15 seconds to 5 minutes.
- Passcode: Set a passcode for the touchscreen for an extra layer of security.
Please refer to Display Management for detailed instructions.
The USB & Power page allows you to configure USB-related settings and power management for your router, such as USB protocol, power direction, idle timeouts, and standby behavior.
Please refer to USB & Power for detailed instructions.
The Time Zone page allows you to set the correct time zone for your router, ensuring that all scheduled tasks, logs, and system events are accurately timestamped according to your local time. This setting is crucial for maintaining precise records and for the proper execution of time-based configurations.
Please refer to Time Zone for detailed instructions.
The Reset Firmware page allows you to reset your router's current firmware version to its default settings, erasing all custom configurations. This process will restore the router to the default settings of the currently installed firmware version. This can be useful for troubleshooting persistent issues or starting fresh with the current firmware's default configuration.
Please refer to Reset Firmware for detailed instructions.
The Log page provides access to various logs that record the router's activities and events, aiding in troubleshooting and performance monitoring. This page includes:
- System Log: Detailed logs of system-level events and activities.
- Kernel Log: Logs related to the kernel's operations and events.
- Crash Log: Records of system crashes and errors, useful for diagnosing critical issues.
- Cloud Log: Logs of interactions and activities related to GoodCloud services integrated with the router.
- Nginx Log: Logs from the Nginx web server, if used by the router, detailing web traffic and server operations.
Additionally, the page features an Export Log button, allowing you to export all collected logs for technical support analysis. This function is invaluable for diagnosing complex issues and obtaining professional assistance.
Please refer to Log for detailed instructions.
The Advanced Settings page provides access to advanced configuration options through the OpenWrt LuCI interface, allowing experienced users to fine-tune their router's settings and functionalities beyond the basic interface options. This includes detailed network configurations, firewall settings, and other advanced system customizations.
Please refer to Advanced Settings for detailed instructions.