AWS Configuration Guide
Introduction
In addition to our standard firmware, we have released a dedicated firmware for AWS IoT to meet the needs of our users. The AWS IoT firmware is built upon the standard firmware and only differs in the cloud platform used for reporting data, all other functions remain unchanged.
Preparation
Determining the Firmware Type
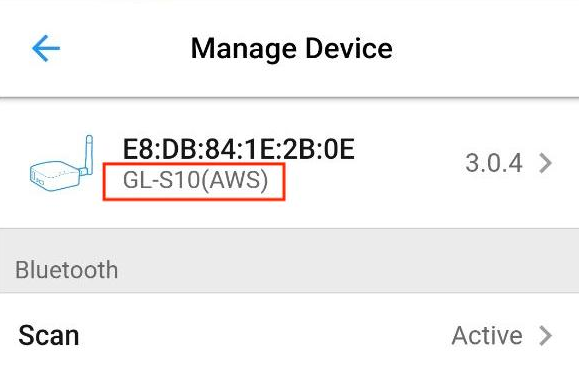
To identify if your GL-S10 is running the AWS IoT firmware, navigate to the Manage Device page of the GL-S10 Tool App. If the model has AWS at the end, it indicates that the device is using the AWS IoT firmware.
Device Network Configuration
When the GL-S10 is configured with both Wi-Fi and an Ethernet cable, it will prioritize the wired connection by default. If you need to connect wirelessly, remove the Ethernet cable first.
-
Ethernet Networking
Connect the device directly to the WAN port of the GL-S10 using an Ethernet cable. Wait until the network indicator light is on, indicating that the device is connected to the network.

-
WiFi Networking
Open the GL-S10 Tool App, locate the WiFi option, and click on it.

On the Connect Wi-Fi page, select the desired Wi-Fi network from the list. If no networks are listed, click "Scan Wi-Fi" to search for nearby networks again.

After configuring the network, restart the GL-S10. If the network indicator blinks, the device is successfully connected to the network.
OTA Upgrade to AWS IoT Dedicated Firmware
If your device is not running the AWS IoT dedicated firmware, you will need to upgrade to the AWS IoT dedicated version.
Note
Before starting the OTA upgrade, ensure that the device is connected to the network. If not, please follow the device network configuration section to connect the device.
Once the device is online, open the GL-S10 app, navigate to the main page, locate the "Upgrade OTA" option, and click on it.

On the Upgrade OTA page, click "aws" and then "Upgrade OTA".

After pressing "Upgrade OTA", the app will enter a waiting state and exit the page once the upgrade is complete. During the OTA process, the GL-S10's indicator light will blink sequentially like a flow light until the upgrade finishes.

AWS IoT Core Cloud Platform Configuration
Before configuring, ensure that your account has access to AWS IoT Core services. Refer to the AWS Official Documentation for more information.
-
Log into the AWS Management Console and search for IoT Core

-
Manage -> All devices -> Things, and click "Create things"

-
Select "Create single thing" and click "Next" button.

-
Enter a name for the thing and click "Next"

-
Select "Auto-generate a new certificate" (or use "Use my certificate" if you already have one) and click "Next"!

-
Click "Create policy"

-
Enter a policy name and click "JSON"

-
Add the following fields to the Policy document
{
  "Version": "2012-10-17",
  "Statement": [
    {
      "Effect": "Allow",
      "Action": [
        "iot:Publish",
        "iot:Receive",
        "iot:RetainPublish"
      ],
      "Resource": [
        "arn:aws:iot:ap-southeast-1:123456789012:topic/GL-IoT/dataTopic/E8DB841E2B0E"
      ]
    },
    {
      "Effect": "Allow",
      "Action": "iot:Subscribe",
      "Resource": [
        "arn:aws:iot:ap-southeast-1:123456789012:topicfilter/GL-IoT/dataTopic/E8DB841E2B0E"
      ]
    },
    {
      "Effect": "Allow",
      "Action": "iot:Connect",
      "Resource": [
        "arn:aws:iot:ap-southeast-1:123456789012:client/E8DB841E2B0E"
      ]
    }
  ]
}
Note
In the resource ARN
"arn:aws:iot:ap-southeast-1:123456789012:client/E8DB841E2B0E", the field afterclient/is the client ID of the end device. Only MQTT clients configured with this client ID can connect. Replace"123456789012"with your AWS account ID. -
Click "Create"

-
Return to the "Attach policies to certificate" page, select the policy you just created, and click "Create thing"

-
In the pop-up window, click to download the device certificate, public key file, private key file, and root CA certificate (RSA 2048)

The relevant certificates must be securely stored and used by end devices when connecting to AWS.
-
You can view the information about the newly created thing on the Things page

Updating Security Certificates on the GL-S10
Note
Before starting, ensure that the device is connected to the network. If not, please connect the device according to the "Device Network Configuration" section.
Open the GL-S10 Tool App, locate the "MQTT Server" option, and click on it.

On the MQTT Configuration page, click "Update Certificate".

On the Update MQTT Configuration page, enter the URL http://134.175.4.252/s10/cert/mqtt_aws/ and click "Done" to begin updating the certificate.
Note
This URL points to the matching certificate for our demo. If you have your own certificates, please name the three files as follows: ca.crt (root certificate), client.crt (client certificate), and client.key (client private key). After renaming, place these files in a folder on your HTTP server. In this example, I used a folder named mqtt_aws.
The app will return to the MQTT Configuration page after the update.
Configuring MQTT Settings on the GL-S10
First, obtain your MQTT server address as shown below:

Set the host and port, then click "Done".

Viewing Data Reported by the GL-S10 on the AWS IoT Core Platform
First, use the app to check the topic for reporting data. Remember that the device is currently reporting to the topic GL-IoT/dataTopic/E8DB841E2B0E.

On the AWS IoT page, click Test -> MQTT test client -> Subscribe to a topic -> Enter GL-IoT/dataTopic/E8DB841E2B0E and click "Subscribe".

After subscribing, select the subscribed topic, and you will see the data reported by the GL-S10.

Still have questions? Visit our Community Forum.