How to set up OpenVPN server on GL.iNet routers
This tutorial will show you how to set up an OpenVPN server on GL.iNet routers. A VPN server allows you to establish a secure connection to your home or office network remotely. With a GL.iNet router, you can set up an OpenVPN server in a few minutes.
Before you start, make sure you meet the following requirements
Public IP address
Setting up an OpenVPN server requires a public IP address. To check if you have one, refer to this link.
Port forwarding
If your GL.iNet router is connected behind a primary router, set up port forwarding on the primary router.
1. Log in to your router
Open a web browser and access the router's web admin panel (default IP: 192.168.8.1). Log in with your admin password.

2. Enable Dynamic DNS (Optional)
Setting up an OpenVPN server typically requires a static public IP address, which provides a fixed endpoint for other devices to access your VPN server.
However, if you do not have a static public IP address, e.g., a dynamic one instead, you may need to enable Dynamic DNS (DDNS) on your GL.iNet router. This allows persistent connectivity to the OpenVPN server even when your public IP address changes dynamically.
Follow the steps below to enable Dynamic DNS.
- In the router's web admin panel, go to APPLICATIONS > Dynamic DNS.

- Toggle on Enable DDNS, read and agree to the Terms of Service & Privacy Policy, then click Apply.

3. Download configuration file
- In the router's web admin panel, go to VPN > OpenVPN Server.
- Click Generate Configuration.
- Keep the default settings as-is, then click Export Client Configuration.

- In the pop-up window, toggle the switch Use DDNS Domain to on if you have set up Dynamic DNS previously.
- Click Download, then save the file.
- At the top of OpenVPN Server page, click Start.

(Optional) To access the local network of the VPN server, enable these settings:
For firmware v4.7 and earlier:
- In the left sidebar, click VPN > VPN Dashboard.
- Click the Options icon.
- Toggle the switch to on for Remote Access LAN.
-
Click Apply.

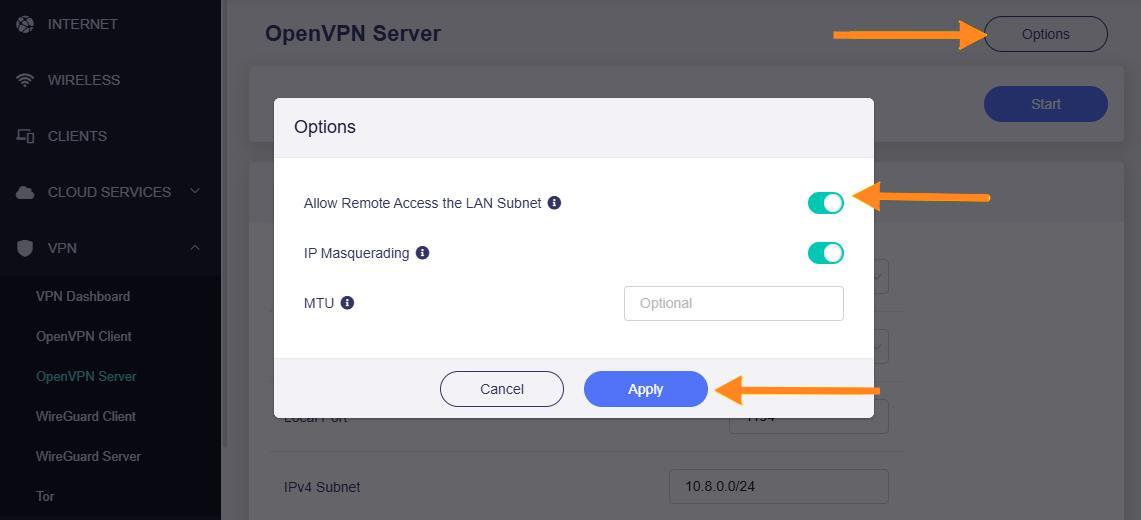
For firmware v4.8 and higher:
- In the left sidebar, click VPN > OpenVPN Server.
- Click Options in the upper right.
- Toggle the switch to on for Allow Remote Access the LAN Subnet.
-
Click Apply.
4. Connect to OpenVPN server
To connect to the OpenVPN server, you will need an OpenVPN client. You can set it up by using one of these methods below:
Method 1: A third-party OpenVPN client app (Use this method if you don't have an additional router that supports setting up an OpenVPN client)
In this tutorial, we will use the OpenVPN Connect app, the official app developed by OpenVPN Inc, as an example.
- On another device, connect to a different Wi-Fi network (or connect to cellular if you are using a mobile device.)
- Send the configuration file you downloaded earlier (e.g., by email) to the device, then download the file to it.
- Download OpenVPN Connect for your device operating system:
- In the app, read the terms and conditions, then select Agree.
- Select Upload File.

- Select Browse, then select the configuration file you downloaded previously.
- Select OK.

- Select Connect > OK > Allow.
You will see the word "Connected" at the top of the VPN profile.

Method 2: A router that supports setting up an OpenVPN client
You can use any routers that support setting up the OpenVPN client manual configuration. In this tutorial, we will use GL.iNet's travel router Beryl AX (GL-MT3000) as an example.
- On another device, connect to a different Wi-Fi network (or connect to cellular if you are using a mobile device.).
- In a web browser's address, enter the URL to your router admin panel (e.g., 192.168.8.1).
- Enter your password, then click Login.
- In the left sidebar, click VPN > OpenVPN Client.

- Click Add Manually.

- Enter a name in the field, then click the check icon.
- Upload the configuration file you downloaded earlier.

- Click Apply.
- Click the three-dot icon, then click Start.
- Connect a device to the router running the OpenVPN client.
5. Verify VPN connection
Open a web browser and search for your IP address and location. If they match the VPN server's IP (instead of your Internet service provider's IP) and location, the VPN connection is successful.
Still have questions? Visit our Community Forum or Contact us.