EasyTether
Easytether project is not updating and this function is not offically supported by GL.iNet.
The following docs is only for your reference.
This article is about how to tether your phone to your router by using EasyTether.
Intro
There is several reasons you need to share your smartphone's data to your router:
- Carriers give you a plan with plenty of data but actually you don't need that much.
- 4G speed is quite fast and it beats your home Internet speed. You can use the data for your laptop.
- Using your phone as a hotspot directly is easy, but you cannot connect too many devices.
It is very easy to share your data to GL.iNet mini router using router's control interfaces, but in some phone and carrier network, they limit sharing data directly, so you can try EasyTether.
We will use Android OS and GL.iNet mini router to demonstrate the procedure.
Stuff you need
Equipment
-
Samsung Galaxy S6 with Android OS
-
GL-AR150 mini router (Other models are also OK)
-
4G SIM card
Software
-
WinSCP (https://winscp.net/eng/download.php)

-
PuTTY (https://www.chiark.greenend.org.uk/~sgtatham/putty/latest.html)

-
EasyTether driver openssl (http://www.mobile-stream.com/easytether/drivers.html)
For firmware v3.201 and newer please use OpenWrt 19.07

For firmware v3.105 and earlier please use OpenWrt 18.06

-
EasyTether Android App (Search in Google Play Store)
Procedure
Preparing your router
1) Set up the router
Enter 192.168.8.1 in your browser and get into the router web interface. Set the password which will be used for OpenWRT later. Next, update your router to the latest firmware.
2) Transfer IPK driver package to the router
i. Find out the chip of your model (for example Atheros 9531, MediaTek MT7620N, etc) from the website. It is because you have to choose the IPK driver package in the EasyTether driver file base on the chip of your router. (For GL router, you can find the information on our website: www.gl-inet.com, and we will also indicate the position of the IPK driver file for our mini router in section iv.):

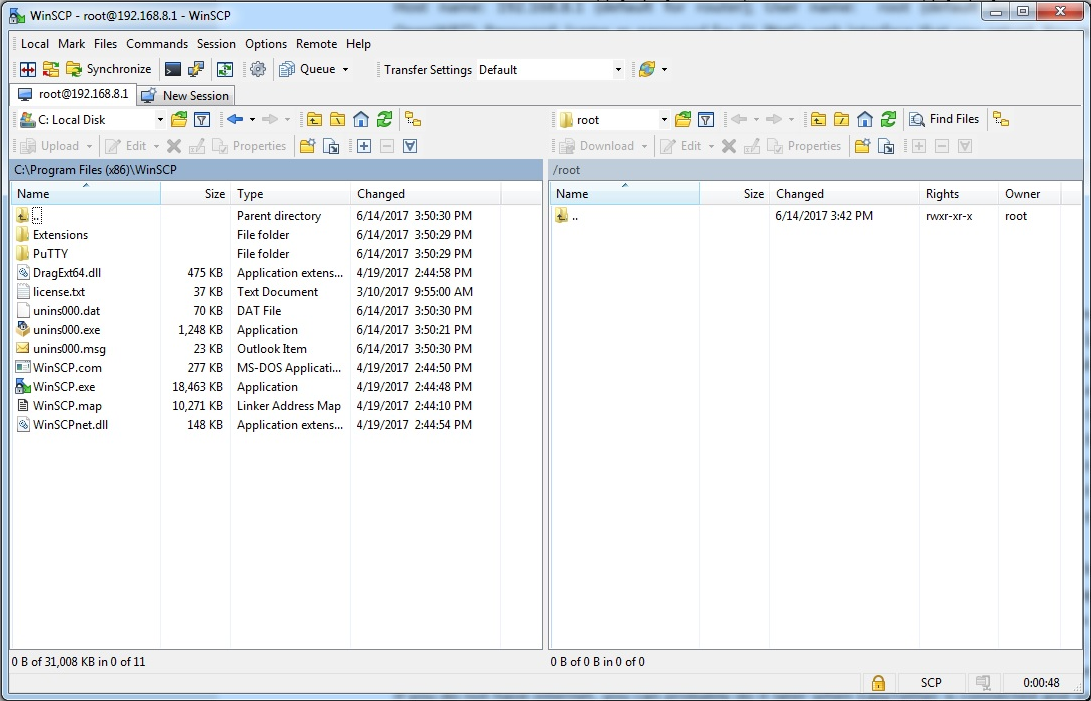
ii. Extract the EasyTether driver file. Open WinSCP, choose SCP as the file protocol and enter the information as the figure shown below:

You can see the following screen once your connection has been established (left-hand side: Your PC, right-hand side: Your router):
iii. Go to the main folder by clicking this button.

You will see the directory tree of the router:

iv. On the left-hand side (Your PC), find the IPK file of your router in EasyTether driver file you have extracted before. On the right-hand side (Your router), open the tmp folder. Lastly, right click the IPK file and choose upload:
Note: For Atheros chip, choose 15.05.1\ar71xx\generic. For MediaTeck, choose 15.05.1\ramips\mt7620. For other chips, please find the similar file name. MT300N & MT300A: \15.05.1\ramips\mt7620\ easytether-usb-openssl_0.8.7-1_ramips_24kec.ipk AR150 & AR300M: \15.05.1\ar71xx\generic\easytether-usb-openssl_0.8.7-1_ar71xx.ipk

3) Use SSH to install EasyTether driver
i. Open PuTTY, enter the IP of your router and other information as the figure shown below, then click Open:

ii. Login by using your username and password of the router (username: root; password: same as the one you need for entering the web interface):
Note: The password you entered will not be showed on the screen.

iii. You can now update the OpenWRT modules (internet connection required) by typing:
opkg update
Hit enter and then it will update automatically.
Note: You can skip the update and do it after you have finished tethering.
iv. Install the driver by typing the following command and then hit enter:
opkg install /tmp/filename.ipk
Note: The filename is the file you uploaded in Procedure A)2.ii.
v. Type in the following command and hit enter:
easytether-usb
vi. Copy the following command to Putty:
cat << EOF >> /etc/config/network

config interface 'wan'
option ifname 'tap-easytether'
option proto 'dhcp'
EOF
Note: To paste it into Putty, just right click the black screen and then hit enter.
vii. Type in the following command to reboot your router or unplug the power cable of your router. Afterward, plug in the power cable to turn on the router.
reboot -f
Preparing your smart phone
1) Enable the Developer Options
i. Go to Setting -> About Device -> Software info. Hitting the build number several times and it will announce that you have turn on the Developer Options.

ii. Go to Setting -> Developer Options, turn on the Developer Options and also the USB debugging.

2) Start tethering
i. Open EasyTether App, tick the USB button, it will show “waiting for connection from the host”.

ii. Connect your phone to the router via USB cable. Hit OK to allow the USB debugging.

iii. Your connection has been established.

You can now connect your device to the router and access the Internet. However, if you are using the lite version of EasyTether app, you will not able to access the website with https like: https://www.youtube.com since this type of secure communication is being blocked by the lite version.
Advanced Configuration
If you are using your WAN ethernet port to connect to the internet, it may be tedious to ssh into your router when you want to switch between EasyTether and ethernet. This section will show you how to set your router up so you can use either one without needing to ssh into the router and reconfigure the interfaces.
i. Create the EasyTether interface
SSH into your router with Putty and run the the following command:
cat << EOF >> /etc/config/network

config interface 'easytether'
        option proto 'dhcp'
        option metric '30'
        option ifname 'tap-easytether'
EOF
ii. Add the EasyTether interface to the firewall.
SSH into your router with Putty and run the the following command:
vi /etc/config/firewall
Press i to change edit mode to insert.
You wil see several entries starting with config zone. Find the one with option name 'wan'.
Add easytether to the end of option network. (See example below)
Press Esc, then type :wq.
Example:
config zone
        option name 'wan'
        option input 'REJECT'
        option output 'ACCEPT'
        option forward 'REJECT'
        option masq '1'
        option mtu_fix '1'
        option network 'wan wan6 wwan easytether'
Enabling auto-connect
This will enable the router to automatically estabilish an easytether connection.
i. SSH into your router with Putty and run the the following commands:
cat << EOF >> /etc/config/easytether

while true
do
        if (ip a s tap-easytether up); then
        else
                easytether-usb
        fi
sleep 1
done
EOF
cat << EOF >> /etc/crontabs/root

@reboot sh /etc/config/easytether
EOF
Interface priority
It can be useful to use EasyTether as a fallback connection in the event your main source of internet goes down. This section shows you how to set interface priorities.
i. SSH into your router with Putty and run the the following commands:
vi /etc/config/network
Edit the option metric value to your desired results for each interface. The lower the number, the higher the priority.
The recommended settings are as follows:
option metric 10 wan (Ethernet)
option metric 20 wwan (Wi-Fi Repeater)
option metric 30 easytether (EasyTether)