Network Storage
Contents
- Introduction
- Supported models
- Insert storage device
- Set up Samba
- Set up WebDAV
- Set up DLNA
- Samba Client
- WebDAV Client
Introduction
Network storage enables wireless file sharing across devices by connecting a USB drive or SD card to your router. The router converts the storage device into a shared network drive, accessible to all Wi-Fi-connected devices.
Some GL.iNet models have MicroSD(TF) card slots, while some models have USB ports, supporting USB flash drives and portable external hard drives. You can configure Samba, WebDAV, DLNA for these storage devices, which support common formats such as NTFS, FAT32, and EXT4.
Note
-
The power consumption of a USB hard drive is quite high. Use it with an external power supply, otherwise it may cause malfunction.
-
Some models have a USB port or MicroSD slot but have limited storage space and do not support network storage.
-
The web Admin Panel only allows you to manage shared folders. To manage files on your storage device, please use the mobile app.
Supported Models
Usually, models with USB ports or MicroSD(TF) slots support network storage (i.e. file sharing).
For devices with flash storage of 32MB or less, the Network Storage function is not yet supported.
| Router Model | Samba | Webdav | DLNA | USB Port | MicroSD Card |
|---|---|---|---|---|---|
| GL-E5800 (Mudi 7) | √ | √ | √ | √ | - |
| GL-MT5000 (Brume 3) | √ | √ | √ | √ | - |
| GL-BE3600 (Slate 7) | √ | √ | √ | √ | - |
| GL-X2000 (Spitz Plus) | √ | √ | √ | √ | - |
| GL-MT6000 (Flint 2) | √ | √ | √ | √ | - |
| GL-XE3000 (Puli AX) | √ | √ | √ | √ | √ |
| GL-X3000 (Spitz AX) | √ | √ | √ | √ | √ |
| GL-MT3000 (Beryl AX) | √ | √ | √ | √ | - |
| GL-MT2500/GL-MT2500A (Brume 2) | √ | √ | √ | √ | - |
| GL-AXT1800 (Slate AX) | √ | √ | √ | √ | √ |
| GL-AX1800 (Flint) | √ | √ | √ | √ | - |
| GL-A1300 (Slate Plus) | √ | √ | √ | √ | - |
| GL-S1300 (Convexa-S) | √ | √ | √ | √ | - |
| GL-SFT1200 (Opal)*FW 4.7.2 | √ | - | - | √ | - |
| GL-E750V2 (Mudi V2)*FW 4.7.2 | √ | - | - | √ | √ |
| GL-AR750S-EXT (Slate)*FW 4.7.2 | √ | - | - | √ | √ |
Insert Storage Device
For TF card, you need to power off the router first, insert the TF card and then power on the router.
For USB Drive, you can directly plug it into the USB port. For portable external hard drive, if you have a separate power supply, please connect it to the power supply.
Log in to the router's web Admin Panel and go to APPLICATIONS -> Network Storage.

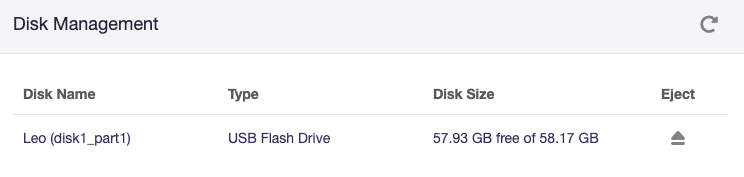
Connect the storage device. When it is detected, the page is displayed as below.
Set Up Samba
-
Toggle on Enable Samba and click Apply.
- Allow Access Samba from WAN: Enable it if you want the upstream devices to access Samba.

-
Click Quick Setup Share to set the shared link.

-
Add a user and click Next. This step will be skipped if you already have an account.

-
Click the triangle icon to show all folders. Select a folder for sharing, or click the disk name (disk1_part1) if you want to share the whole disk. Then click Next.

-
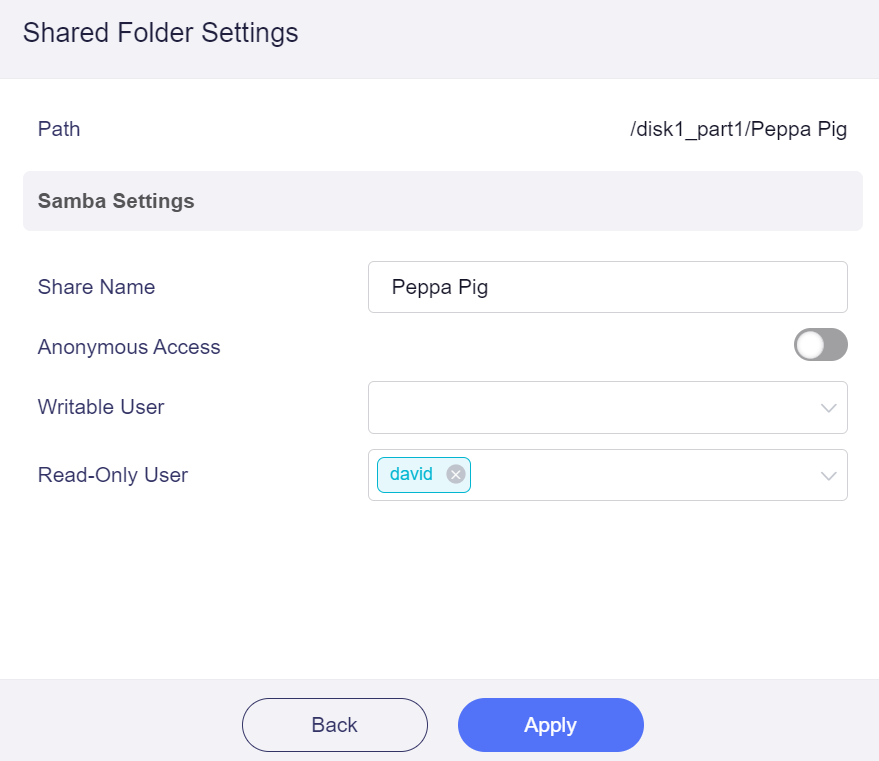
Set up the shared folder.
For security reasons, it is not recommended to enable Anonymous Access.
The user created in the previous step will be added to Read-Only User by default. If you want this user to be able to write or delete files, remove it from Read-Only User and add it to Writable User, and click Apply.
-
Obtain the folder access link.
The page will show the link for Windows and Unix-like OS. The Unix-like system includes Android, iOS, macOS, Ubuntu, etc.
Now you can access your shared folder over Samba service via these links. Click here for details.

Note: If you enable Allow Access Samba from WAN and access the shared folder from upper network, please replace the router IP (default 192.168.8.1) in the access link with your router's WAN IP, which can be found on the INTERNET page of the web admin panel.
Set Up WebDAV
-
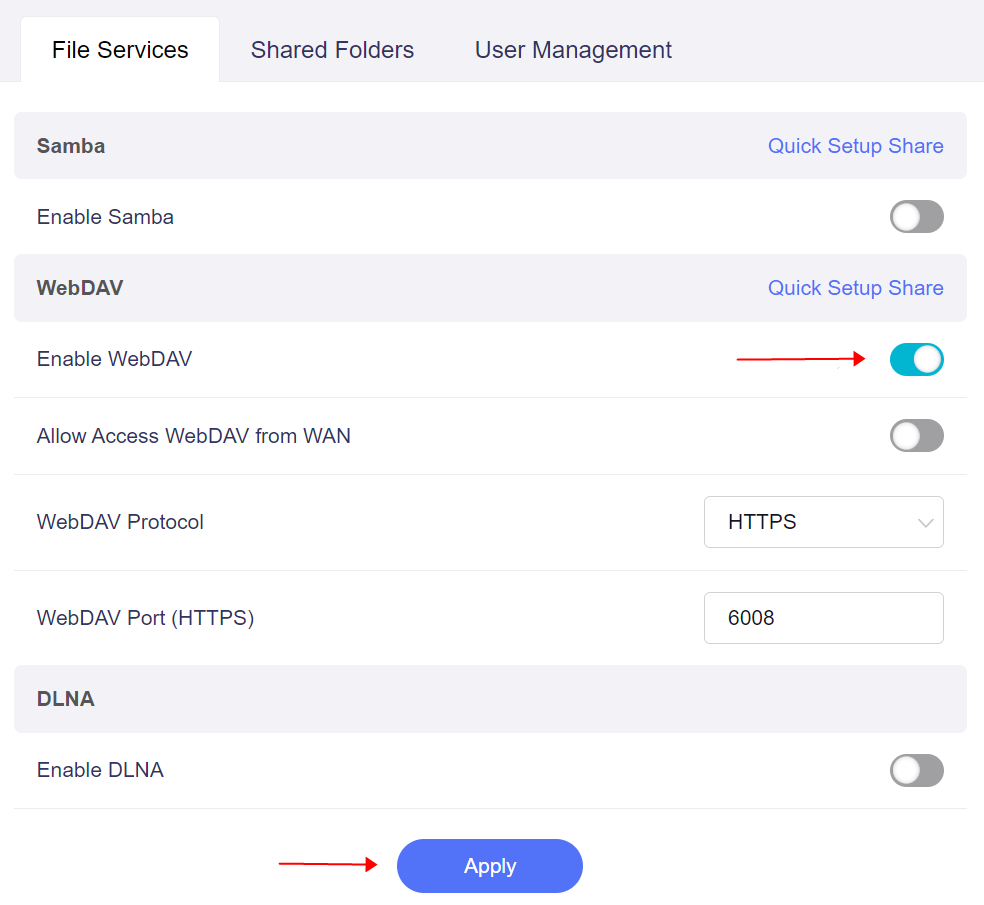
Toggle on Enable WebDAV, and click Apply.
-
Allow Access WebDAV from WAN: Enable it if you want the upstream devices to access WebDAV.
-
WebDAV Protocol: HTTP is not encrypted; use it at your own risk. HTTPS is encrypted and it uses self-signed certificate.
-
WebDAV Port: No need to modify the port number unless there’s a conflict. The recommended port number range is 1024 - 65535.
-
-
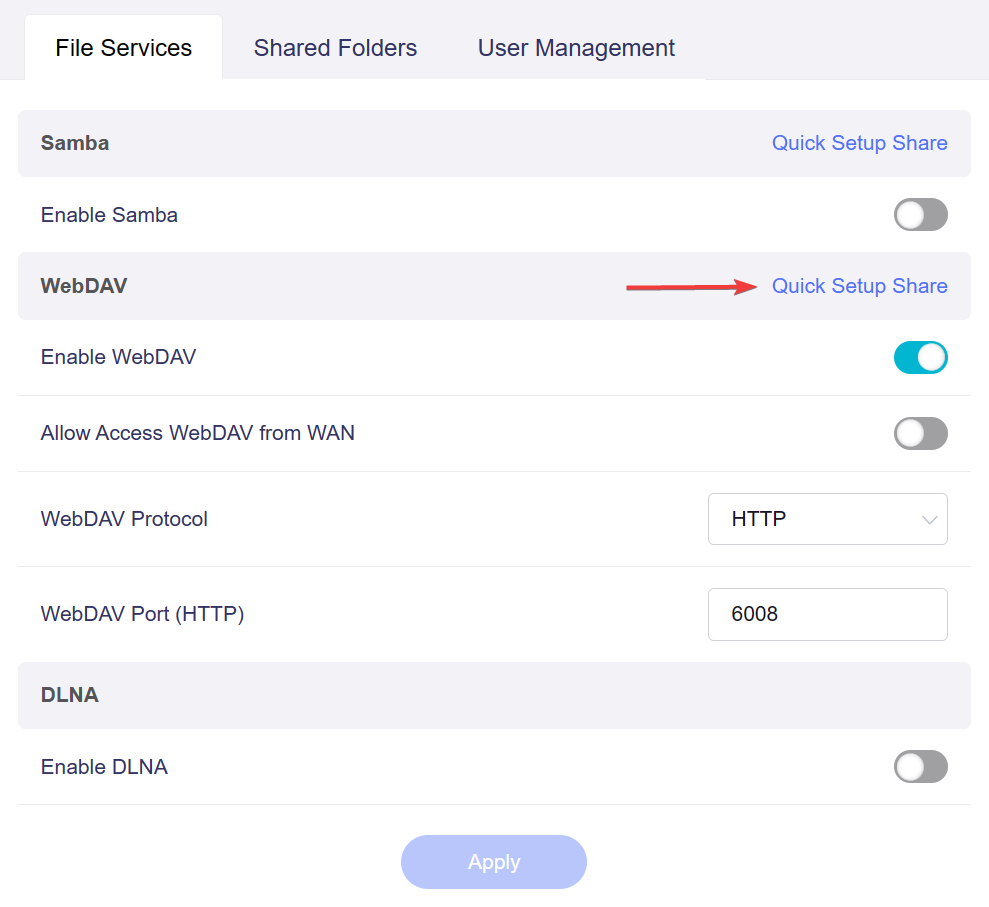
Click Quick Setup Share to set the shared link.
-
Add a user and click Next. This step will be skipped if you already have an account.
-
Click the triangel icon to show all folders. Select a folder for sharing, or click the disk name (disk1_part1) to share the whole disk. Then click Next.
-
Set up the shared folder.
For security reasons, it is not recommended to enable Anonymous Access.
The user created in the previous step will be added to Read-Only User by default. If you want this user to be able to write or delete files, remove it from Read-Only User and add it to Writable User, and click Apply.

-
Obtain folder access link.
The page will show the link for Windows and Unix-like OS. The Unix-like system includes Android, iOS, macOS, Ubuntu, etc.
Now you can access your shared folder over WebDAV service via these links. Click here for details.

Note: If you enabled Allow Access WebDAV from WAN and access the shared folder from upper network, please replace the router IP (default 192.168.8.1) in the access link with your router's WAN IP, which can be found on the INTERNET page of the web admin panel.
Set Up DLNA
Toggle on Enable DLNA, and click Apply.
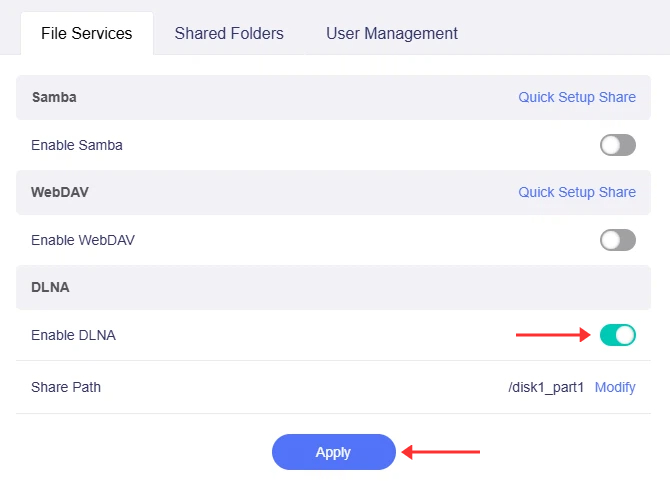
Connect your smart TV to the router, and it will find the DLNA Server.
Samba Client
Here is an example of Windows 11, which also applies to Windows 10.
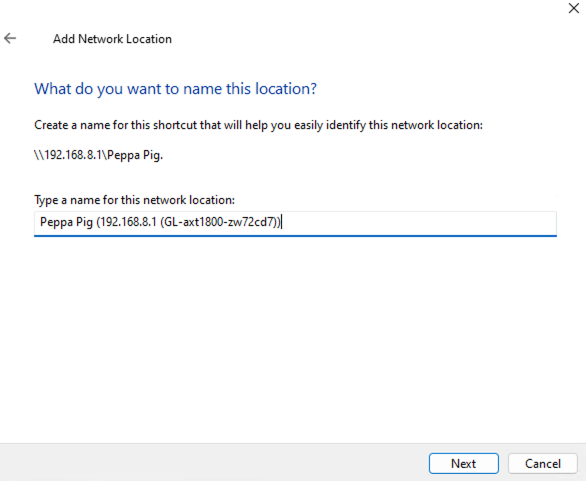
Open up File Explorer and then right-click on This PC (in the left pane). From the resulting context menu, select Show more options -> Add a network location

Click Choose a custom network location and then click Next.

Enter the Samba access link. Then click Next.

Give a name of this location. Click Next.
Click Finish.

If it need username and password, it will ask to enter the credential. Then click OK.

You can access Samba by the Finder.
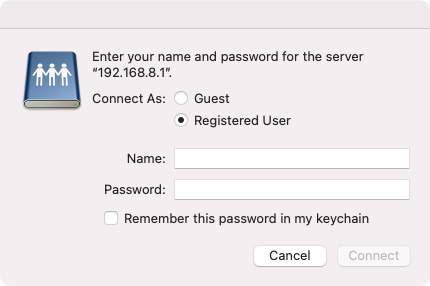
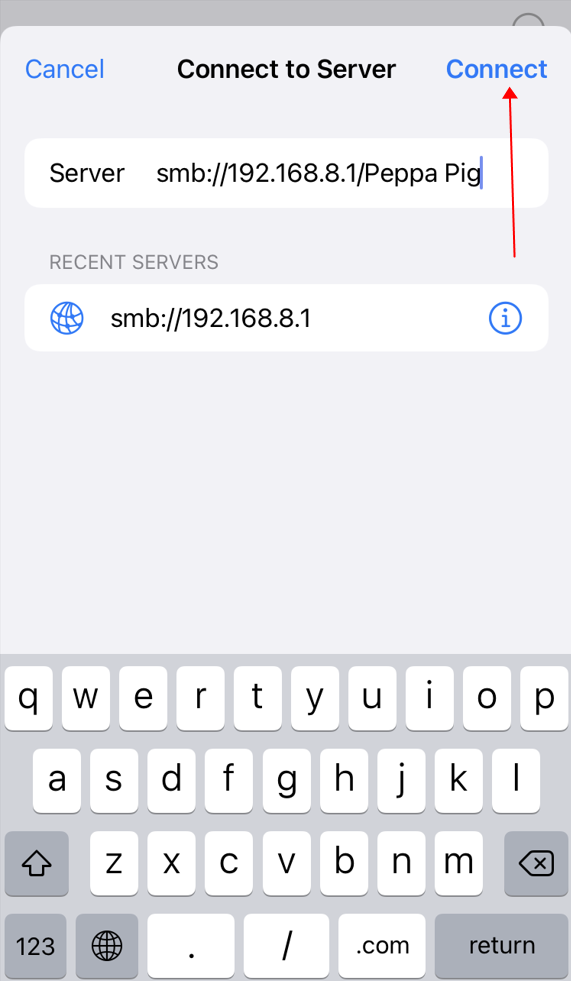
Open up the Finder and click Go -> Connect to Server on the menu. Copy & paste the Samba access link.

It will ask for the username and password, the username is when you setup Shared Folder Settings.
If you set up anonymous access, please choose Guest in the image below.
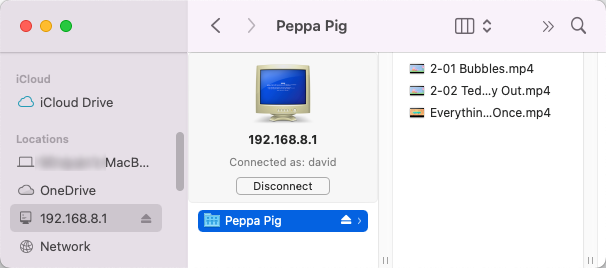
Click Continue, it will show the Samba on the sidebar of Finder.
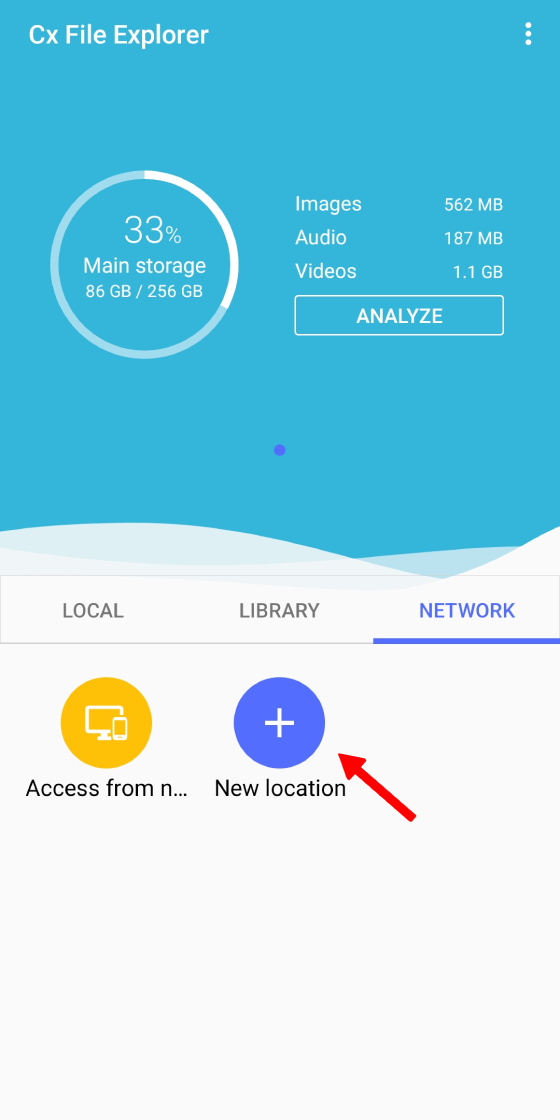
There are many Android apps that support Samba, here is an example of Cx File Explorer.
At the home page, click NETWORK.

Click New Location.
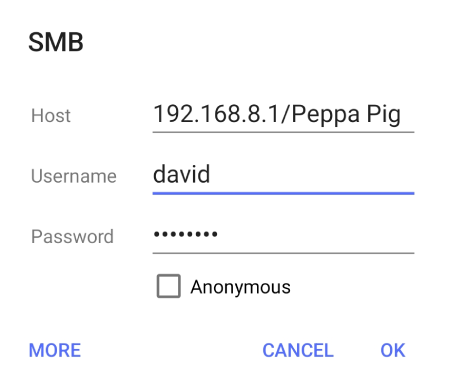
Click SMB.

Input the Host, Username, Password. If is Anonymous Access, please check the Anonymous.
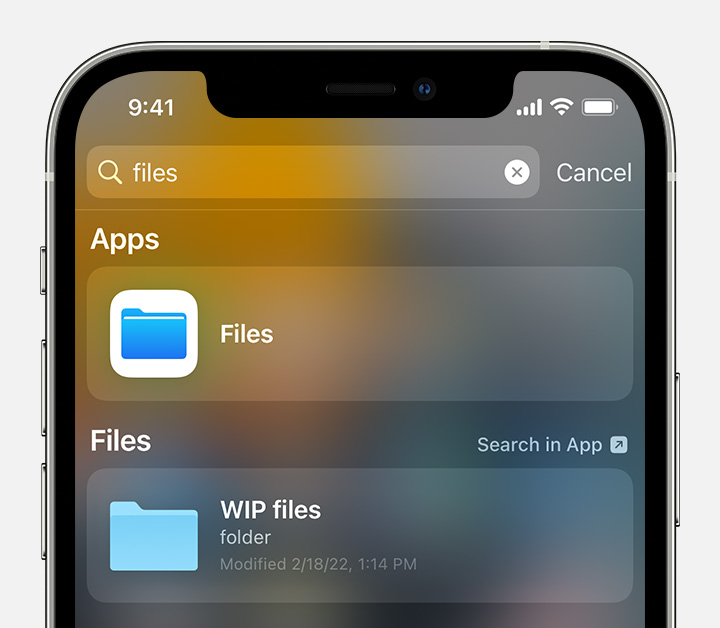
iOS Files app support Samba, or you can use other apps, for example Documents.
The next section describes how to connect to Samba using Files app and Documents app respectively.
-
Guide of connect to Samba server by Files app.
Open the Files app. It's installed by default so you should find it on your home screen. As Files is now a removable app, you might need to reinstall it from the App Store if it doesn't show up.
Make sure you're on the Browse tab at the bottom of the screen. Tap the "…" (three dots) icon in the top-right to display the app's context menu.
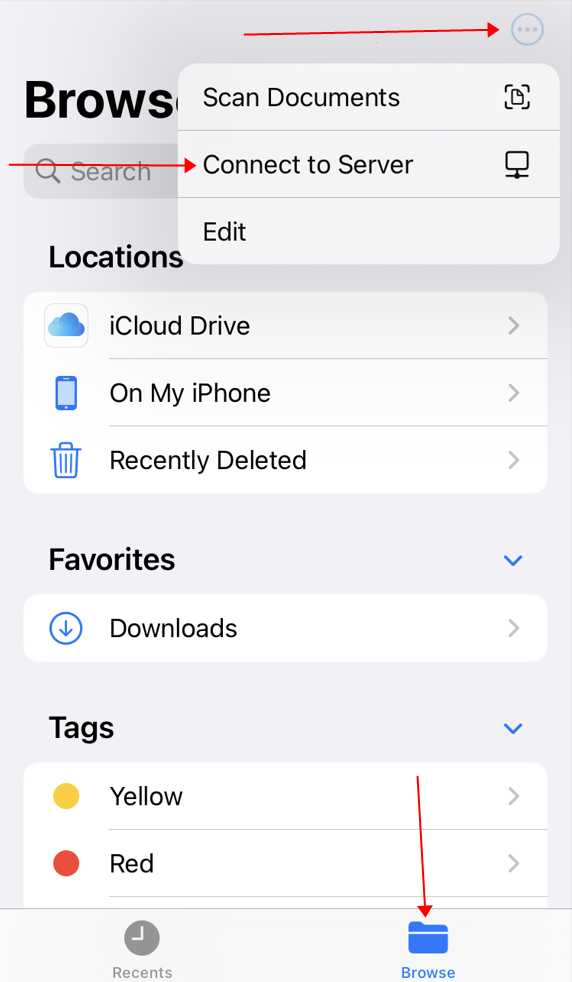
Tap the Connect to Server option near the top of the menu. On the next screen, enter your server's connection url. You can find the url in Shared Link. Tap the Next button in the top-right to continue.
The following screen lets you enter authentication credentials if you'll be connecting to a protected network share. Tap Registered User and fill out the Name and Password fields with your Samba username and password. You can tap "Guest" instead if you enable the Anonymous Access.

Press the Next button in the top-right to complete the connection. Your iOS device should successfully connect to the server and display a list of available shares.

The Samba share will be listed at the bottom of menu, underneath the Shared heading.

-
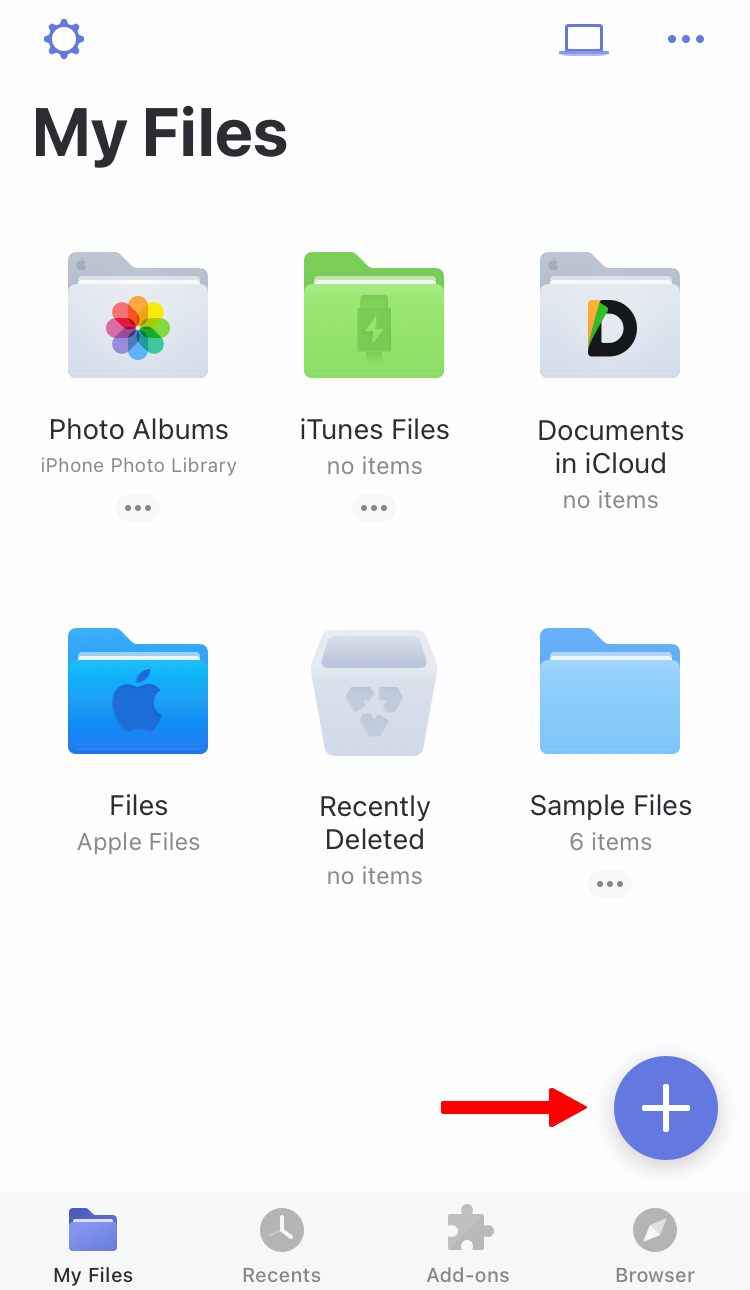
Guide of connect to Samba server by Documents app.
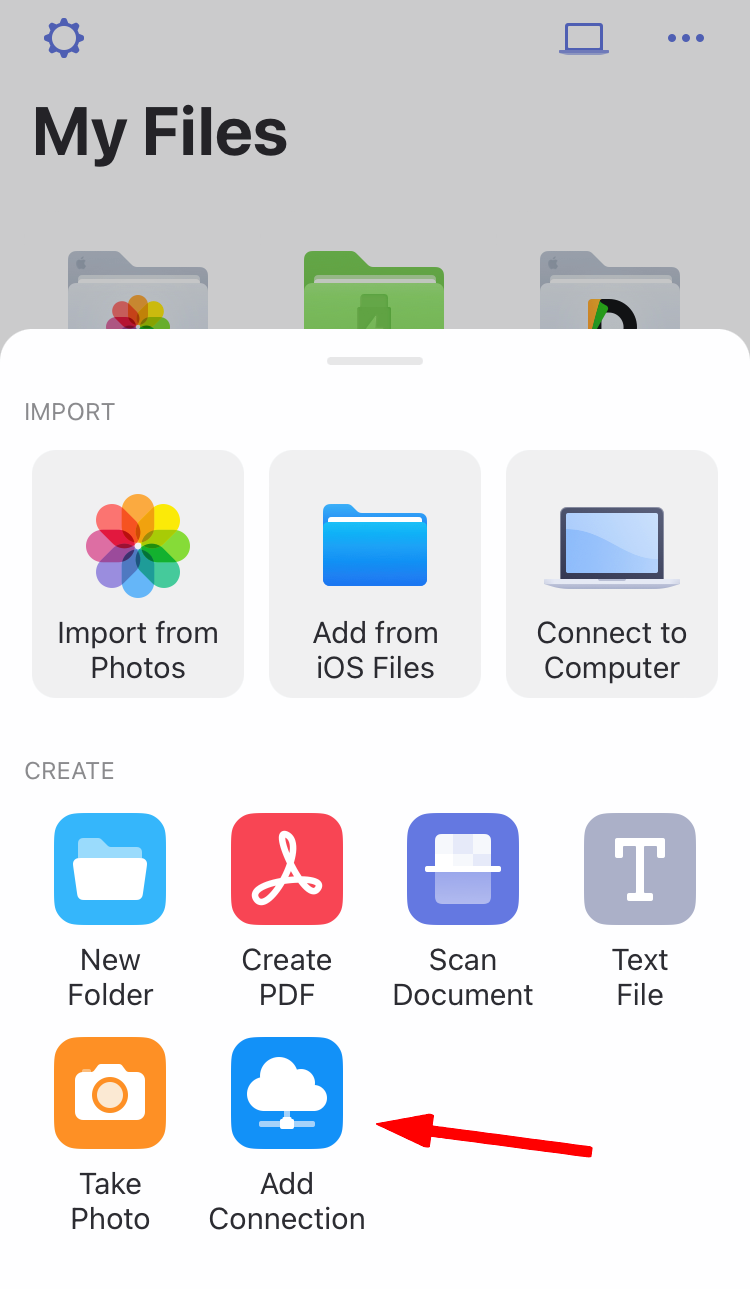
Click the plus button in the lower right corner.
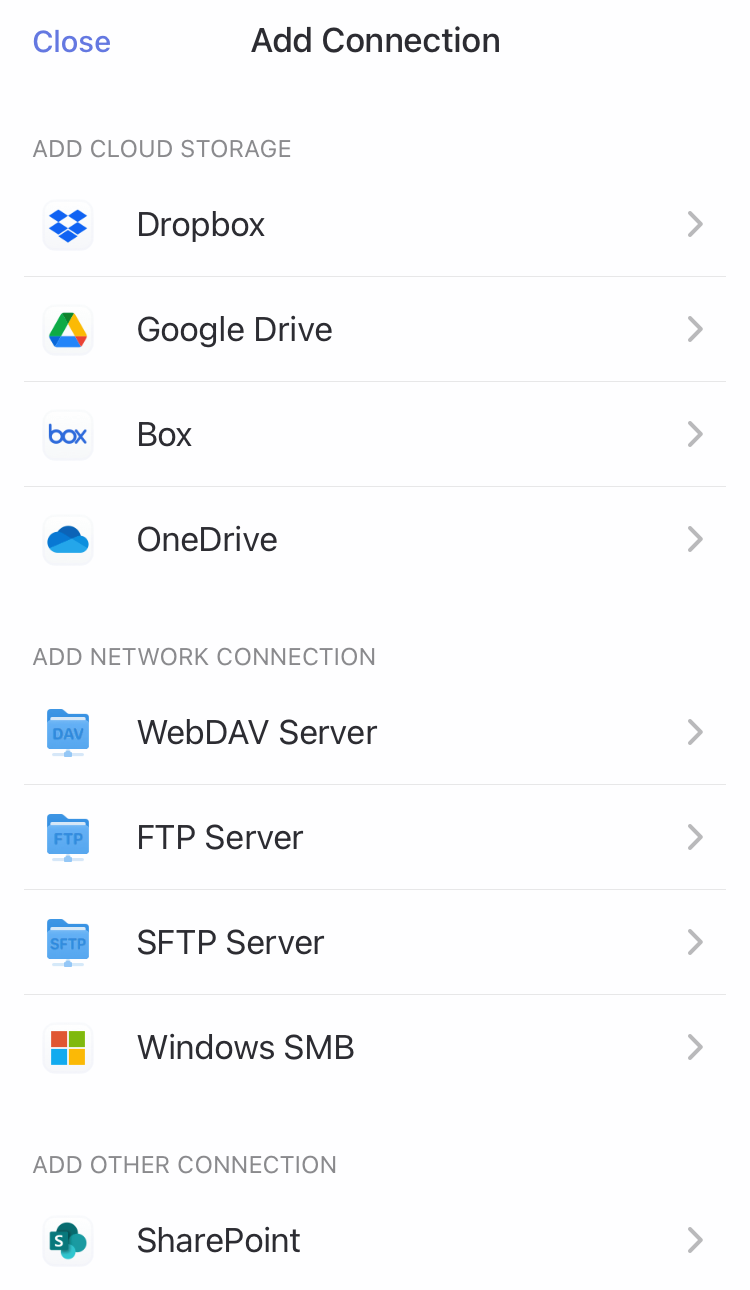
Click Add Connection.
Click Windows SMB.
The Title is for a name of this connection. URL is the access link. Login is the username. If is anonymous access, just leave Login and Password empty.
Click Done button to complete this setup.

WebDAV Client
There is a lot of software that supports WebDAV, for example RaiDrive, Cyberduck, WinSCP.
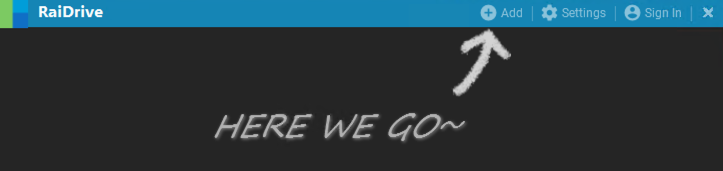
Here is an example of RaiDrive.
Click Add.
In the Storage area, click NAS -> WebDAV.
In the Address area, check/uncheck the checkbox near Address to switch https/http, enter the address.
In the Account area, enter username and password, or check the Anonymous.
Finally, click Connect, it will add a X drive in the File Explorer.

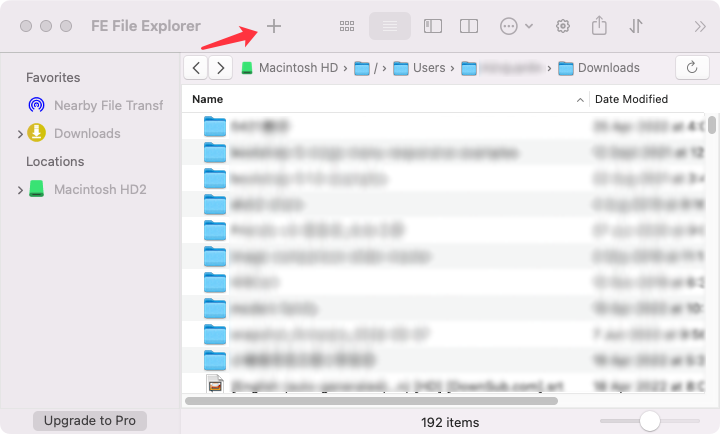
There is a lot of app that supports WebDAV, for example FE File Explorer, Cyberduck.
Here is an example of FE File Explorer.
Click Add button.
Select WebDAV.

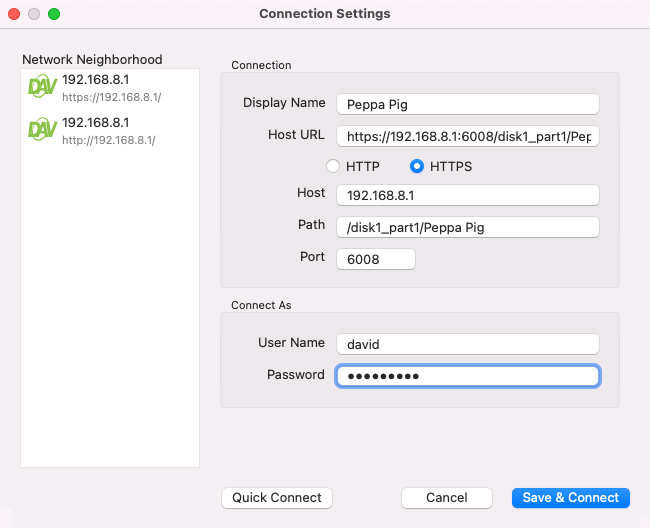
Enter connection settings. If is anonymous access, just leave User Name and Password empty. Then clidk Save & Connect.
It may has a warning says The following secure server (null) uses an untrusted certificate. Trust this server?, that is because it use self signed certificate, please trust it.
There are many iOS apps that support WebDAV, here is an example of Cx File Explorer.
Note: Cx File Explorer doesn't support anonymous access.
At the home page, click NETWORK.
Click New Location.
Click WebDAV.
Input the Host, Port, Username, Password.

There are many iOS apps that support WebDAV, here is an example of Documents.
Click the plus button in the lower right corner.
Click Add Connection.
Click WebDAV Server.
The Title is for a name of this connection. URL is the access link. Login is the username.
Click Done button to complete this setup.

Using Mobile App
The web Admin Panel only allows you to manage shared folders. To manage files on your storage device, please use the mobile app.
-
When accessing the app over the local network, it shows your storage device and its capacity, and supports read/write access.
-
When accessing the app via the cloud, it shows your storage device and its capacity, but does not support read/write access.
Still have questions? Visit our Community Forum or Contact us.