GL.iNet GoodCloud
Contents
- Introduction
- Bind Devices to GoodCloud
- Manage Devices
- Remote Access
- Modify Settings
- Email Alarm
- Site to Site
- GoodCloud and VPN
- View Logs
- Disable Cloud
- Delete Account
Introduction
GL.iNet GoodCloud is a platform designed to simplify the remote deployment and management of connected devices. It provides an easy way to remotely access and manage GL.iNet routers. By centralizing network devices on the cloud, users can efficiently perform batch management tasks, such as deploying network configurations and performing software upgrades. They can also remotely access the router's web admin panel or connect to the router's terminal via SSH, achieving cross-regional and end-to-end network device management.
With GoodCloud, you can:
-
Check the router's real-time status
- Monitor online-offline status
- View real-time RAM usage and load average
- Receive email alerts for online-offline status changes
-
Set up routers remotely
- configure router settings (e.g. SSID and password)
- Remote SSH access
- Remote access to the WebUI
- Share router access with others
-
Monitor connected clients remotely
- View devices connected to your network
- Monitor real-time traffic and block clients
- Receive email alerts for new connections and block events
-
Perform batch operations
- Batch reboot
- Batch firmware upgrade
-
Establish Site-to-Site connectivity
- Virtual Office: Extend your office network to other branch offices
- Business Travel: Remotely access office systems (e.g., OA, CRM, MySQL)
- Smart Home: Remotely access home devices (e.g., IP cameras, NAS)
If you need to manage multiple devices and unlock advanced features like bulk operations, multi-account management, and customized solutions, choose our value-added plans. Click here for details, and feel free to reach out to support@glinet.biz.
Bind Devices to GoodCloud
To connect devices to the cloud platform successfully, please follow the binding procedures corresponding to your firmware version.
For firmware v4.6 or earlier
Enable GoodCloud
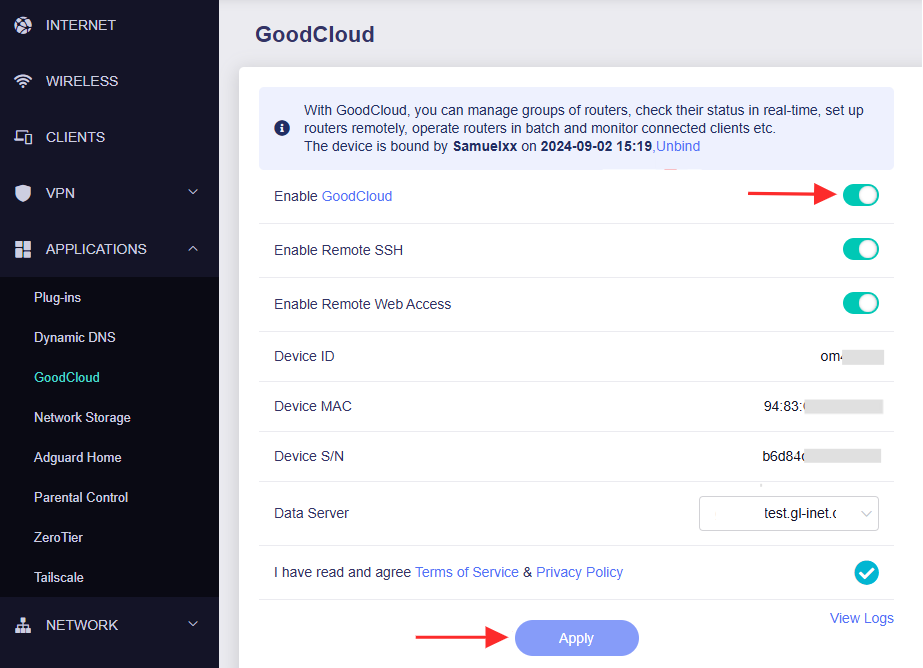
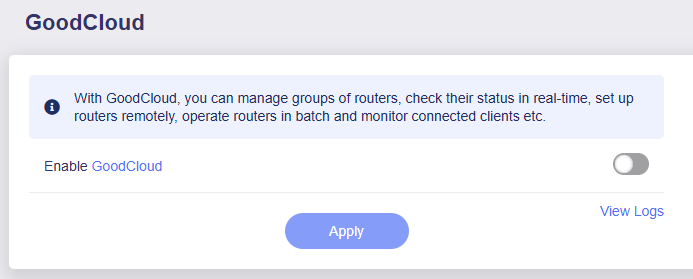
Log in to your router's web admin panel, and navigate to APPLICATIONS -> GoodCloud. Toggle the switch to enable GoodCloud.

Enable Remote SSH and Remote Web Access as needed, select the nearest server, read and agree the Terms of Service & Privacy Policy, then click Apply.

-
Remote SSH: For remotely accessing the router's terminal via GoodCloud.
-
Remote Web Access: For remotely accessing the router's web admin panel via GoodCloud.
-
Data Server: Please choose the server nearest to your device's location. There are three options: Asia Pacific (Japan), America (Oregon), and Europe (Ireland).
Sign up an account
Visit the GoodCloud website to sign up for an account and log in.
If you don't receive the verification email, check your spam folder or wait a few minutes and try again. For any signup difficulties, please email support@glinet.biz for assistance.
Add devices
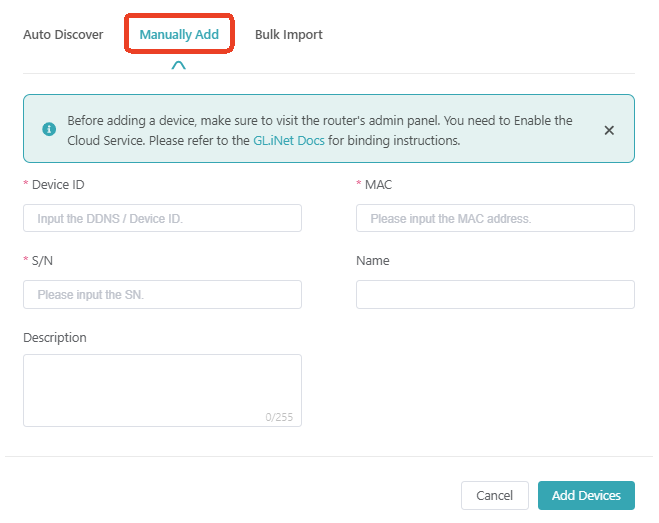
On the Cloud platform, navigate to Devices -> Bound Devices -> Add Devices.

There are three methods to bind device to your GoodCloud account: Auto Discover, Manually Add, and Bulk Import.
Auto Discover
You may try Auto discover if your router and the device used to access GoodCloud website are on the same network.
Select your device from the drop-down list, and input the DDNS / Device ID, which can be found at the bottom of your router, or on the GoodCloud page in the web admin panel.
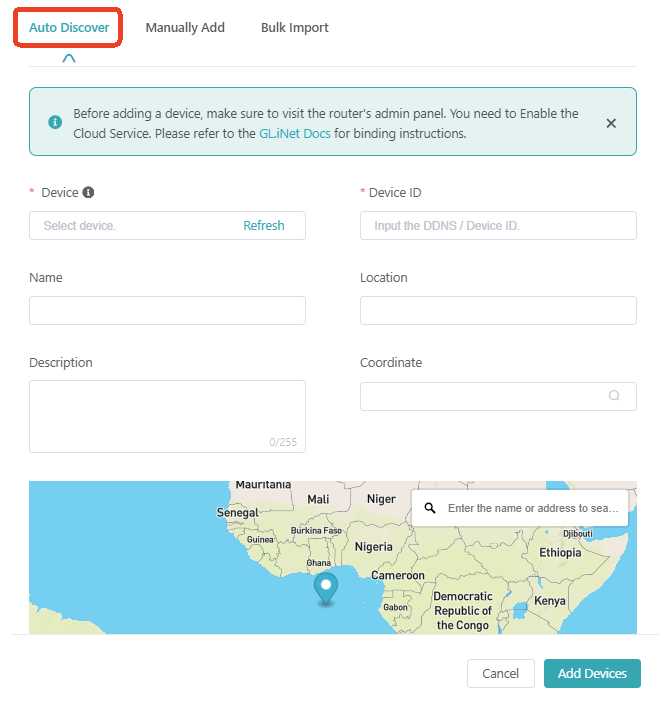
Please refer to this link to find the Device ID.
Manually Add
If your device is not in the list, click Manually add and input the details of your router. All information requested can be found at the bottom of the router, or on the GoodCloud page in the web admin panel.
Bulk Import
Bulk Import is designed for users managing a large number of devices. You can import multiple devices via a Microsoft Excel file.

Binding details
After successfully binding, log in back to the router's web admin panel, and navigate to APPLICATIONS -> GoodCloud. Refresh this page, and it will display the bound GoodCloud username and date.

Unbind device
If you want to unbind your router, log in to the router's web admin panel, navigate to APPLICATION -> GoodCloud and click Unbind.

Alternatively, you can remove the corresponding device from the Bound Devices List on the GoodCloud platform. The router's web admin panel will then synchronize to reflect the latest device binding status.
For any difficulties, please email support@glinet.biz for assistance.
For firmware v4.7 or later
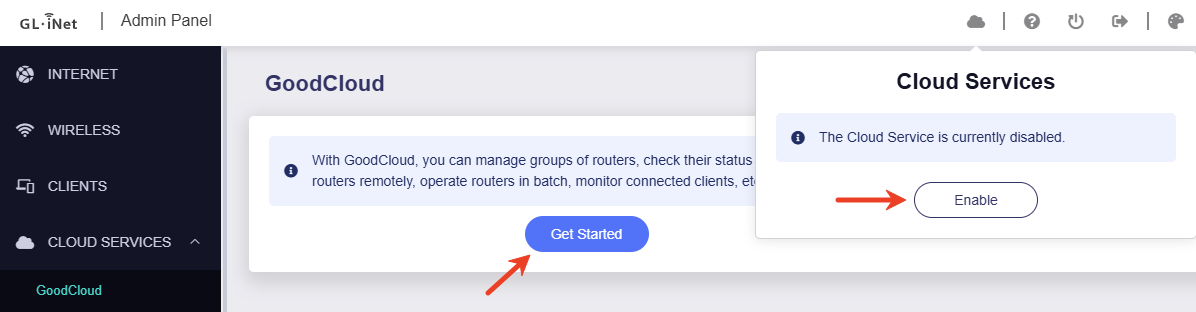
Enable Cloud service
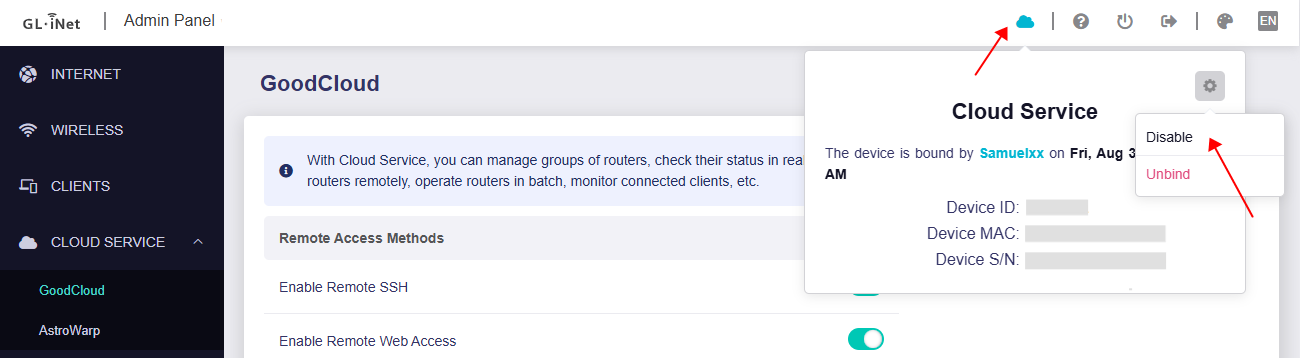
Log in to your router's web admin panel, and navigate to CLOUD SERVICE -> GoodCloud.
Click the Get Started button, and a Cloud Service pop-up window will appear in the upper right corner. Click Enable to use Cloud Service.
Log in to your GoodCloud account.
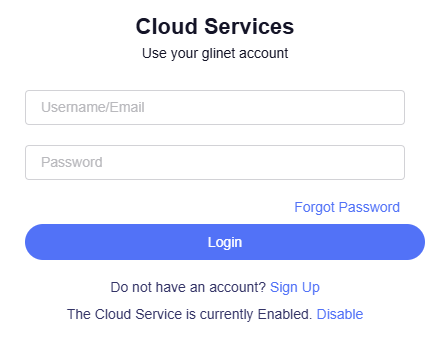
If you don't have an account, sign up for one and log in. Once registration is complete, the router will automatically bind to this account.
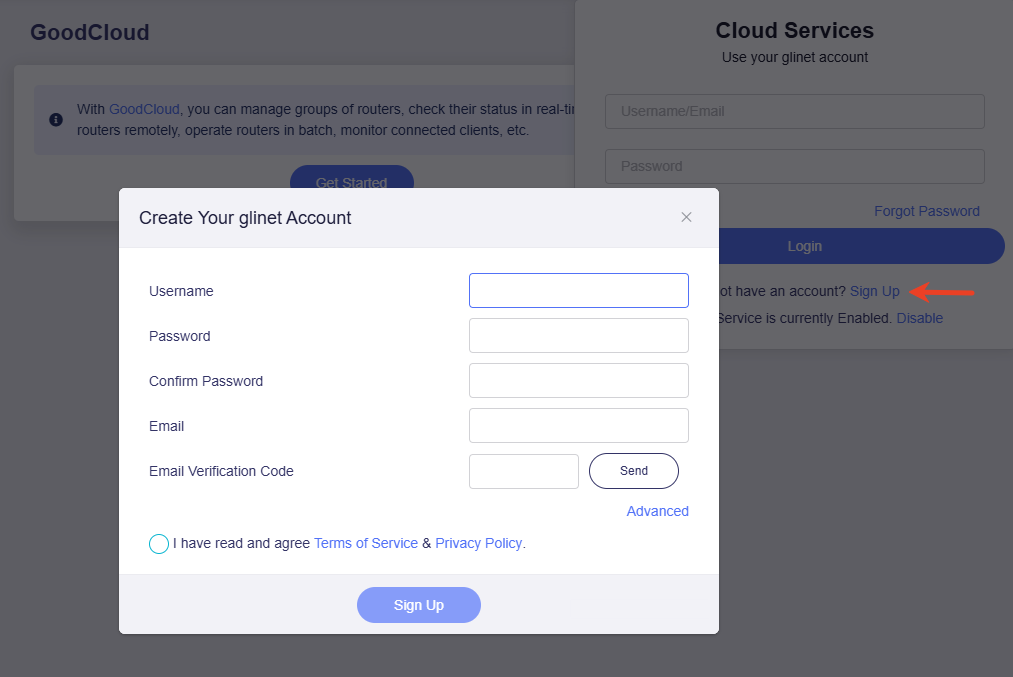
If you don't receive the verification email, check your spam folder or wait a few minutes and try again. For any signup difficulties, please email support@glinet.biz for assistance.
Binding details
After successfully binding, log in back to the router's web admin panel, click on the Cloud icon in the upper right corner, and you will see the binding details, including the bound GoodCloud username and date, Device ID, Device MAC and Device S/N.

In the web admin panel, navigate to CLOUD SERVICES -> GoodCloud, and you can enable or disable the remote access for your router.

-
Remote SSH: For remotely accessing the router's terminal via GoodCloud.
-
Remote Web Access: For remotely accessing the router's web admin panel via GoodCloud.
-
View Logs: It will show API call logs by GoodCloud.
Unbind device
If you want to unbind your router, log in to the router's web admin panel. Click the cloud icon in the upper right corner, and click Unbind.

Alternatively, you can remove the corresponding device from the Bound Devices List on the GoodCloud platform. The router's web admin panel will then synchronize to reflect the latest device binding status.
For any difficulties, please email support@glinet.biz for assistance.
Manage Devices
System info and actions
On the GoodCloud -> Bound Devices, you can view the system information (e.g., model, version, MAC address, IP address) and status (e.g., online, offline) of all devices bound to your account.

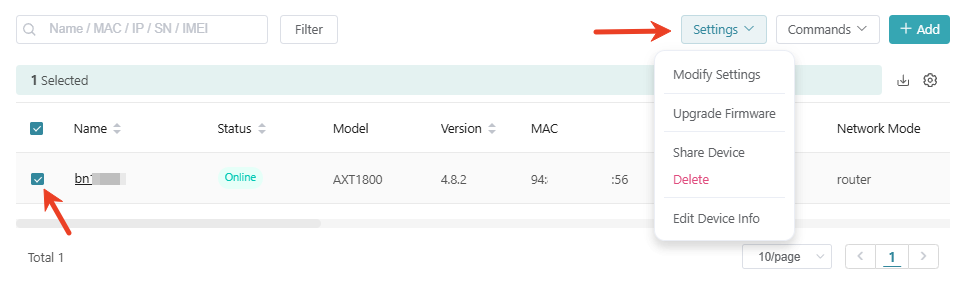
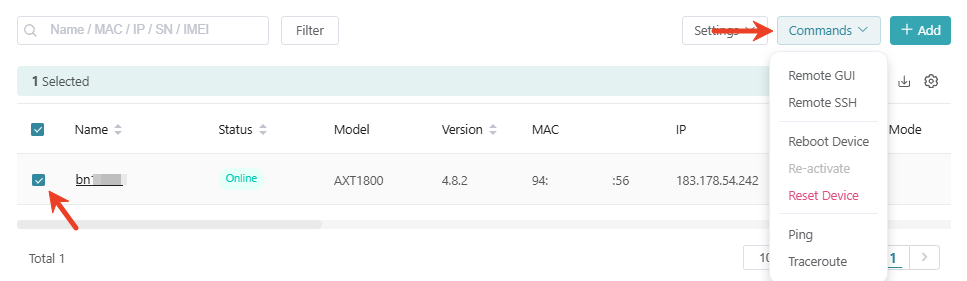
Select a device, then you can perform actions in the upper right corner, such as modifying settings, updating firmware, remote accessing the device, rebooting, or resetting.
Click the gear icon on the far right of the list header, and you can customize the display of columns and their order to focus on the device information that matters most.

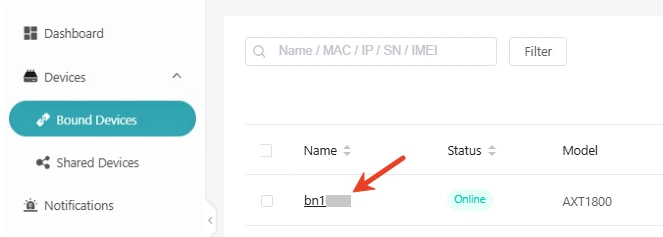
Device details
On the GoodCloud -> Bound Devices, click a device name, and you will be redirected to the device details page, where it displays the router's basic info, statistical data, network settings, clients list, etc.
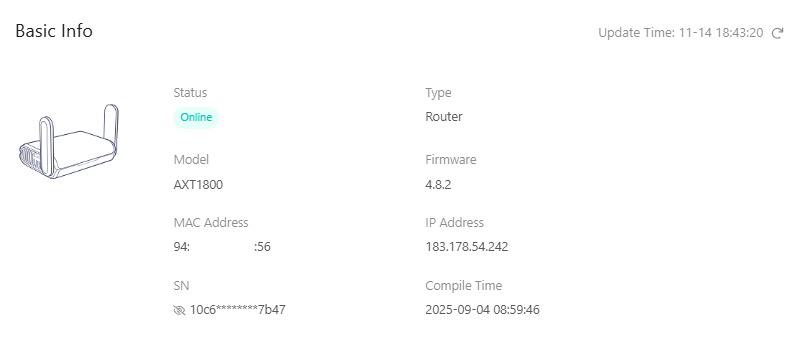
Basic info
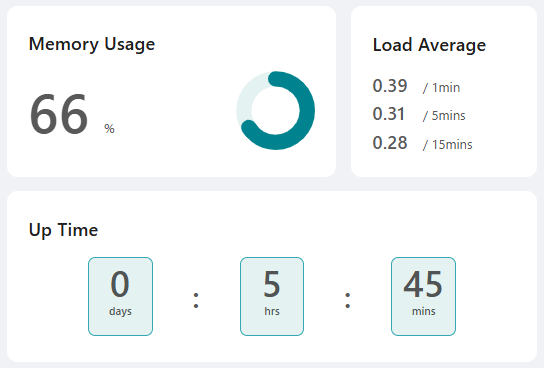
Statistics
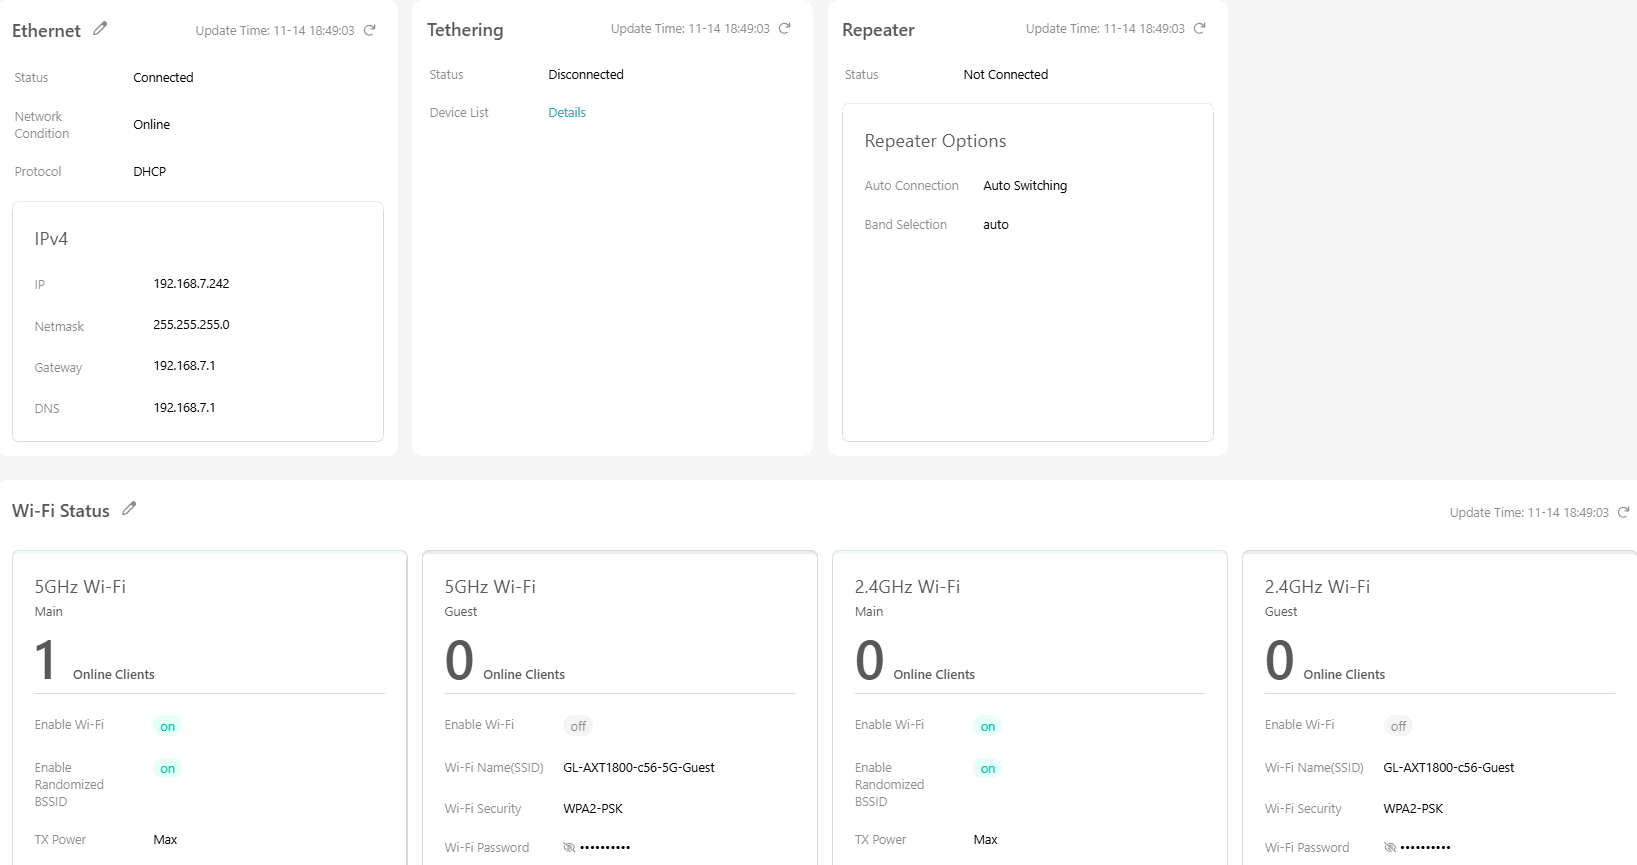
Network settings
This page displays your router's network configurations and Wi-Fi settings.
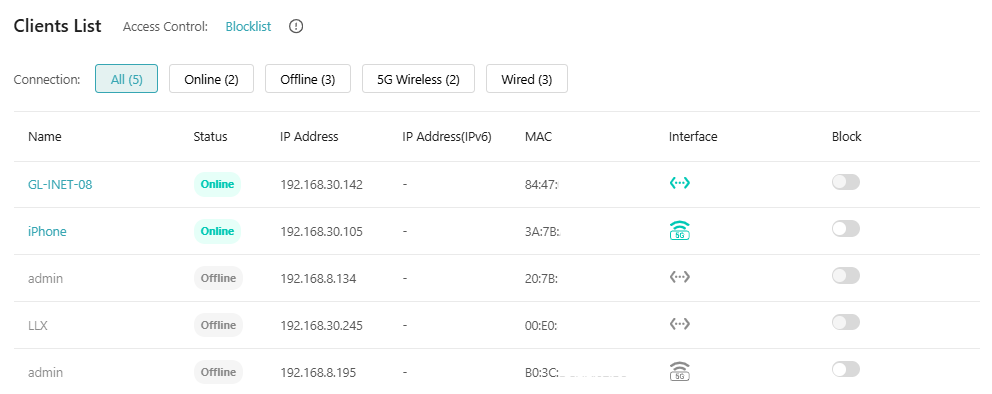
Clients list
Remote Access
On the GoodCloud -> Bound Devices, click the name of the device you want to access to enter the details page, then you will see remote actions in the upper right corner.

Remote GUI
Click Remote GUI to remotely access your router's web admin panel.
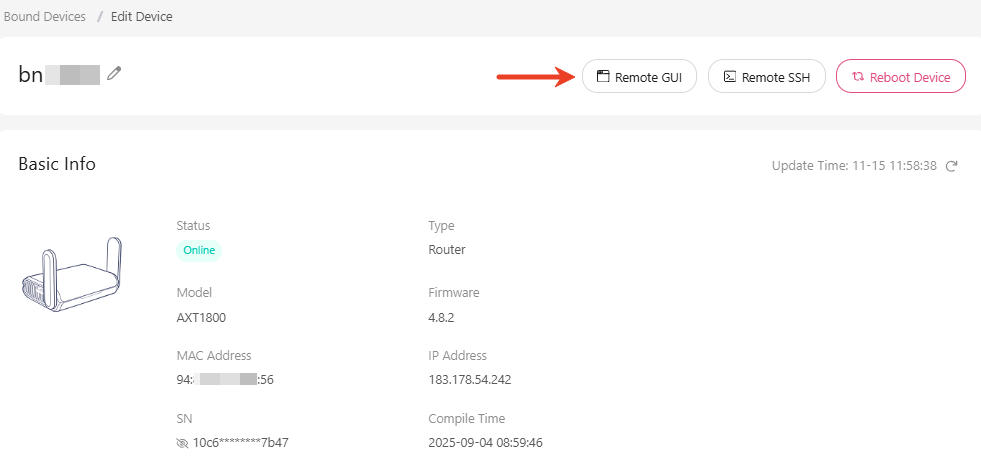
If this option is grayed out or unavailable, it is likely that this feature is disabled. Please enable it in the router's web admin panel first before accessing it via GoodCloud.
If this option is clickable but unresponsive, try using your browser's incognito/inPrivate mode.
Remote SSH
Click Remote SSH to remotely access your router's terminal over SSH.
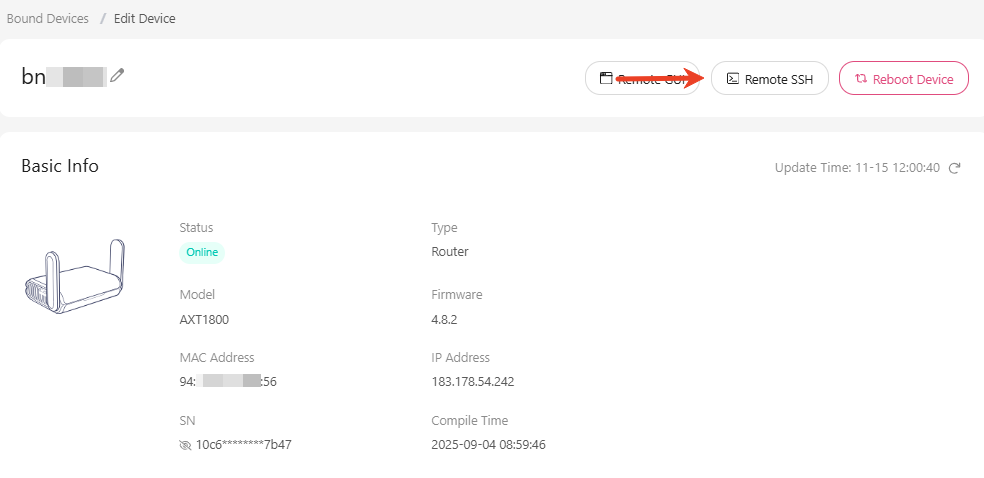
If this option is grayed out or unavailable, it is likely that this feature is disabled. Please enable it in the router's web admin panel first before accessing it via GoodCloud.
If this option is clickable but unresponsive, try using your browser's incognito/inPrivate mode.
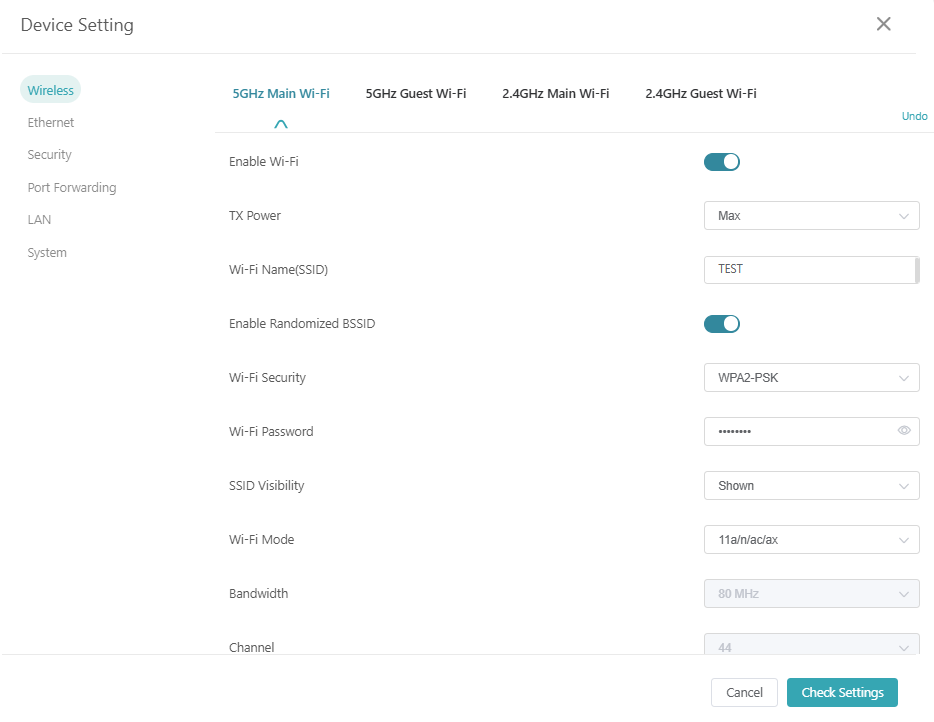
Modify Settings
You can configure multiple parameters for a single device or multiple devices.
On the GoodCloud -> Bound Devices, select the device you want to configure, and in the upper right corner, click Settings -> Modify Settings.
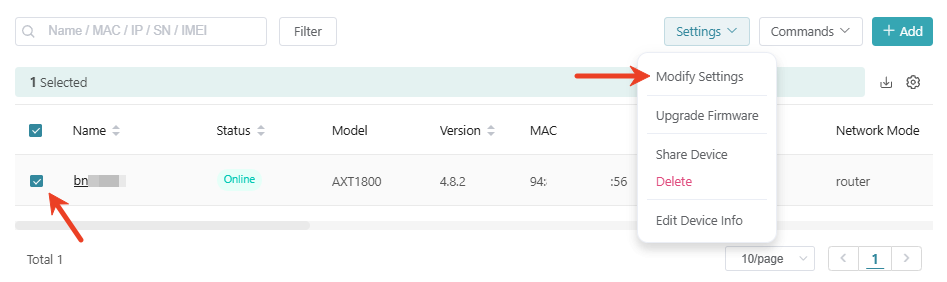
Here you can check and modify the router's network settings, including wireless, Ethernet, security, port forwarding, LAN and system settings.
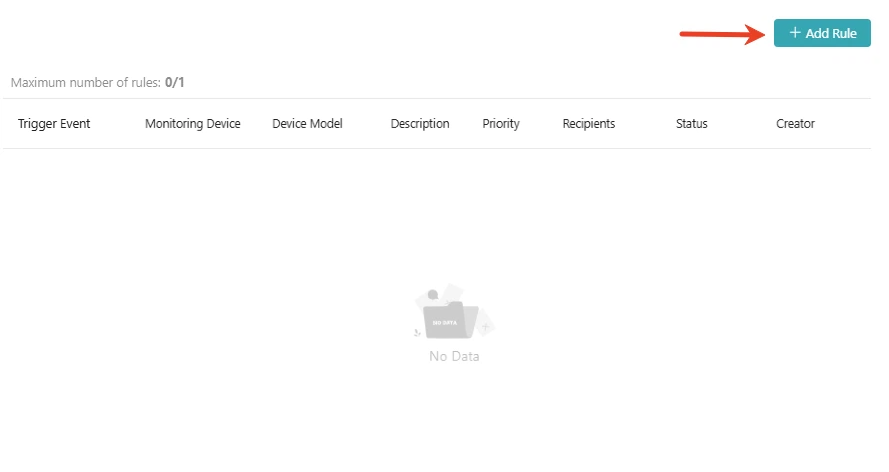
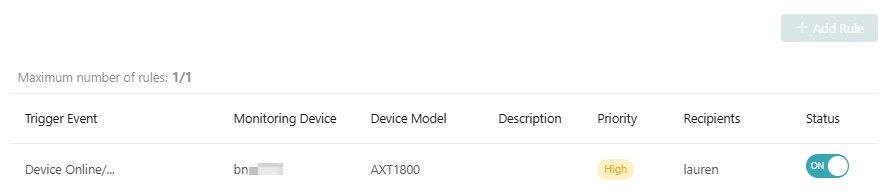
Email Alarm
You can set up an email alarm when the device status changes (online/offline) or new clients connect.
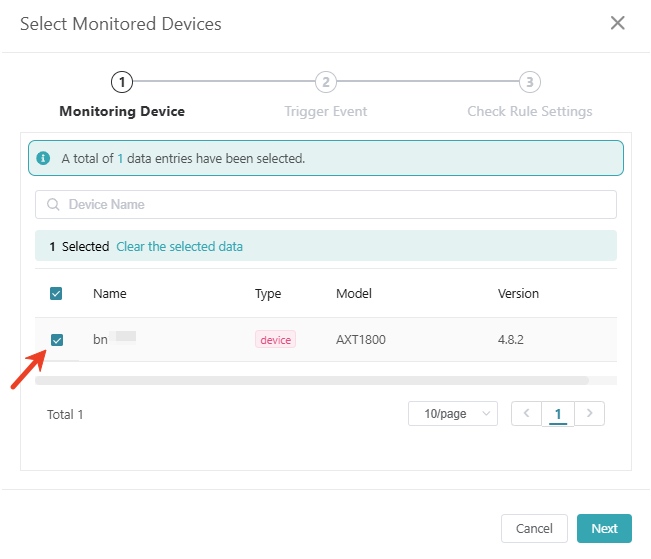
On the GoodCloud -> Notifications, click the Add Rule button in the upper right corner.
Select the device you want to monitor, and click Next.
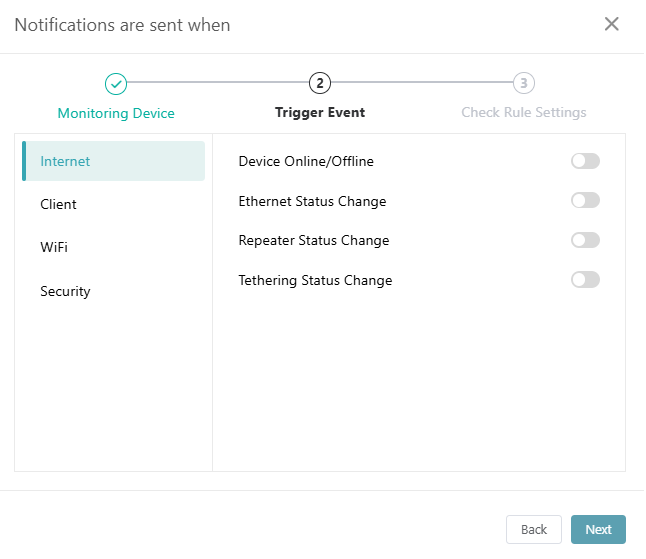
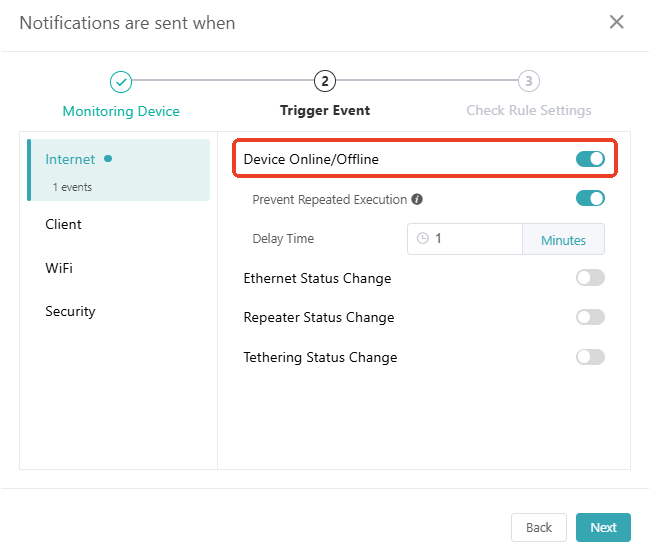
Select the trigger event, such as device online/offline status, and click Next.
Check the rule settings, and click Apply.
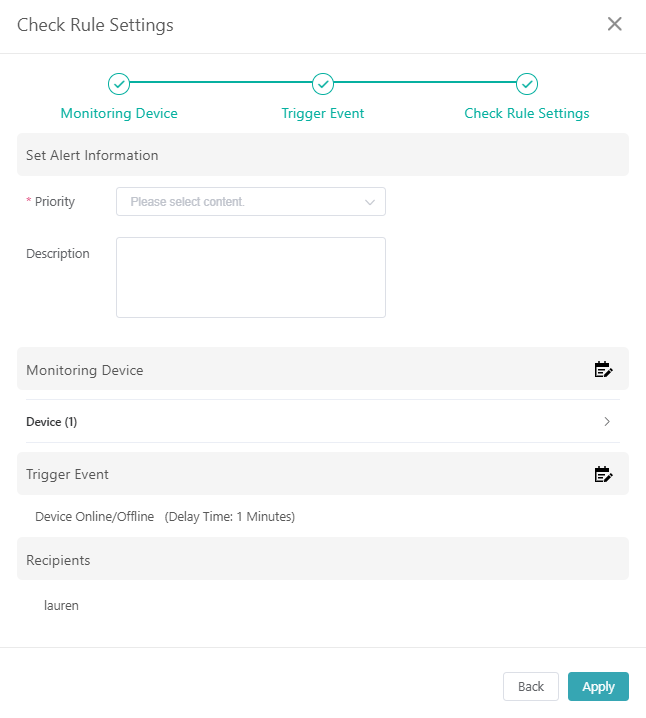
In the Notifications list, you can view the alert rules you've created. Individual users are limited to creating one alert rule. If you require bulk device management, feel free to contact us to upgrade your plan.
Site to Site
Please refer to GoodCloud Site to Site.
GoodCloud and VPN
If you enable GoodCloud and VPN client at the same time on your router, the connection between the router and the GoodCloud server will not go through the VPN by default. This ensures a more stable connection to GoodCloud services.
However, if you want the GoodCloud connection to go through the VPN, you can change this settings in the router's web admin panel. Navigate to VPN -> VPN Dashboard -> VPN Client -> Options, and enable the option "Services from GL.iNet Use VPN".
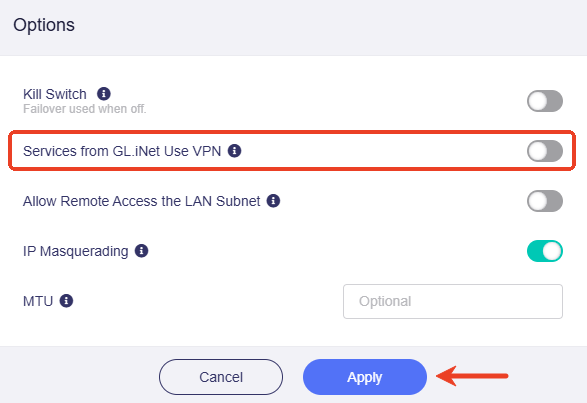
Note that routing GoodCloud through VPN may affect the stability of the cloud connection, especially if:
- The VPN connection is unstable
- The VPN provider filters or blocks GoodCloud traffic
- The VPN adds significant latency to the connection
It is generally recommended to keep the default settings where GoodCloud bypasses the VPN for optimal performance and reliability.
View Logs
You can view GoodCloud logs as needed, including Activity Logs, Device Logs, Upgrade Logs, Alert Logs, and Device Settings Logs.
On the GoodCloud -> Logs, and select the logs you want to view from the drop-down list.

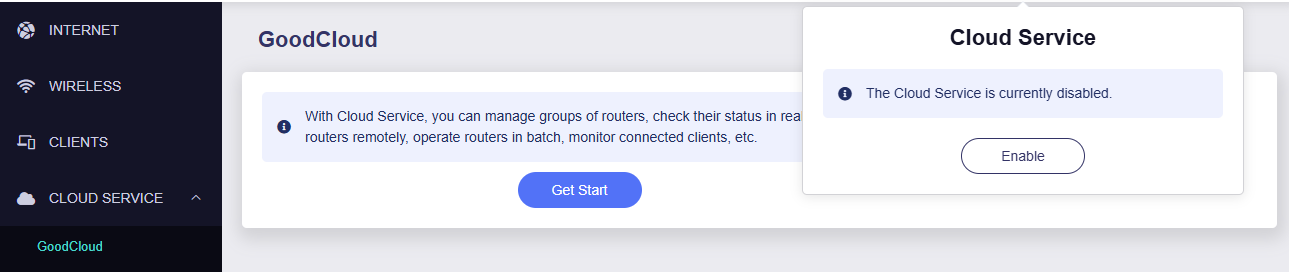
Disable Cloud
If you no longer wish to have your device connected to the cloud platform, you can disable cloud service in the router's web admin panel.
For firmware v4.6 or earlier
Log in to your router's web admin panel, navigate to APPLICATIONS -> GoodCloud, toggle the switch to disable GoodCloud, and click Apply
Once disabled, the interface will display as follows.
For firmware v4.7 or later
Log in to your router's web admin panel, and click the cloud icon in the top right corner.
Once disabled, the interface will display as follows.
Delete Account
For security reasons, you may delete your account if it is no longer in use.
On the GoodCloud platform, click the user name in the top right corner and select Personal Center. Scroll down to the bottom of the page and click Delete Account.
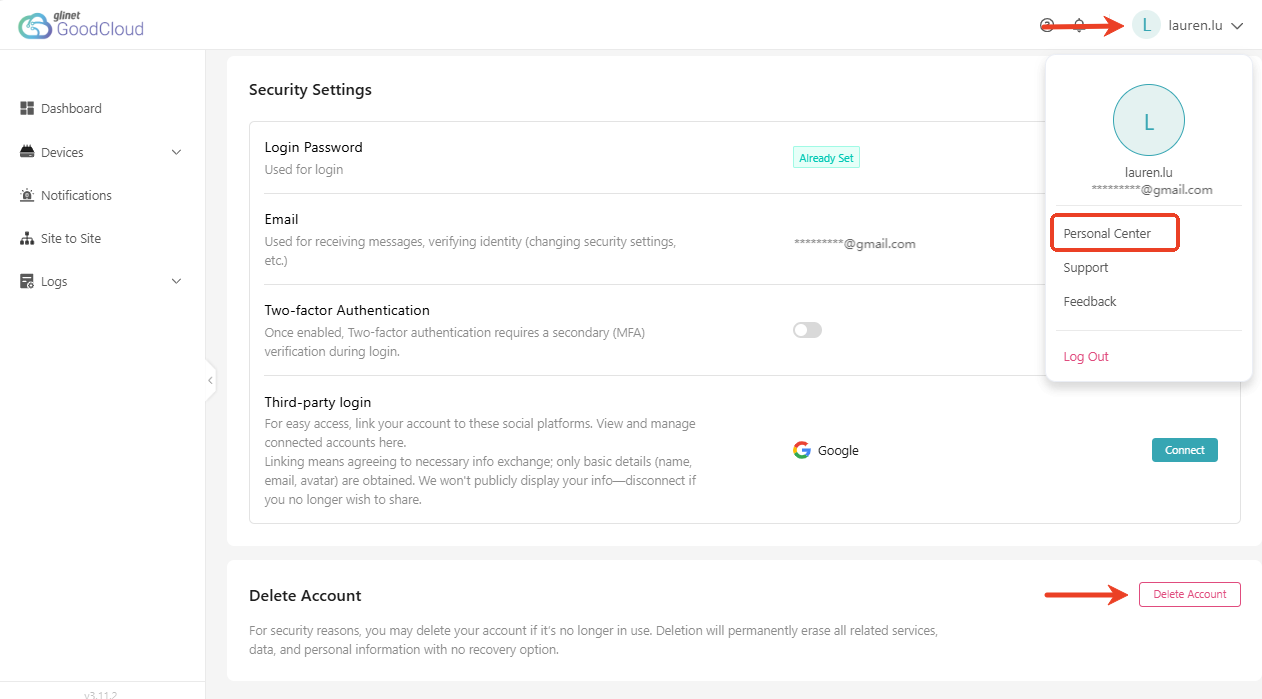
Note
Deletion will permanently erase all related services, data, and personal information with no option for recovery.
If your account belongs to any organization, please leave all organizations first before deleting your account.
Still have questions? Visit our Community Forum or Contact us.