Privacy error when accessing KVM via browser
When accessing the GL.iNet KVM via browser, you may encounter a browser alert: Your connection isn't private.

This warning means that the browser cannot validate the SSL/TLS certificate presented by the KVM. For example, the certificate may not be issued by a certificate authority trusted by your browser, or it may not match the IP address or hostname you used to access the console.
Why do I get this warning?
In the example above, 192.168.8.11 is the KVM local IP address dynamically assigned by the upper router via DHCP.
Note
If the gateway of your router that your GL.iNet KVM is connected to is "192.168.x.1" (where x is typically 0, 1, or 8 in private networks), the local IP of your KVM should be "192.168.x.y" (where y is a valid host address in the subnet).
This local IP address is used to access the GL.iNet KVM console, instead of a public website.
The KVM uses a default TLS certificate for HTTPS browser access. Browsers validate certificates for local consoles just as they do for public websites: the certificate must be trusted, valid, and match the address being accessed.
If the default certificate is not trusted by your browser, or does not cover the local IP address or hostname you entered, the browser displays a warning. The warning does not mean that the KVM has no certificate. HTTPS can still encrypt the connection, but the browser cannot verify the KVM's identity.
How to resolve the warning?
For local access, first confirm that the address belongs to your KVM. Then click Advanced and Continue to "192.168.8.11" (the exact wording varies by browser).

Then you will be redirected to the GL.iNet KVM console.

Can I use my own certificate?
Yes. You may install and use your own SSL/TLS certificate on the KVM. Follow the steps below.
-
Obtain an SSL/TLS certificate that covers the hostname or IP address you use to access the KVM. To avoid browser warnings, the certificate must be valid and issued by a certificate authority trusted by your browser. A self-signed certificate will still trigger a warning unless you explicitly configure your controlling device to trust it.
-
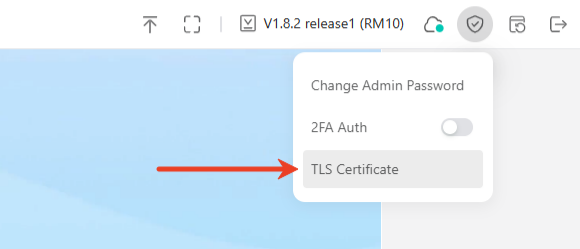
Log in to your KVM console. Click the shield icon in the upper right corner to go to Security -> TLS Certificate.
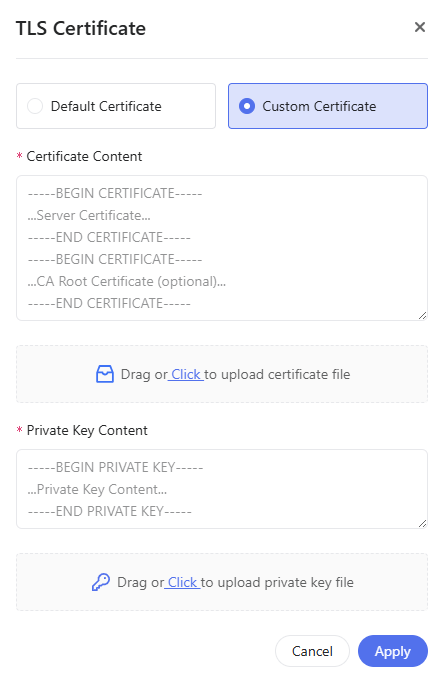
In the pop-up window, select Custom Certificate, then upload your certificate file and private key. This feature has been available since firmware v1.8.0.
Alternatively, you can replace the certificate and private key on the KVM via SSH terminal or WinSCP. The certificate and key are stored in the following directory:
/etc/kvmd/user/sslReplace them with your new SSL certificate and private key.
Still have questions? Visit our Community Forum or Contact us.