VPN Dashboard (Firmware v4.9)
On the left side of the web Admin Panel, go to VPN -> VPN Dashboard.
The VPN dashboard displays VPN connection details, such as routing rules, connected server, traffic statistics, client virtual IP, and connection log, and allows users to configure advanced settings such as the VPN Kill Switch, IP Masquerading, and MTU.
Compared to firmware v4.8, v4.9 includes the following improvements to the VPN Dashboard:
-
Allow users to select multiple profiles within a tunnel group and set their priority. The tunnel will attempt to connect using each profile in priority order until a connection is successfully established.
-
Each tunnel group operates independently and does not perform failover between groups. If all profiles in a single tunnel fail to connect, the system will determine whether to switch to the local WAN based on the status of the Tunnel Kill Switch and the All Other Traffic tunnel.
Getting Started
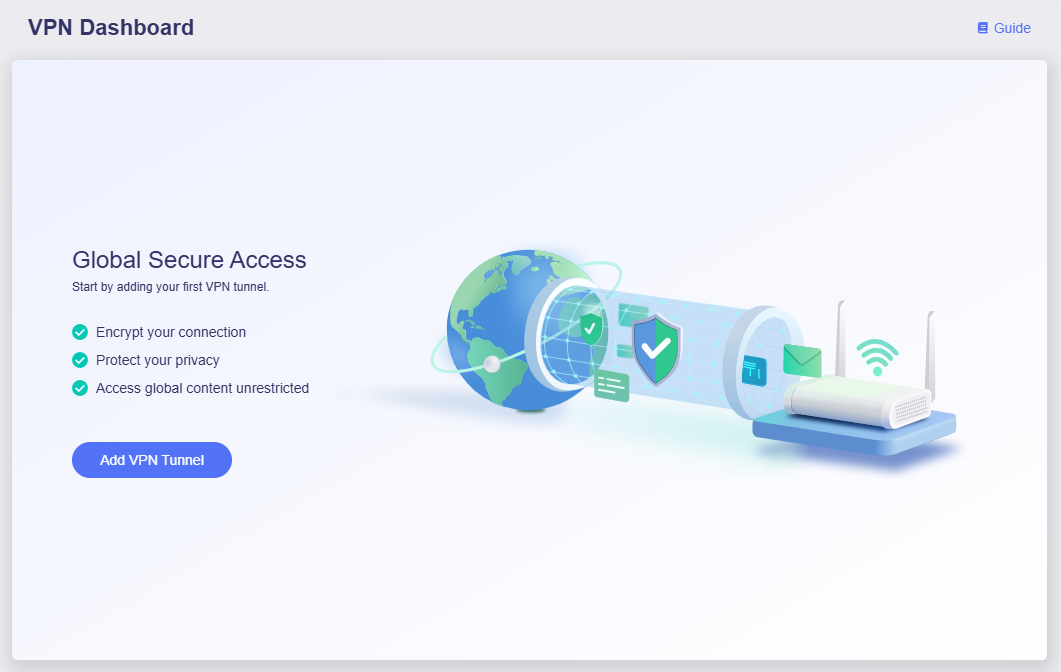
When entering this page for the first time, if no tunnels have been created, the page will appear as shown below. Click Add VPN Tunnel to get started.
You will be directed to the VPN Client Profile page. Select a VPN provider and log in.
The VPN providers listed are integrated into the GL.iNet router web Admin Panel. With an active subscription, users simply enter their credentials to log in instantly and obtain configuration files for VPN connections.
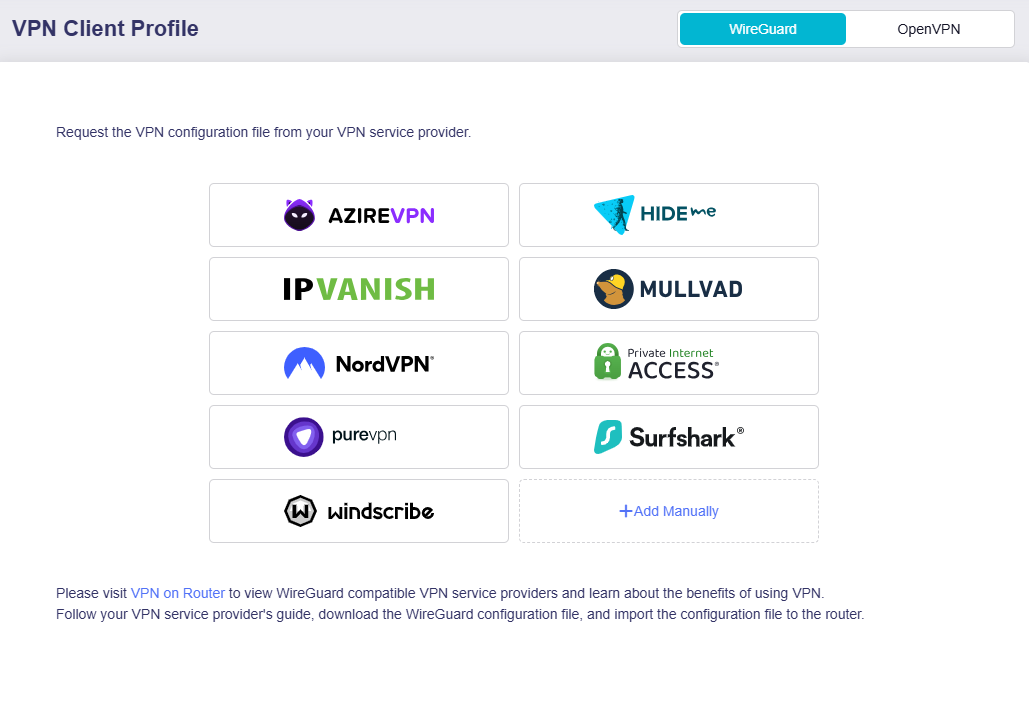
If you have subscribed to other VPN providers, or if you want to upload your personal VPN configurations, click Add Manually and upload your configurations.
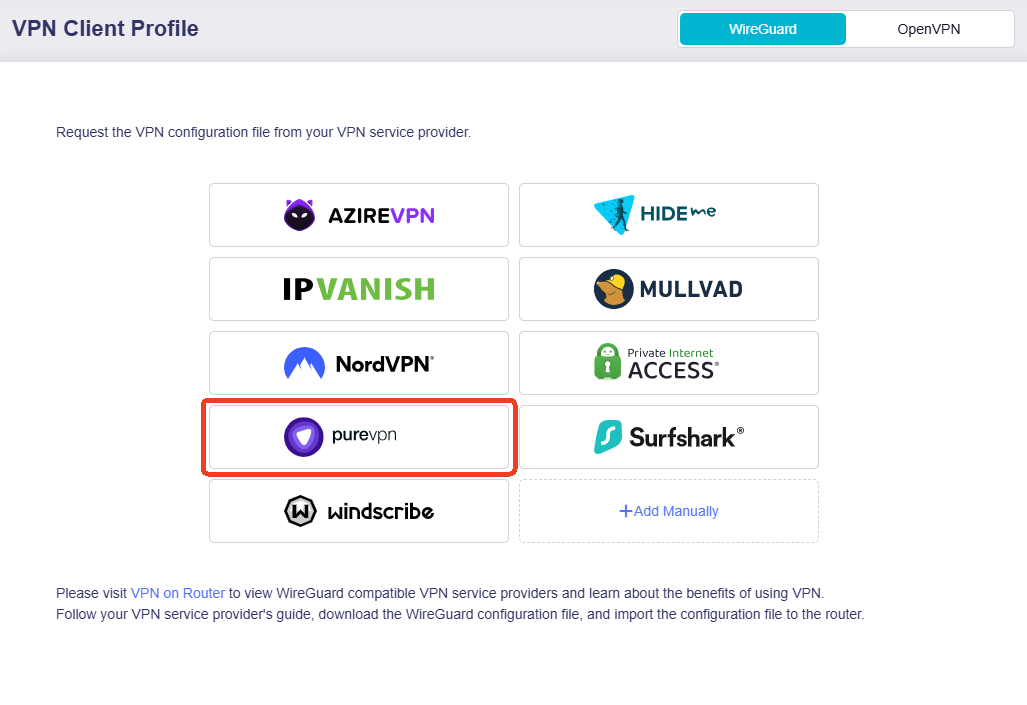
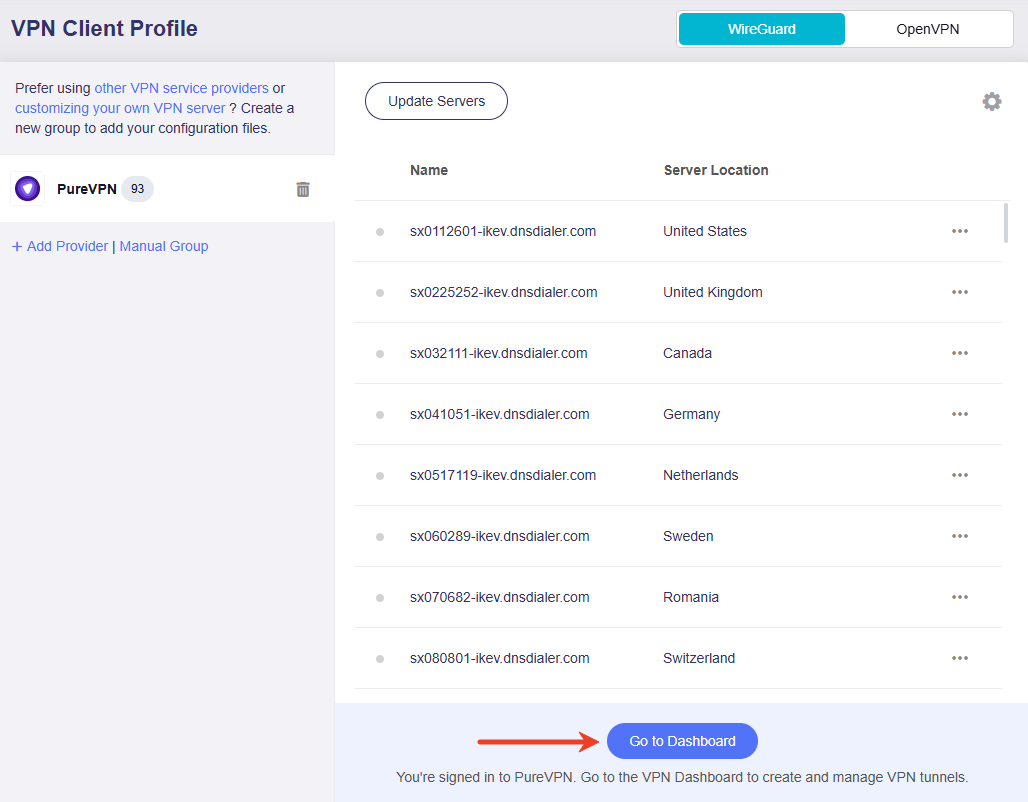
Take PureVPN as an example. Click PureVPN and log in with valid credentials.
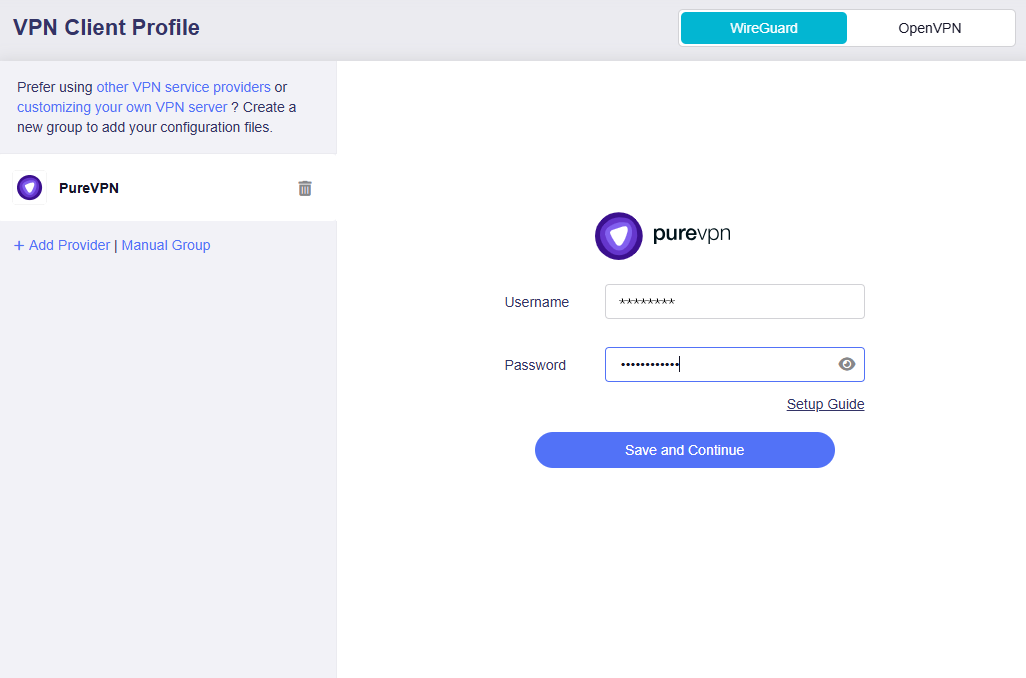
You will obtain a list of VPN profiles. For some VPN service providers, you may need to select a VPN protocol or preferred servers/cities before the list of profiles appears.
Then click Go to Dashboard at the bottom. You will be directed to the VPN Dashboard to add your VPN tunnel and set up VPN policy.
What is VPN policy?
A VPN policy defines how network traffic is routed through VPN tunnels, determining which traffic goes to target destinations via VPN and which accesses the Internet directly through the local WAN.
It allows all clients or specific devices to access designated websites or the entire Internet over a VPN connection, enabling flexible and secure network management.
On the VPN Dashboard, follow the setup wizard to configure your VPN policy, including selecting VPN profile, traffic source, and traffic destination.
-
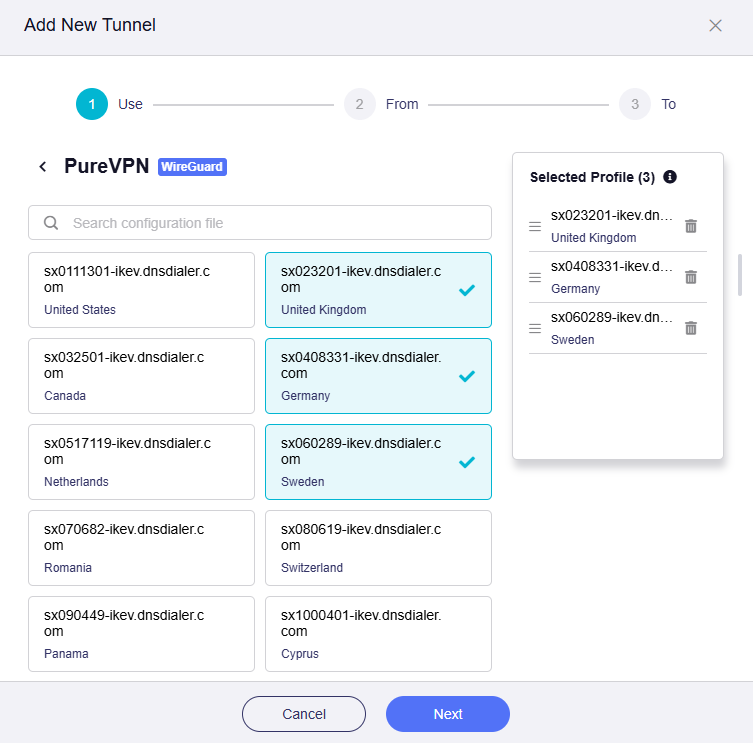
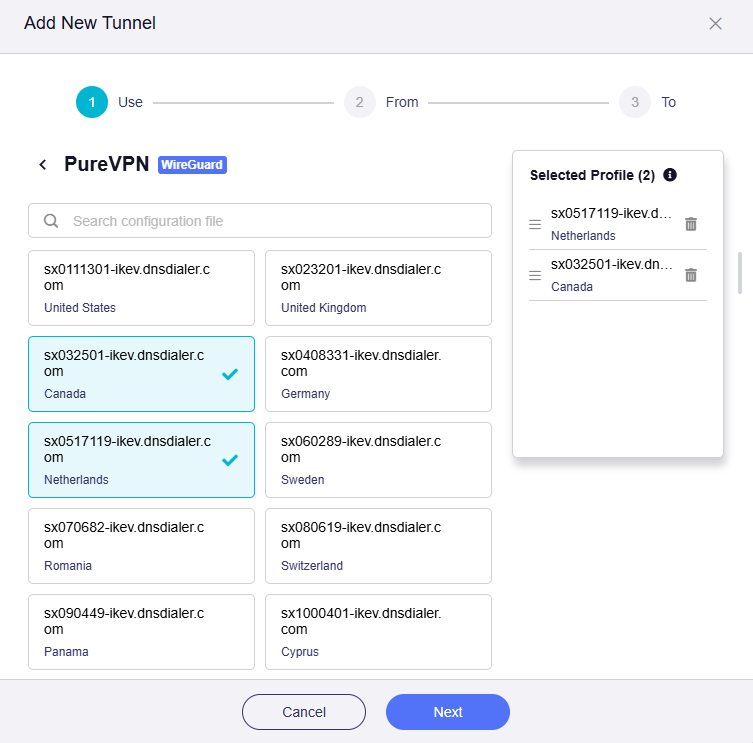
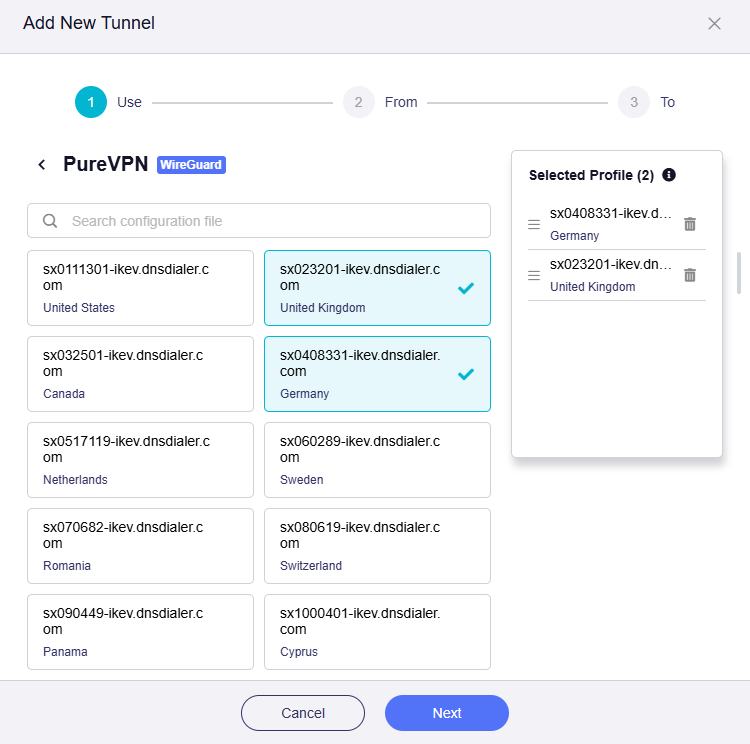
Select the VPN profile.
If you have previously logged in with any integrated VPN service credentials or uploaded a configuration file, the available profiles will be listed here. Otherwise, go to VPN Client Profile to log in with your credentials or upload a configuration file manually.
Take PureVPN as an example. Select one or multiple profiles, and adjust their priority on the right as needed.
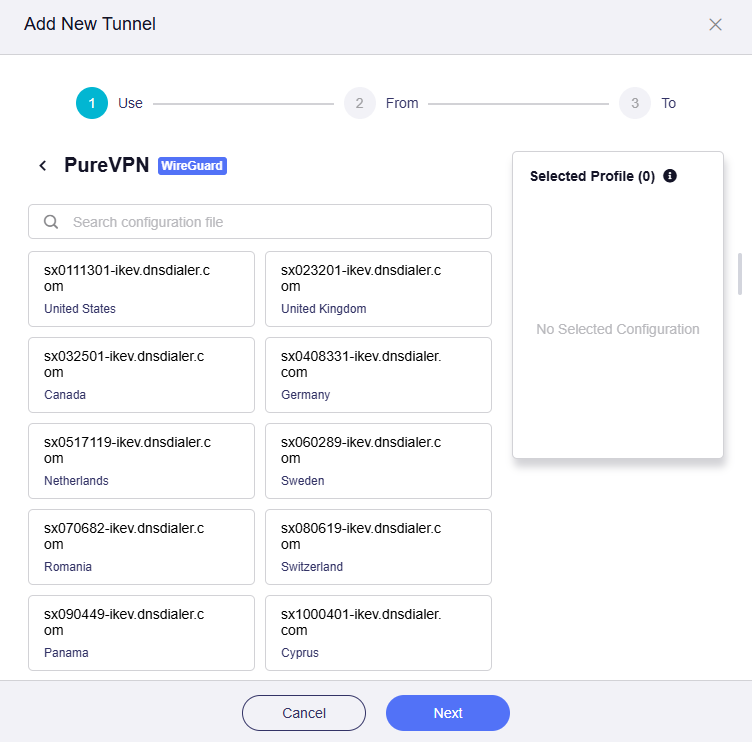
Note: When multiple profiles are selected, the tunnel will attempt to connect using each profile in priority order until a connection is successfully established. If all profiles within a single tunnel fail to connect, the system will determine whether to switch to the local WAN based on the status of the Tunnel Kill Switch and All Other Traffic policy.
-
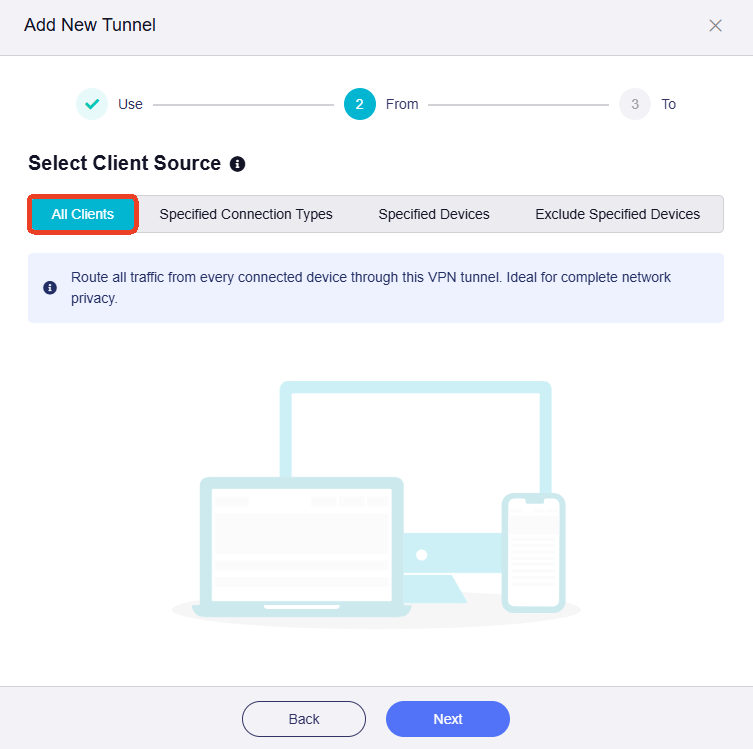
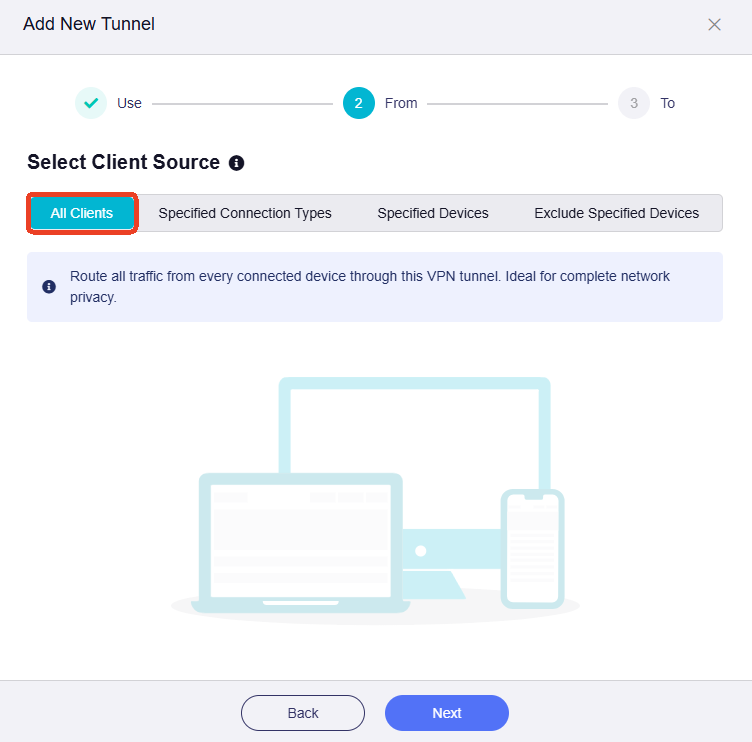
Select the client source.
There are four options:
-
All Clients: If selected, traffic from all devices will match this rule.
-
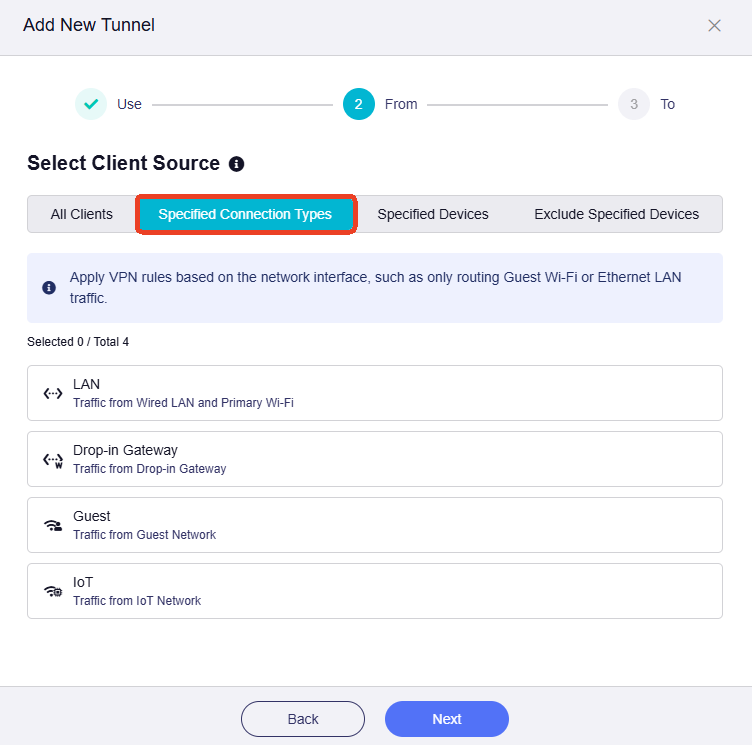
Specified Connection Types: If selected, traffic from specified connection types (e.g., LAN subnet, Drop-in Gateway, Guest Network) will match this rule.
-
Specified Devices: If selected, traffic from specified devices (identified by MAC address) will match this rule.
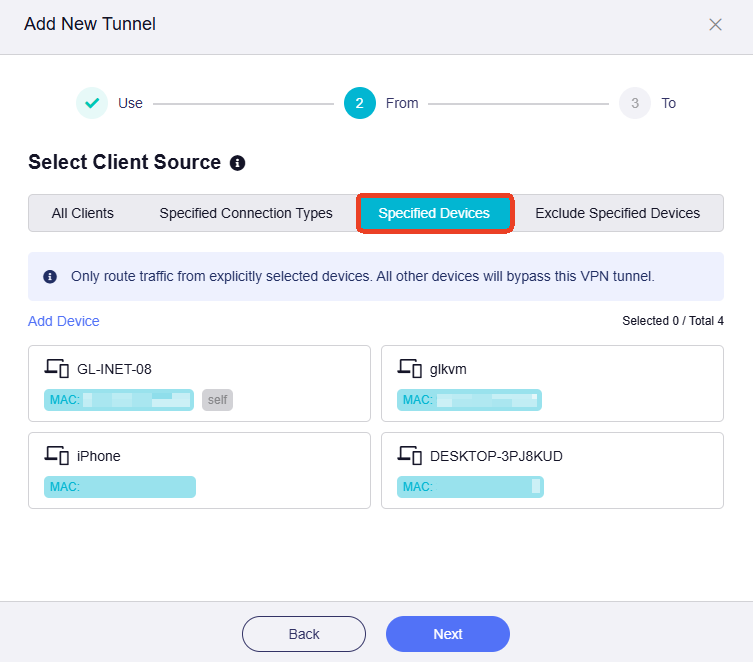
-
Exclude Specified Devices: If selected, traffic from specified devices (identified by MAC address) will not match this rule.

-
-
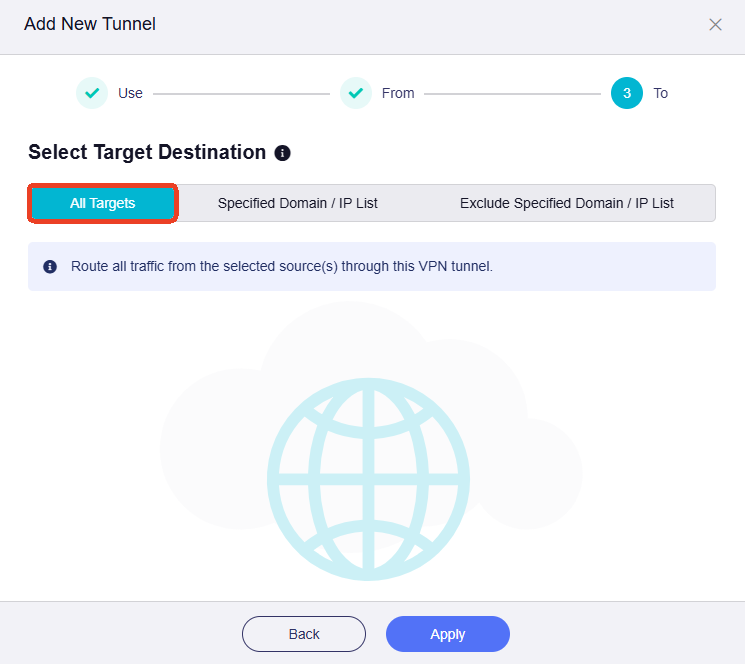
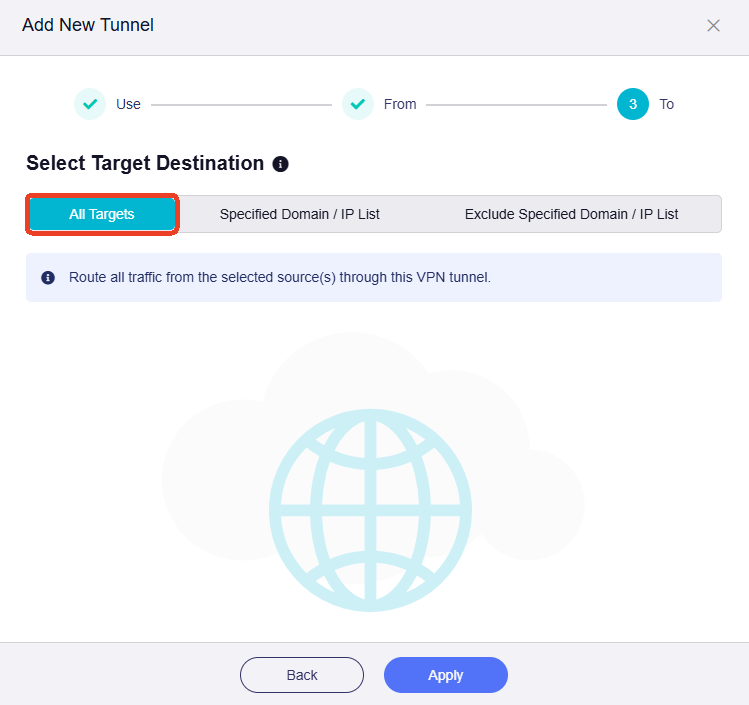
Select the target destination.
There are three options:
-
All Targets: If selected, traffic matching this rule will be routed to all targets.
-
Specified Domain / IP List: If selected, traffic matching this rule will be routed to specified domains or IP addresses. You need to enter them manually.

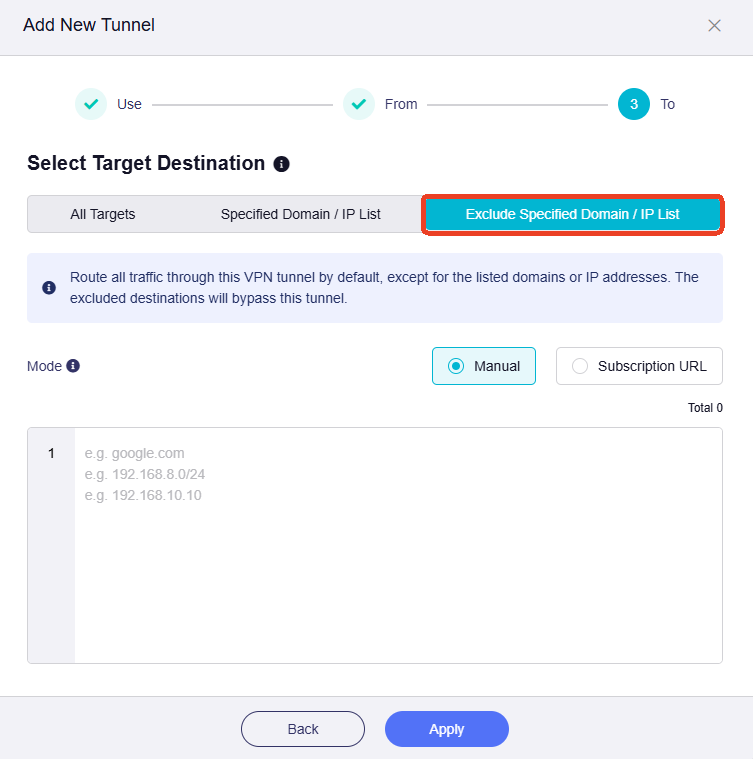
-
Exclude specified Domain / IP List: If selected, traffic matching this rule will not be routed to specified domains or IP addresses. You need to enter them manually.
-
Usage Scenarios
Here are two scenarios with step-by-step setup instructions for your reference.
Scenario 1
Objectives:
-
Only specific devices connected to this router access the Internet through the VPN. All other devices access the Internet through the local WAN.
-
The selected devices must use the VPN connection only. If the VPN disconnects unexpectedly, Internet access for these devices will be blocked to prevent DNS leaks and IP tracking.
Follow the steps below to configure the VPN policy.
-
Select the VPN profile.
If you have logged in with any integrated VPN service credentials or uploaded a configuration file, the available profiles will be listed here. Otherwise, go to VPN Client Profile to log in with your credentials or upload a configuration file manually.
Take PureVPN as an example. Select one or multiple profiles, and adjust their priority on the right as needed.
Note: When multiple profiles are selected, the tunnel will attempt to connect using each profile in priority order until a connection is successfully established. If all profiles within a single tunnel fail to connect, the system will determine whether to switch to the local WAN based on the status of the Tunnel Kill Switch and All Other Traffic policy.
-
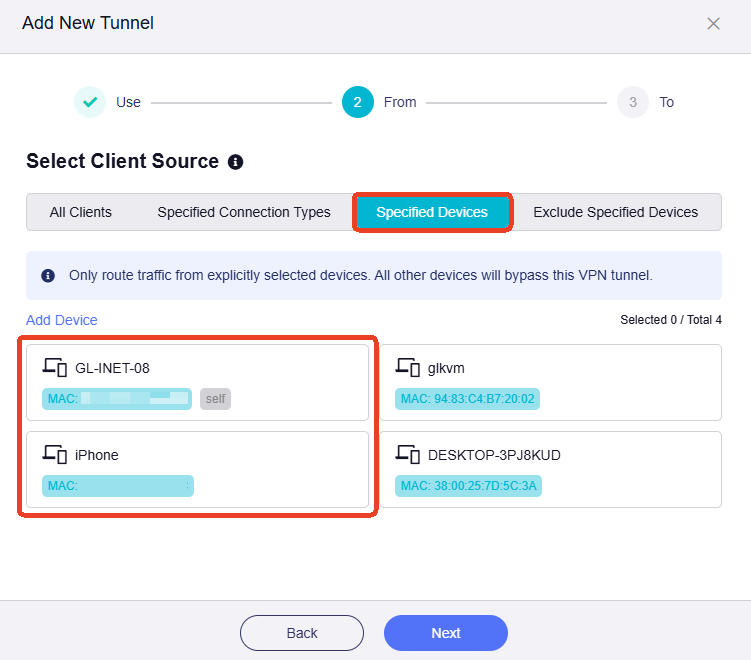
Select Client Source.
Click the Specified Devices tab, select the devices that will use the VPN, then click Apply.
-
Select Target Destination.
Click the All Targets tab, set it as the traffic destination, then click Apply.

-
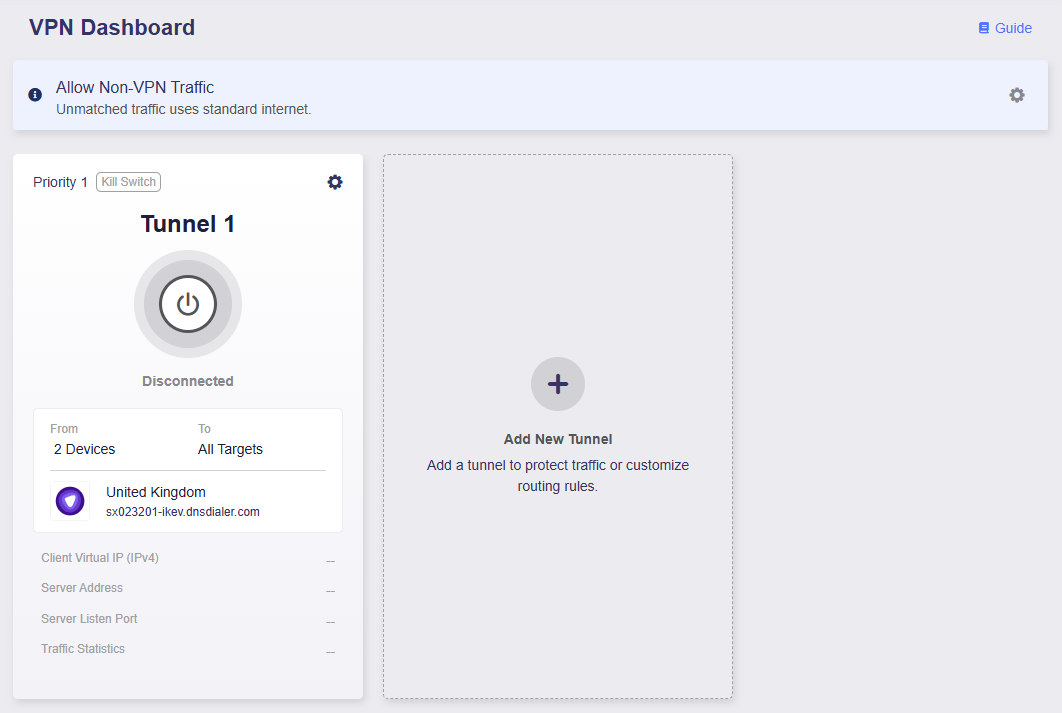
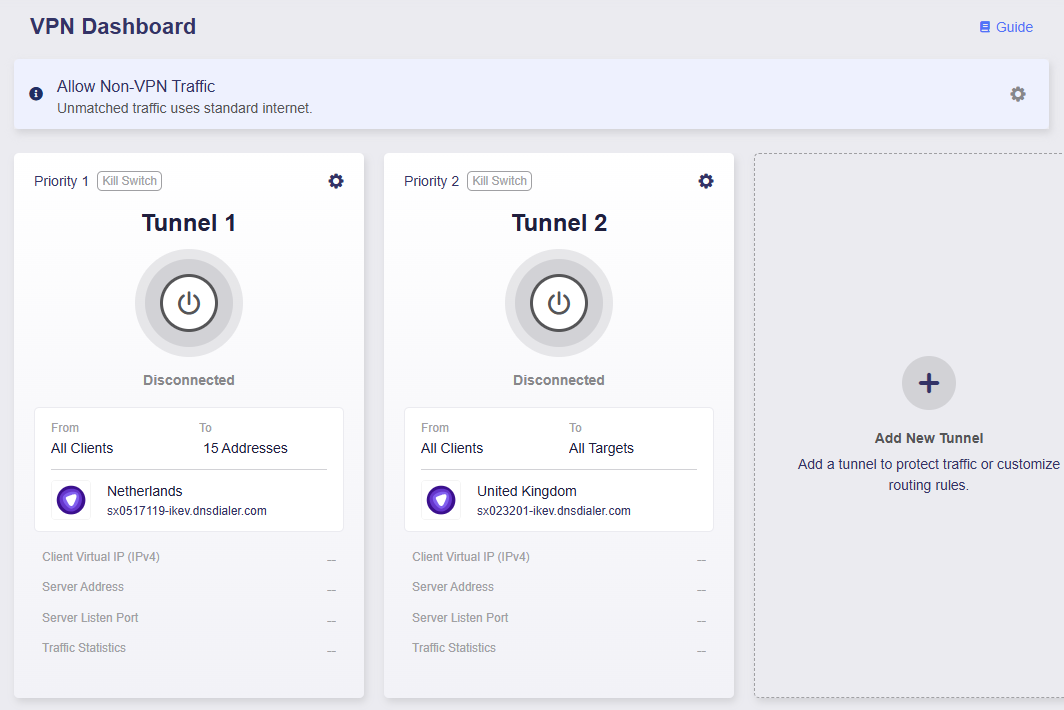
You will be directed to the VPN Dashboard, where a VPN tunnel has been added.
-
Make sure the Kill Switch for this tunnel is enabled. If the VPN disconnects unexpectedly, Internet access for traffic matching this tunnel will be blocked to prevent DNS leaks and IP tracking.
-
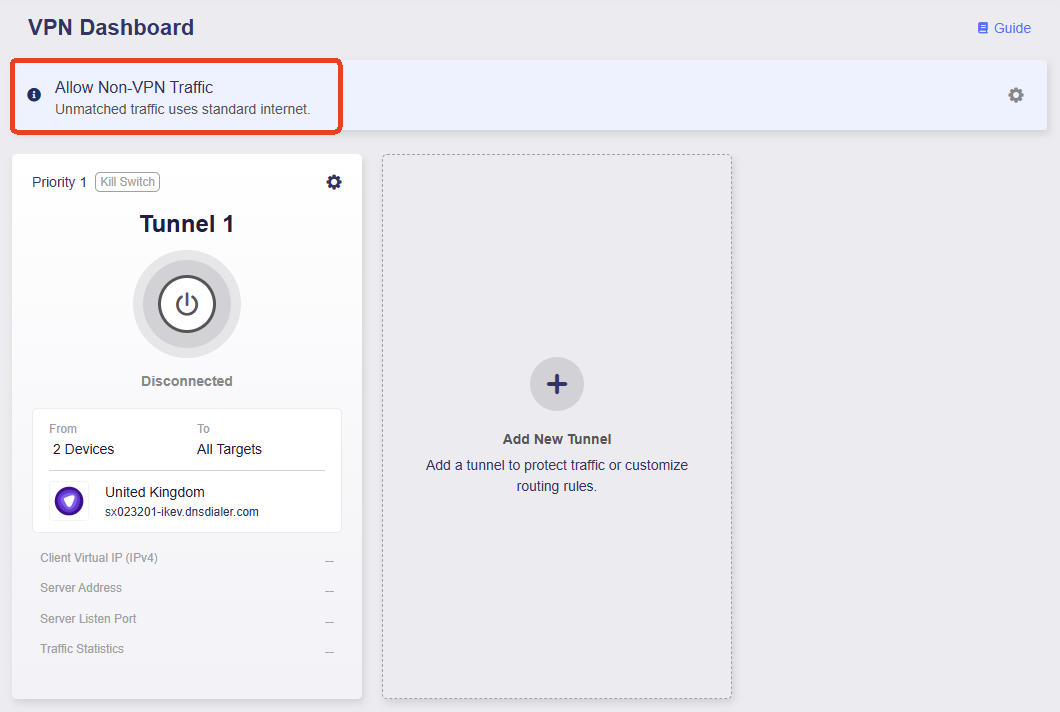
Make sure the Allow Non-VPN Traffic is enabled. This is enabled by default to ensure that traffic not matching the VPN tunnel can still access the Internet through the local WAN.
-
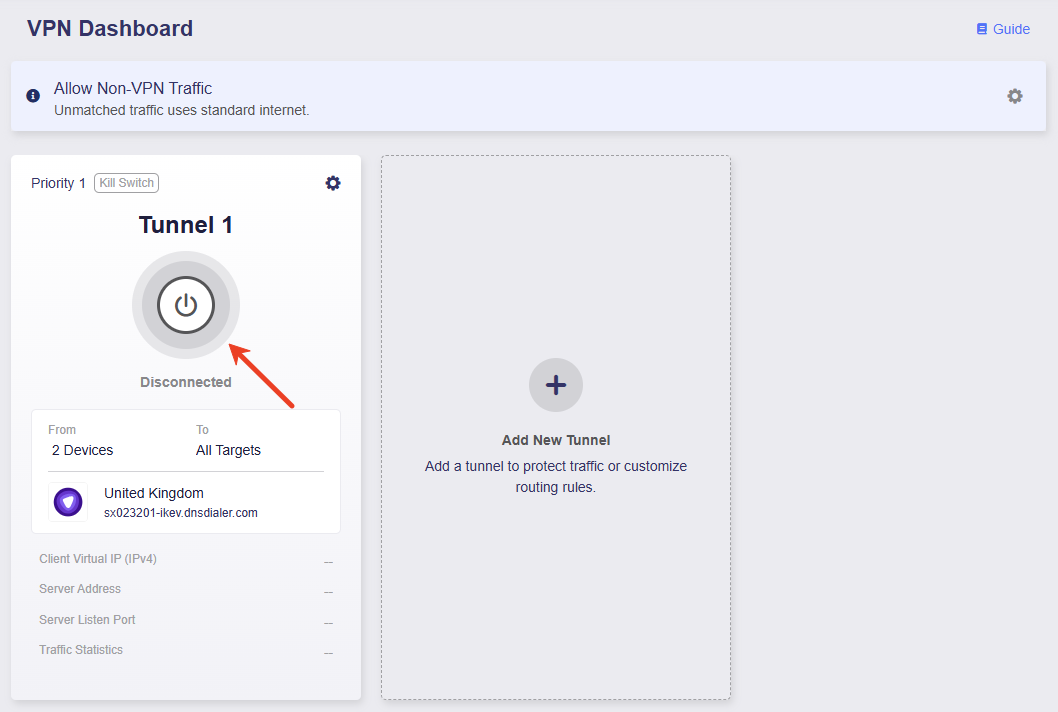
Click the middle button to activate this tunnel.
-
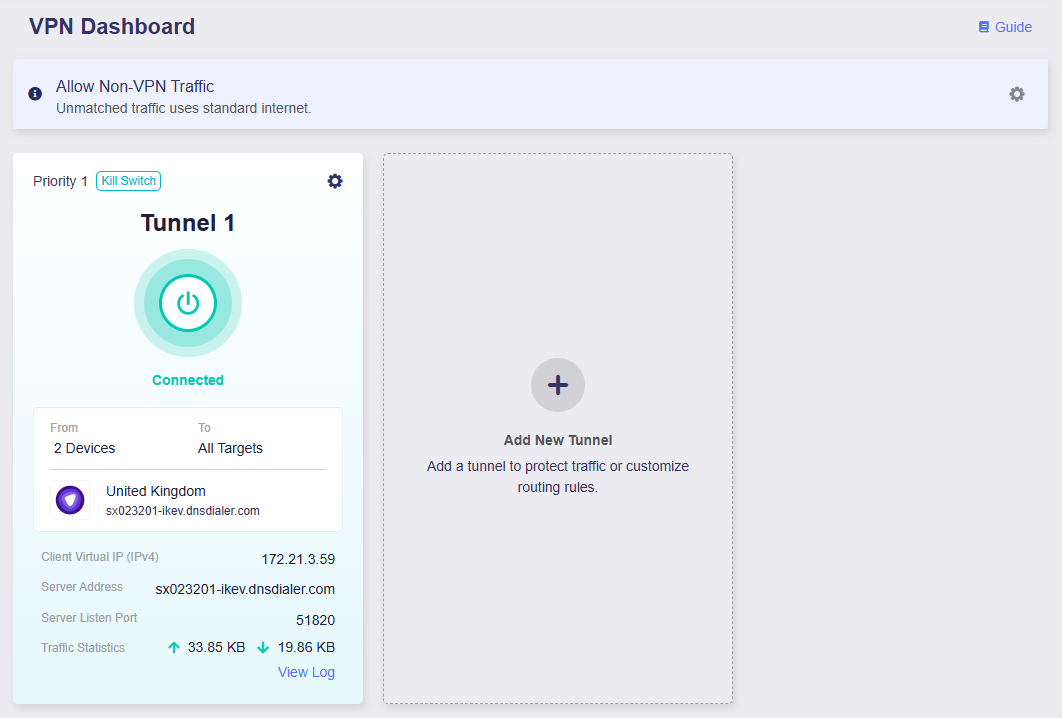
Once connected, the page will display the VPN connection details, including VPN policy, traffic statistics, server address, listen port, and virtual IP address.
Now, only two specified devices access the Internet through VPN. If the VPN disconnects unexpectedly, Internet access for these devices will be blocked to prevent DNS leaks and IP tracking. All other devices will access the Internet through the local WAN instead.
Scenario 2
Objectives:
-
All devices use VPN Tunnel 1 when accessing domains of specific social media and streaming services, and use VPN Tunnel 2 for all other Internet access.
-
If the VPN tunnels disconnect unexpectedly, Internet access for all devices will be blocked to prevent DNS leaks and IP tracking.
Follow the steps below to configure the VPN policy.
-
Select the VPN profile for Tunnel 1.
Take PureVPN as an example. Select one or multiple profiles, and adjust their priority on the right as needed.
Note: When multiple profiles are selected, the tunnel will attempt to connect using each profile in priority order until a connection is successfully established. If all profiles within a single tunnel fail to connect, the system will determine whether to switch to the local WAN based on the status of the Tunnel Kill Switch and All Other Traffic policy.
-
Select Client Source.
Click the All Clients tab, set it as the client source for Tunnel 1, then click Apply.

-
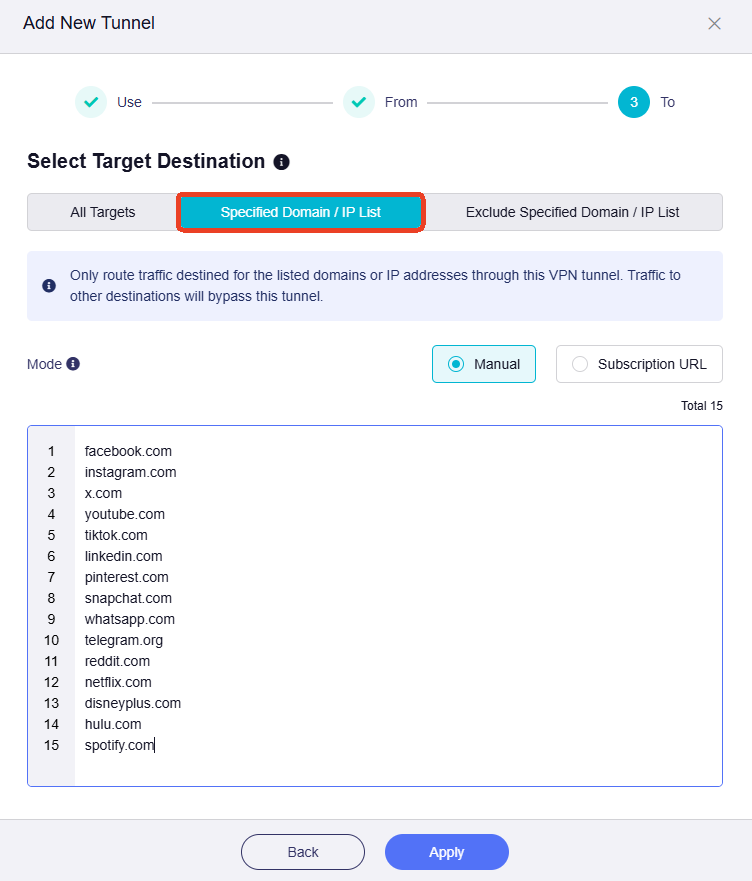
Select Target Destination.
Click the Specified Domain / IP List tab, enter domains of some common social media and streaming services, as shown below, then click Apply.
-
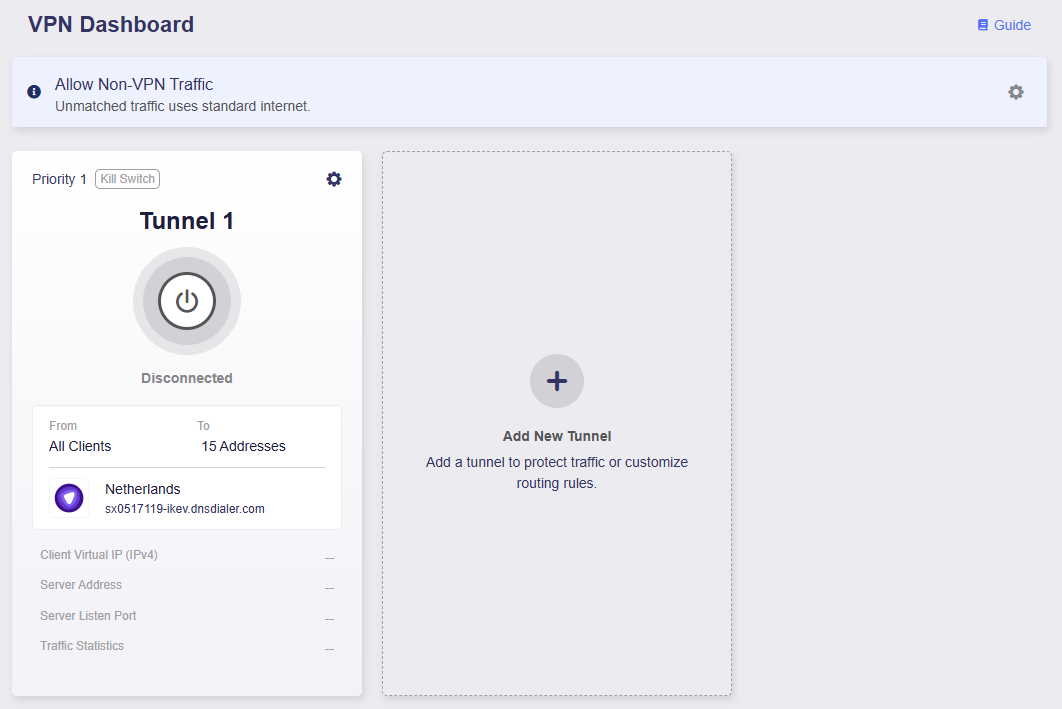
You will be directed to the VPN Dashboard, where the Tunnel 1 has been added.
-
Make sure the Kill Switch for Tunnel 1 is enabled. If the VPN disconnects unexpectedly, Internet access for traffic matching this tunnel will be blocked to prevent DNS leaks and IP tracking.

-
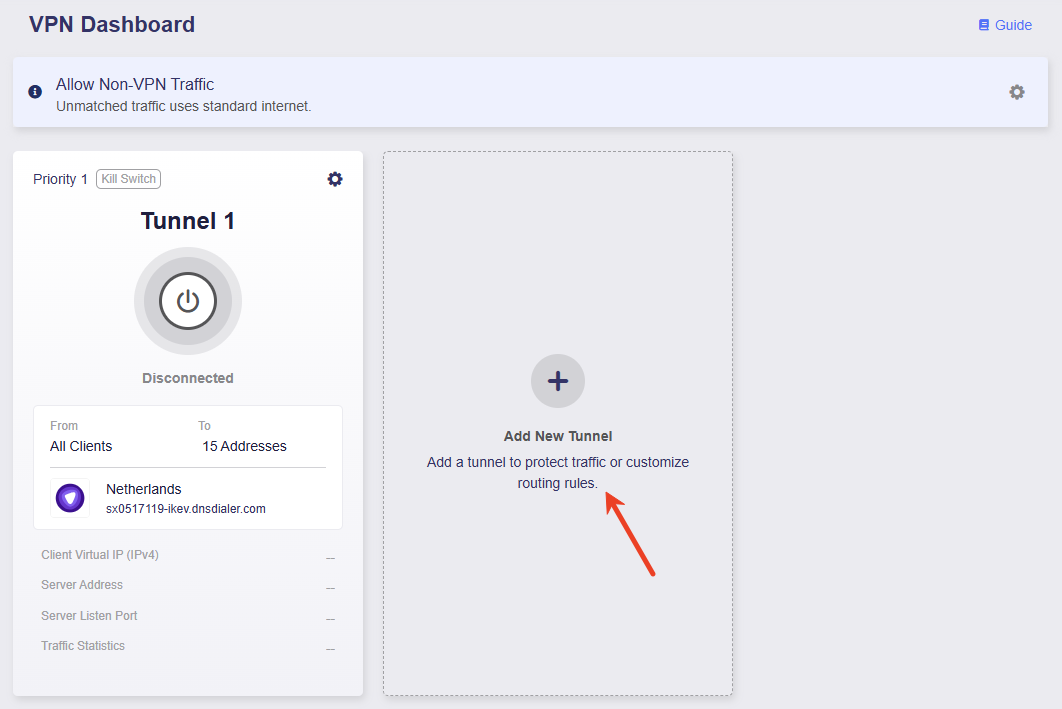
Click Add New Tunnel to add Tunnel 2.
-
Select the VPN profile for Tunnel 2.
Take PureVPN as an example. Select one or multiple profiles, and adjust their priority on the right as needed.
Note: When multiple profiles are selected, the tunnel will attempt to connect using each profile in priority order until a connection is successfully established. If all profiles within a single tunnel fail to connect, the system will determine whether to switch to the local WAN based on the status of the Tunnel Kill Switch and All Other Traffic policy.
-
Select Click Source.
Click the All Clients tab, set it as the client source for Tunnel 2, then click Apply.
-
Select Target Destination.
Click the All Targets tab, set it as the traffic destination for Tunnel 2, then click Apply.
-
You will be directed to the VPN Dashboard, where the Tunnel 2 has been added.
-
Make sure the Kill Switch for Tunnel 2 is enabled. If the VPN disconnects unexpectedly, Internet access for traffic matching this tunnel will be blocked to prevent DNS leaks and IP tracking.

-
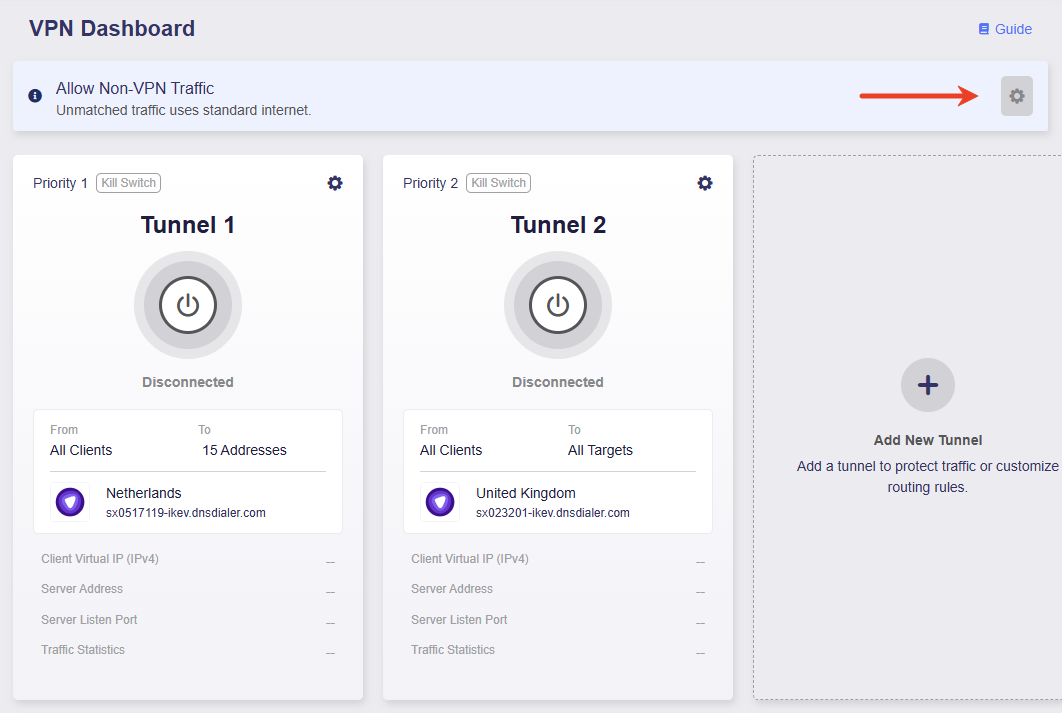
Click the gear icon at the upper right and enable Enhanced Kill Switch. This ensures that all traffic must access Internet via the VPN.
-
Click the middle button to activate Tunnel 1 and Tunnel 2.
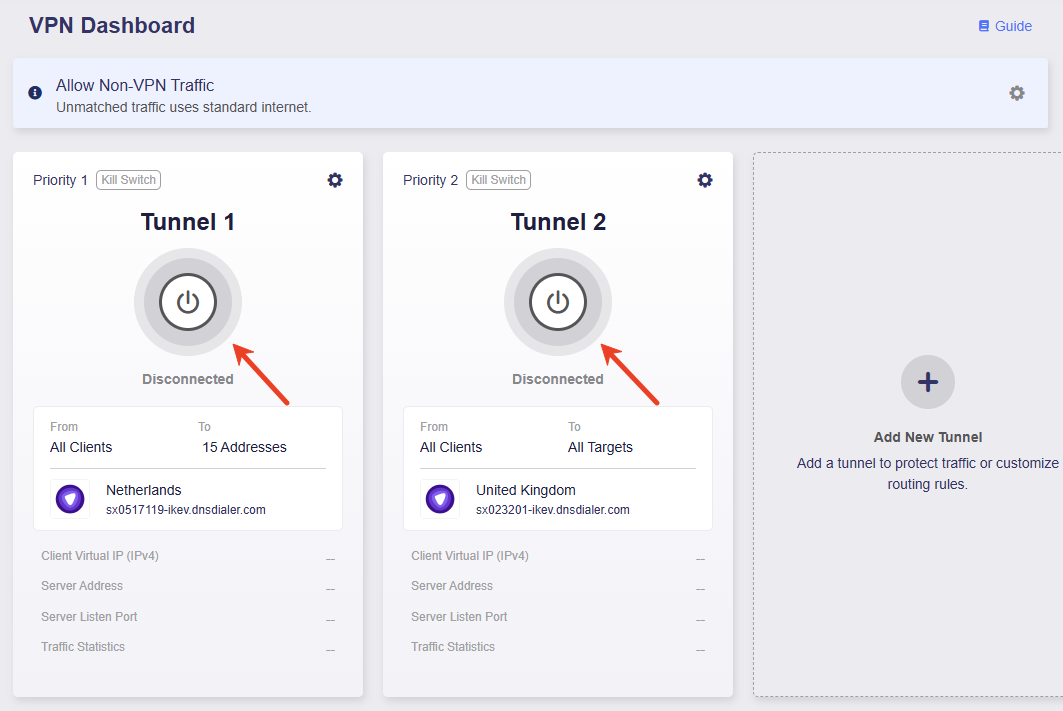
-
Once connected, the page will display the VPN connection details, including VPN policy, traffic statistics, server address, listen port, and virtual IP address.
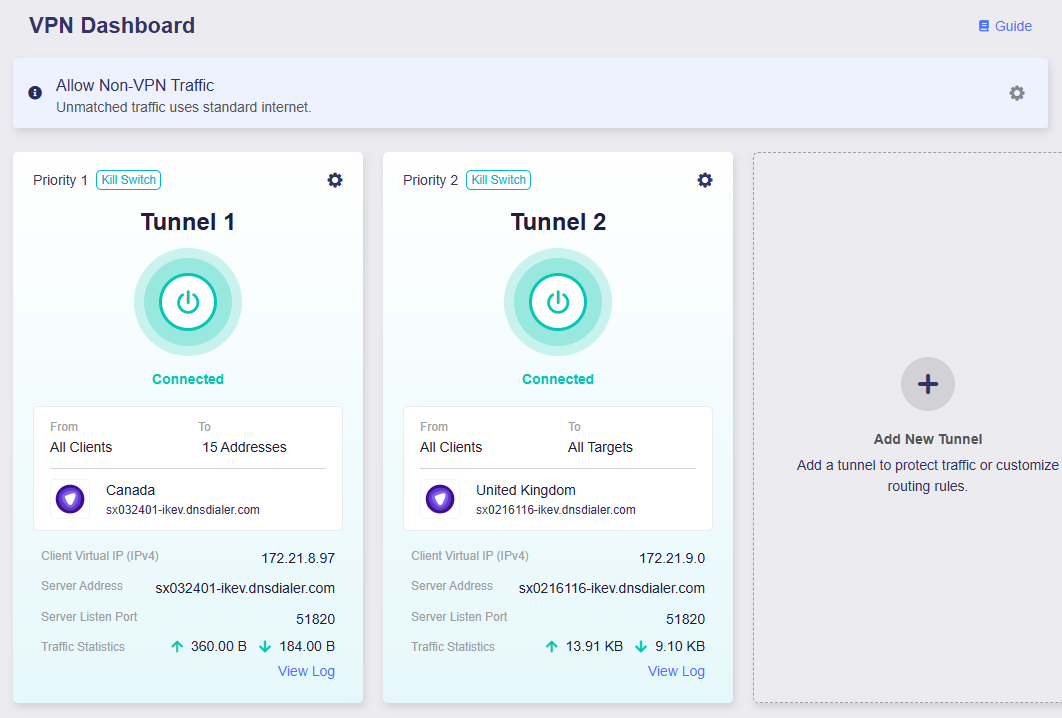
Now, all devices will use VPN Tunnel 1 when accessing specified domains, and use VPN Tunnel 2 for all other Internet access. If the VPN tunnels disconnect unexpectedly, Internet access for all devices will be blocked to prevent DNS leaks and IP tracking.
All Other Traffic
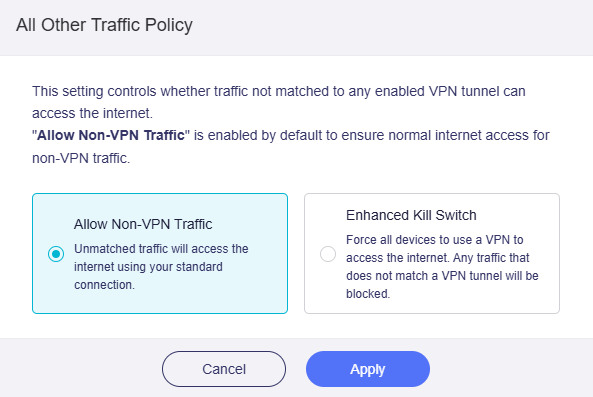
Click the gear icon at the upper right to set up policy for those traffic not matching VPN tunnel.

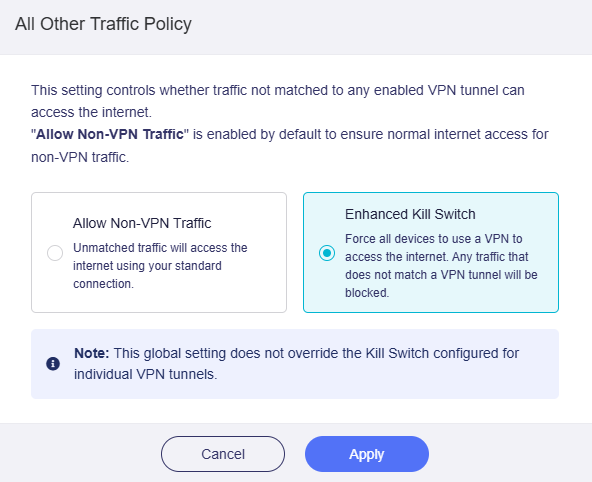
This policy controls whether traffic that does not match any of your VPN tunnel groups can access the Internet or not. It has two options: Allow Non-VPN Traffic and Enhanced Kill Switch.
-
Allow Non-VPN Traffic: Enabled by default to ensure normal internet access for non-VPN traffic.
-
Enhanced Kill Switch: Forces all devices to access the Internet through a VPN. Any traffic that does not match a VPN tunnel will be blocked. This global setting does not override the Kill Switch configured for individual VPN tunnels.

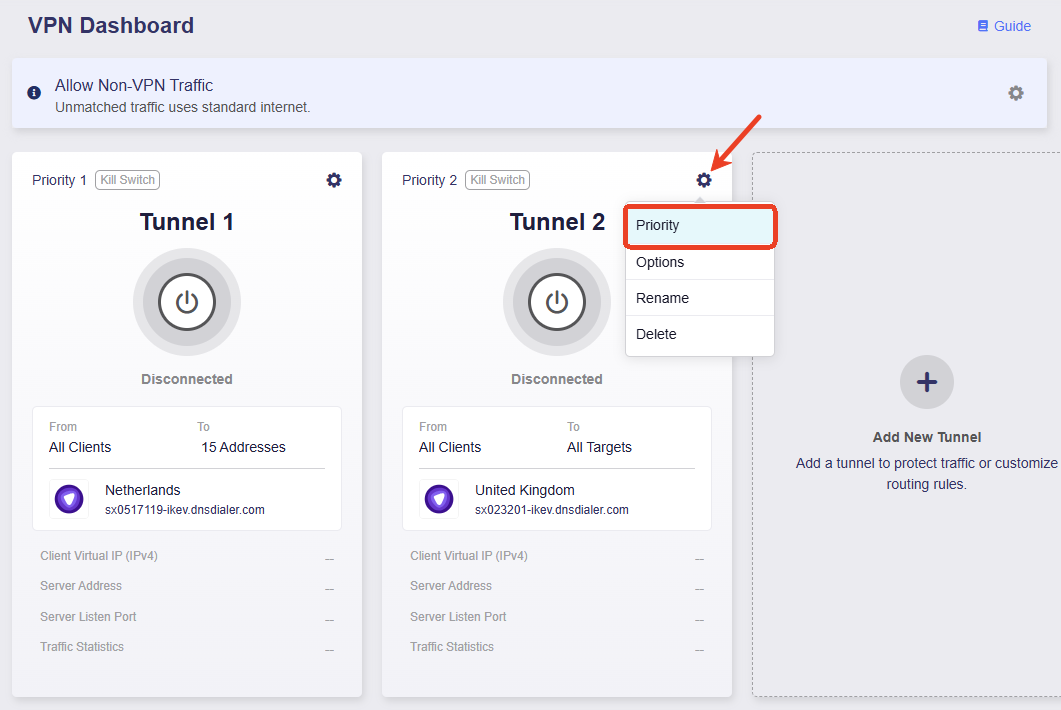
Tunnel Priority
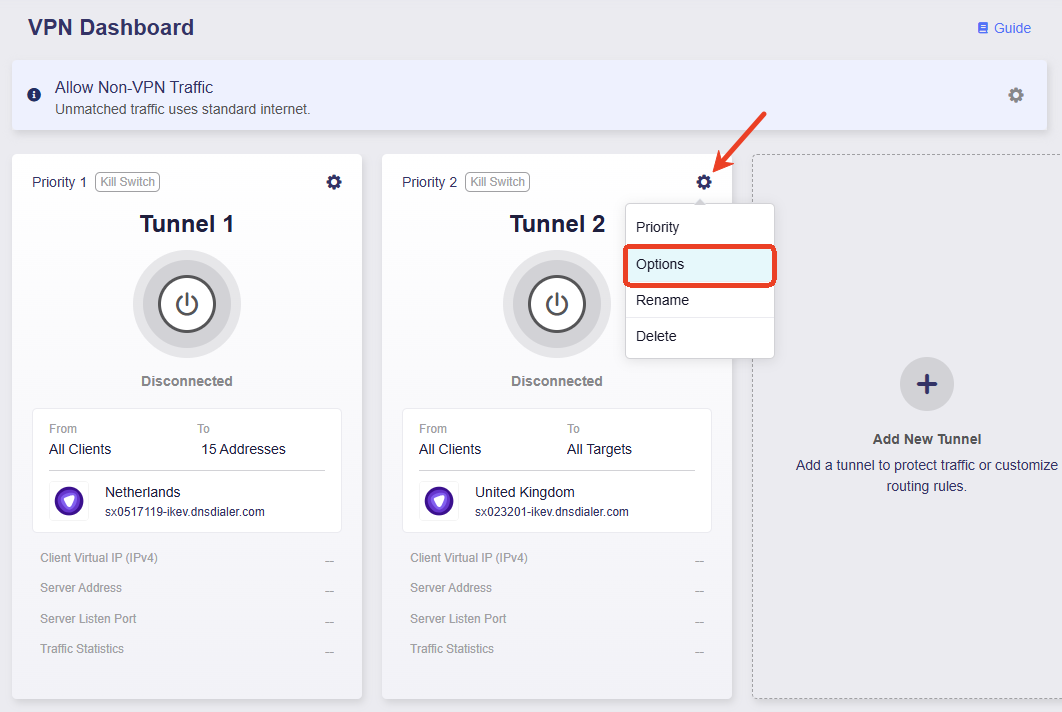
To adjust tunnel priority, click the gear icon in a tunnel group and select Priority.
Click and hold the three-line icon on the right to reorder the tunnels, then click Apply.
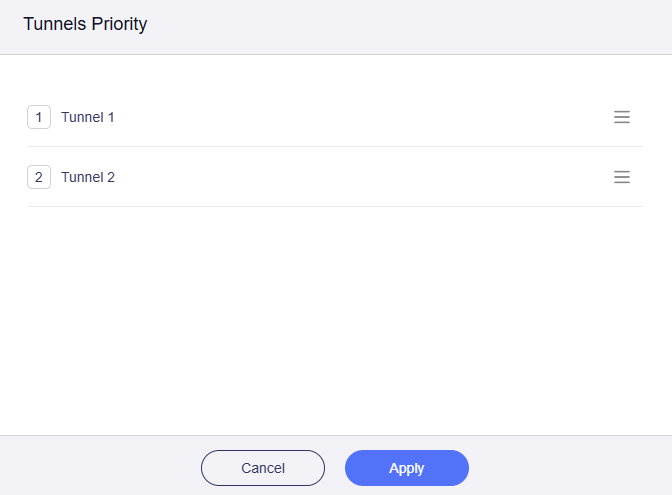
When multiple tunnels are enabled, the router routes traffic according to the following rules:
-
Traffic will first attempt to match the highest-priority tunnel rule. If matched, it will be routed through that tunnel; otherwise, it will try the next priority tunnel, and so on.
-
Each tunnel group operates independently. Once traffic matches a tunnel rule, it will be routed through that tunnel and will not fail over between tunnel groups.
-
Multiple profiles can be selected within each tunnel group to enable intra-tunnel failover. When the highest-priority profile in a tunnel group goes down, the tunnel will automatically connect using the second-highest priority profile, and so on.
-
If a VPN tunnel disconnects unexpectedly, the system will determine whether to fail over the traffic to the All Other Traffic tunnel based on whether this tunnel's Kill Switch is enabled.
- If the Kill Switch is enabled, traffic will be blocked and will not fail over to the All Other Traffic tunnel.
- If the Kill Switch is disabled, traffic will fail over to the All Other Traffic tunnel.
-
In the All Other Traffic tunnel, different modes determine whether the traffic that does not match the VPN tunnel can access the Internet.
-
Allow Non-VPN Traffic: It is enabled by default to ensure that traffic not matching the VPN tunnels can still access the Internet via local WAN.
-
Enhanced Kill Switch: It forces all devices to access the Internet through a VPN. Any traffic that does not match a VPN tunnel will be blocked. This global setting does not override the Kill Switch configured for individual VPN tunnels. In short, it strengthens the Kill Switch and blocks regular Internet access to prevent IP leaks.
-
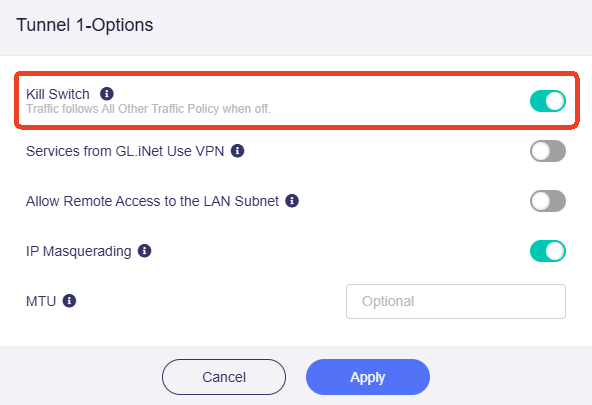
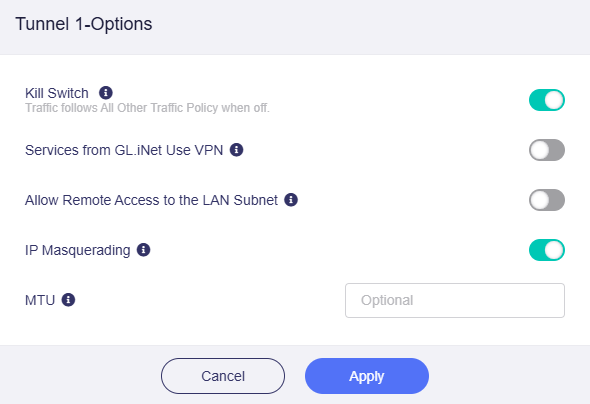
Tunnel Options
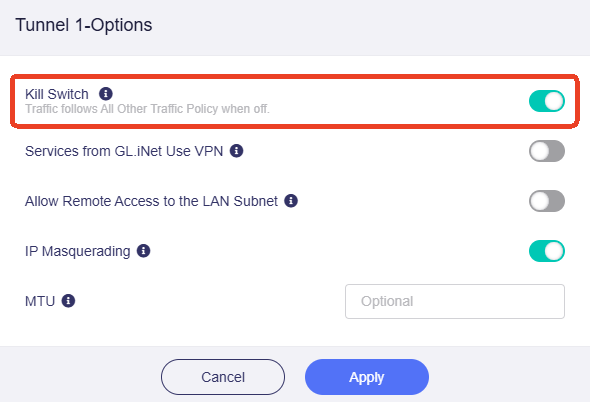
You can configure advanced settings for each VPN tunnel, such as the VPN Kill Switch, IP Masquerading, and MTU.
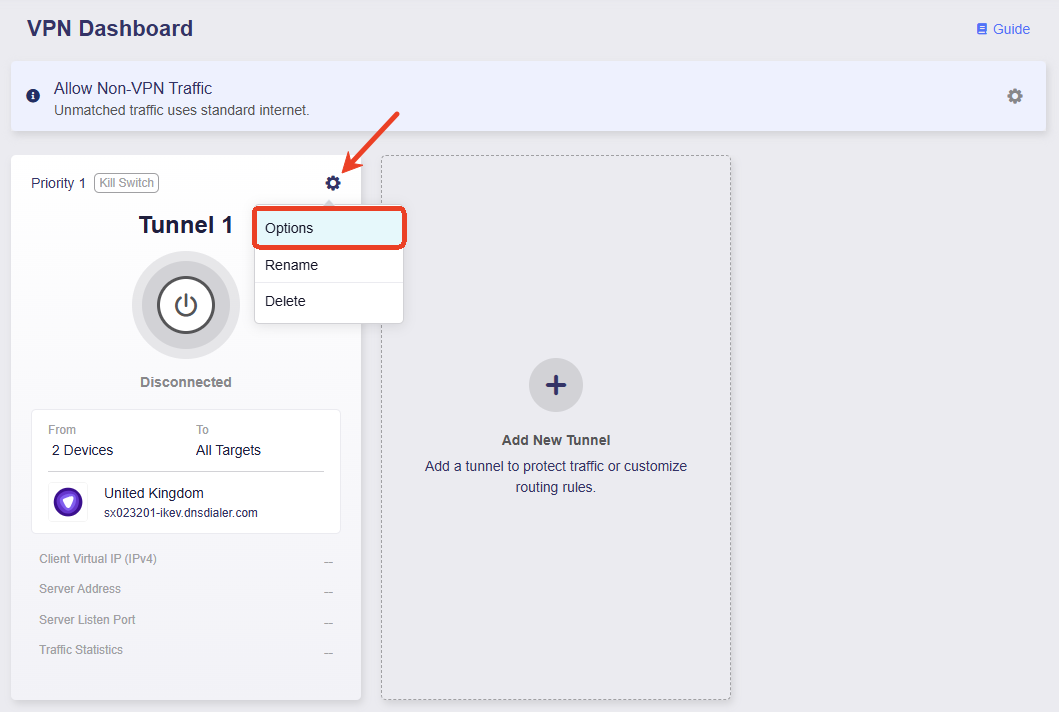
Click the gear icon in a tunnel group, and select Options.

-
Kill Switch: If enabled, traffic matching this VPN tunnel will be blocked if the VPN connection fails unexpectedly. If disabled, such traffic will fail over to the All Other Traffic tunnel.
-
Services from GL.iNet Use VPN: If enabled, GoodCloud, DDNS, and rtty services will transmit packets through VPN tunnels. This option is disabled by default, as these services normally require the device's real IP address to work properly.
-
Allow Remote Access to the LAN Subnet: If enabled, remote access to this router and its LAN devices through the VPN will be allowed. It requires the VPN server to advertise a route back to its LAN subnet.
-
IP Masquerading: If enabled, the source IP addresses of LAN clients will be rewritten to the router's VPN tunnel IP. Disable this only for Site-to-Site setups where the remote peer knows your LAN subnets.
-
MTU: The MTU value you set for the tunnel will override the MTU settings in the configuration file.
Still have questions? Visit our Community Forum or Contact us.