Using Uboot to unbrick your router
If you bricked your router due to some DIY projects or flashing a wrong firmware, you may fail to access it. In this case, you can re-install the firmware by using U-Boot failsafe.
Note: The U-Boot operation will remove your router's settings and installed plugins.
Preparation
Please prepare a computer or laptop with an Ethernet port. If your computer does not have an ethernet port, an additional USB-Ethernet adapter is required.
Note: GL-E5800 (Mudi 7) currently does not support firmware flashing via U-Boot.
Unbrick Steps
Refer to this video tutorial or follow the procedures below to access the U-Boot Web UI and re-install the firmware.
The steps for using U-Boot to re-install firmware are roughly the same, and this video takes Mudi/Mudi V2 as an example. For other models, you may follow the procedures below.
-
Download U-Boot firmware here to your computer.
Some models offer two firmware variants. Please download the U‑Boot compatible firmware.
-
Power off your router. Connect a computer to the router's Ethernet LAN port, and leave all the other ports unconnected.
Note
On some models, a specific individual LAN port can be switched to WAN. Please do not use this LAN port for firmware flashing. For example, on the GL-MT6000 (Flint 2), do not use LAN 1. Please use LAN 2, LAN 3, or LAN 4 instead.
-
Press and hold the Reset button firmly, at the same time power on the router. If your router doesn't have a power button, plugging the power in will power it on automatically.
Wait for the LED to flash in a regular sequence several times. Release the Reset button after the flashing pattern changes.
LED Flashing Patterns by Device Model
Note: Identical router models from different production batches may have different LED colors or flashing sequences. This does not affect the U-Boot recovery process. Please focus on the change of the LED flashing state.
-
For GL-MT3600BE (Beryl 7): The blue LED flashes 7 times, then turns solid white.
-
For GL-MT5000 (Brume 3): The Power LED flashes blue 7 times, then turns solid white.
-
For GL-BE6500 (Flint 3e): The blue LED flashes 6 times, then turns solid white.
-
For GL-BE9300 (Flint 3): The blue LED flashes 6 times, then turns solid white.
-
For GL-BE3600 (Slate 7): After holding down the Reset button for about 5 seconds, a 5-second countdown will appear on the touchscreen. Keep pressing the Reset button until the next prompt appears on the screen, e.g., manually set the IP address of your computer to 192.168.1.2, and use browser to visit http://192.168.1.1. Turn to Step 4 for further instruction.
-
For GL-X2000 (Spitz Plus): The Internet LED flashes 5 times, then the Wi-Fi LED stays on.
-
For GL-B3000 (Marble): The blue LED light flashes 7 times, then turns solid white.
-
For GL-MT6000 (Flint 2): The blue LED flashes 6 times, then turns solid white.
-
For GL-MT3000 (Beryl AX): The blue LED flashes 6 times, then turns solid white.
-
For GL-MT2500/GL-MT2500A (Brume 2): The Power LED flashes blue 5 times, then turns solid white.
-
For GL-X3000 (Spitz AX): The Internet LED flashes 5 times, then the Wi-Fi LED stays on.
-
For GL-XE3000 (Puli AX): The Internet LED flashes 5 times, then the Wi-Fi LED stays on.
-
For GL-XE300 (Puli): The LAN LED flashes 5 times, then the Wi-Fi LED stays on.
-
For GL-E750 (Mudi): Its screen will first display "Booting", followed by "Reset Counting 1 to 4", and finally "Please Open Web 192.168.1.1".
-
For GL-X750 (Spitz): The Internet LED flashes 5 times, then the Wi-Fi LED stays on.
-
For GL-AX1800 (Flint): The blue LED flashes 5 times, then turns solid white.
-
For GL-AXT1800 (Slate AX): The blue LED flashes 5 times, then turns solid white.
-
For GL-SFT1200 (Opal): The blue LED flashes 5 times, then turns solid white.
-
For GL-MT1300 (Beryl): The blue LED flashes twice slowly, then flashes 5 times faster and turns solid white.
-
For GL-A1300 (Slate Plus): The LED flashes slowly 5 times, then stays on for a short while, then flashes quickly all the time.
-
For GL-MT300N-V2 (Mango) and GL-AR300M (Shadow): The LED flashes 5 times.
-
For GL-X300B (Collie): The WAN LED flashes 5 times, then the Wi-Fi LED stays on.
-
For GL-AP1300 (Cirrus): The power LED flashes slowly 5 times, then stays on for a short while, then flashes quickly all the time.
-
For GL-B1300 (Convexa-B) and GL-S1300 (Convexa-S, EOL): The LED flashes 4 times.
The leftmost Power LED stays on the whole time while the rightmost Wi-Fi LED flashes 4 times, then the middle Mesh LED turns solid on.
(For some old GL-B1300, the leftmost Power LED stays on the whole time, and both the middle LED and the rightmost LED flash 5 times simutaneously, then stay on.)
-
For GL-B2200 (Velica): The two LEDs start blue, then turn white and flash 5 times, then turn solid blue.
-
For GL-SF1200: The 5G LED flashes 5 times, then turns solid on.
-
For GL-S200, the cyan LED flashes 5 times, then briefly turns purple, then turns solid cyan.
-
For GL-AR750 (Creta) and GL-AR750S-EXT (Slate): The LED flashes 5 times.
-
For GL-USB150 (Microuter), microuter-N300 and GL-AR150 (White): The LED flashes 5 times.
-
For GL-MV1000/GL-MV1000W (Brume): No repeat LED flashes signal. Power and WAN LEDs will stay on the whole time.
-
For GL-MiFi: The LED flashes 6 times.
-
For GL-MT300N and GL-MT300A: The LED flashes 3 times.
-
-
Manually set the IP address of your computer to 192.168.1.2. Please check the step-by-step guide for different operating systems below:
Windows 7 / Windows 10
-
Go to Control Panel -> Network and Internet -> Network and Sharing Center -> Change adapter settings.
-
Right click Local Area Connection -> Properties.
-
Click Internet Protocol Version 4 (TCP/IPv4) -> Properties.
-
Set the IP adress to
192.168.1.2manually. -
Set the Subnet mask to
255.255.255.0.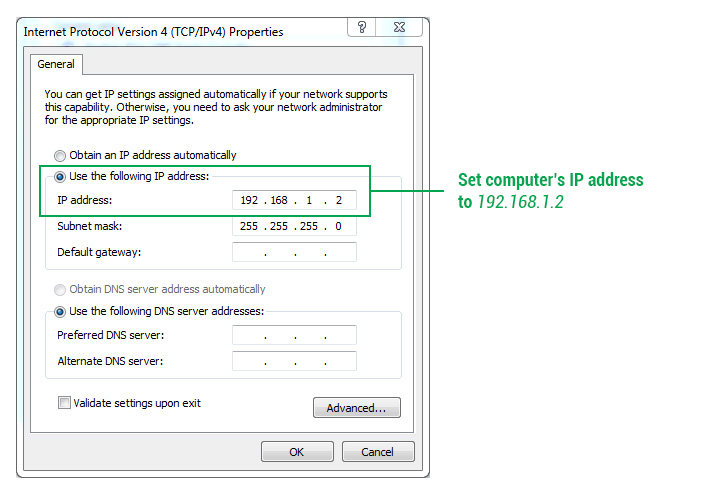
-
Click the OK button.
Windows 11
-
Open Settings.
-
Click on Network & Internet.
-
Click the Ethernet tab.

-
Under the "IP assignment" section, click the Edit button.

-
Select the Manual option.

-
Turn on the IPv4 toggle switch.
-
Set the static IP address as 192.168.1.2.

-
Specify the Subnet mask as 255.255.255.0.
-
Click the Save button.
macOS
-
Click the Apple icon in the top left corner of the screen, and select System Preferences.

-
Click Network.

-
Click Ethernet on the left and then click the drop-down box next to Configure IPv4 and select Manually. If you are using a USB Ethernet Adapter, Ethernet may not be found and it may show up as the name of the USB Ethernet Adapter.

-
Enter the IPv4 Address to
192.168.1.2, Subnet Mask to255.255.255.0, Router to192.168.1.1, then click the Apply button in the lower right corner.
-
-
Use your web browser to visit http://192.168.1.1. This is the U-Boot Web UI.

Note
-
If you fail to access U-Boot Web UI, check if you have any VPN or proxy software running. Disable any VPN or proxy software, including Tailscale and ZeroTier.
-
The U-Boot Web UI above may not be exactly the same as what you see, because the U-Boot version is different for different production dates. In some extreme cases, we recommend upgrading the U-Boot version. Please refer to the tutorial here.
-
-
Click Choose file button to find the firmware file. Then click Update firmware button.
-
Wait for about 3 minutes. Don't power off your device during the firmware update.
The router is ready when the LED keeps flashing blue; for some cellular models, it is ready once both the Power and Wi‑Fi LEDs are solid on.
-
Revert the IP settings you did in step 4 and connect your computer to the router's LAN or Wi-Fi. You will be able to access the router's web admin panel via 192.168.8.1 again.
Note: It might be required to use the incognito mode or to delete the browser cache and cookies to access the router.
Still have questions? Visit our Community Forum or Contact us.