Flint 4 (GL-BE14000) User Guide
Product overview
Flint 4 (GL-BE14000) redefines what a home router can be. It features tri-band Wi-Fi 7 with MLO, delivering peak rates of 688 Mbps (2.4 GHz) + 4323 Mbps (5 GHz) + 8646 Mbps (6 GHz). For wired connectivity, it comes with a full multi-gig wired backbone, including one 10G SFP+ WAN/LAN port, one 10GE WAN/LAN port, one 2.5GE WAN/LAN port, three 2.5GE LAN ports and four 1GE LAN ports. Supporting high-performance VPN, it achieves throughput up to 1.5 Gbps for both WireGuard® and OpenVPN DCO. A 2.4-inch touchscreen display is also equipped on-board, enabling real-time network-status monitoring and allowing users to view key network metrics directly on the hardware device.
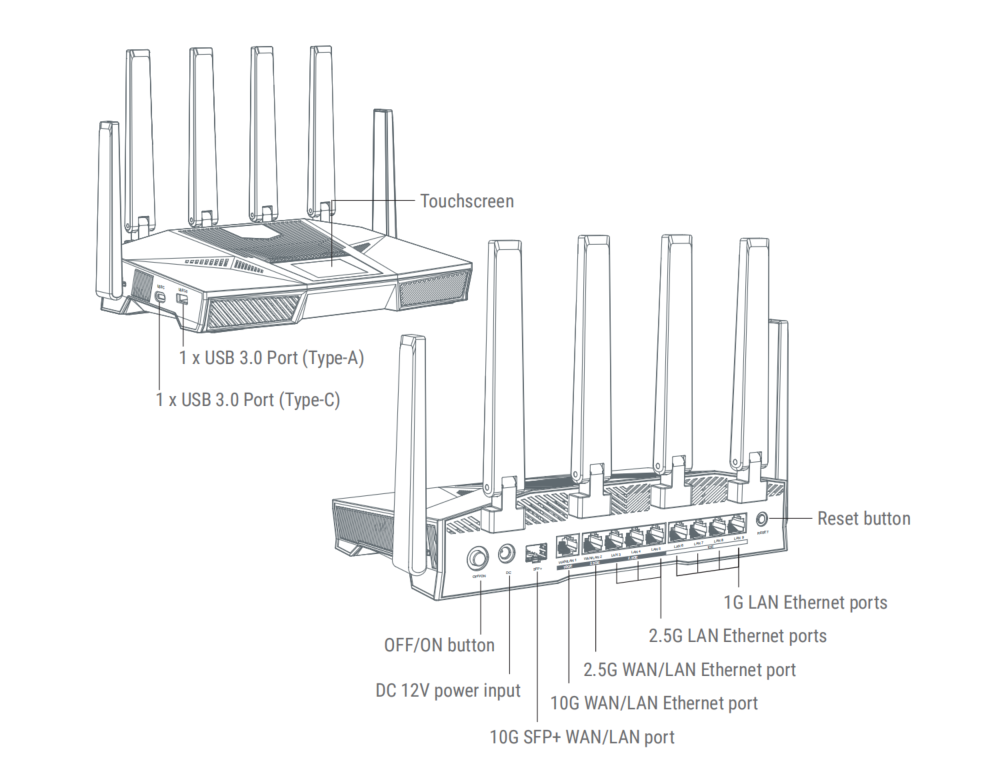
Package contents
- 1 x Flint 4 (GL-BE14000)
- 1 x Power adapter
- 1 x Ethernet cable
- 1 x User Manual
- 1 x Thank you card
- 1 x Converter (Based on your shipping country)
Check out Flint 4's unboxing video below.
How to set up Flint 4
Watch this setup video or follow the steps below.
1. Power on
Put the two-piece power adapter together. Connect it to your router and plug it into a outlet. It will start up automatically.
2. Connect device
Connect a device (e.g., computer, laptop or smartphone) to the router using Wi-Fi or Ethernet.
-
Ethernet
Connect your device to the router's LAN port using an ethernet cable.
-
Wi-Fi
On your device, locate your router's Wi-Fi network name in the available networks list, and enter the password to join the network. You can find the default network name (SSID) and password printed on the router's label.
3. Log in to web Admin Panel
Open a web browser, enter 192.168.8.1 in the address bar and log in. Set your admin password and Wi-Fi details, then click Apply.
4. Internet setup
Configure your Flint 4 using one of the supported internet connection methods: Ethernet (SFP+), Ethernet (RJ45), Repeater, Tethering, and Cellular. If you want to use the Multi-WAN feature, please set up more than one internet connection.

Flint 4 comes with a 10G SFP+ WAN/LAN port, designed for fiber uplinks, high‑speed switch backhaul, and high‑performance network expansion. This port is set to WAN by default and can be switched to LAN if needed.
Below is an example of connecting the Flint 4's 10G SFP+ port to ISP fiber uplink via an optical transceiver and fiber cable for internet access. Please refer to Connecting the 10G SFP+ port on Flint 4 for more solutions.
- Insert a compatible 10G SFP+ transceiver into Flint 4's SFP+ port, then connect it to your ISP fiber uplink.
- Flint 4 will attempt to obtain network parameters (IP address, gateway, DNS) automatically via DHCP. If your ISP requires PPPoE or static IP addressing, adjust the WAN connection settings in the web Admin Panel accordingly.
- Once successfully connected to the internet, the Ethernet section on the touchscreen homepage will turn blue (active). You can either tap Ethernet on the touchscreen or log in to the web admin panel to check connection details.
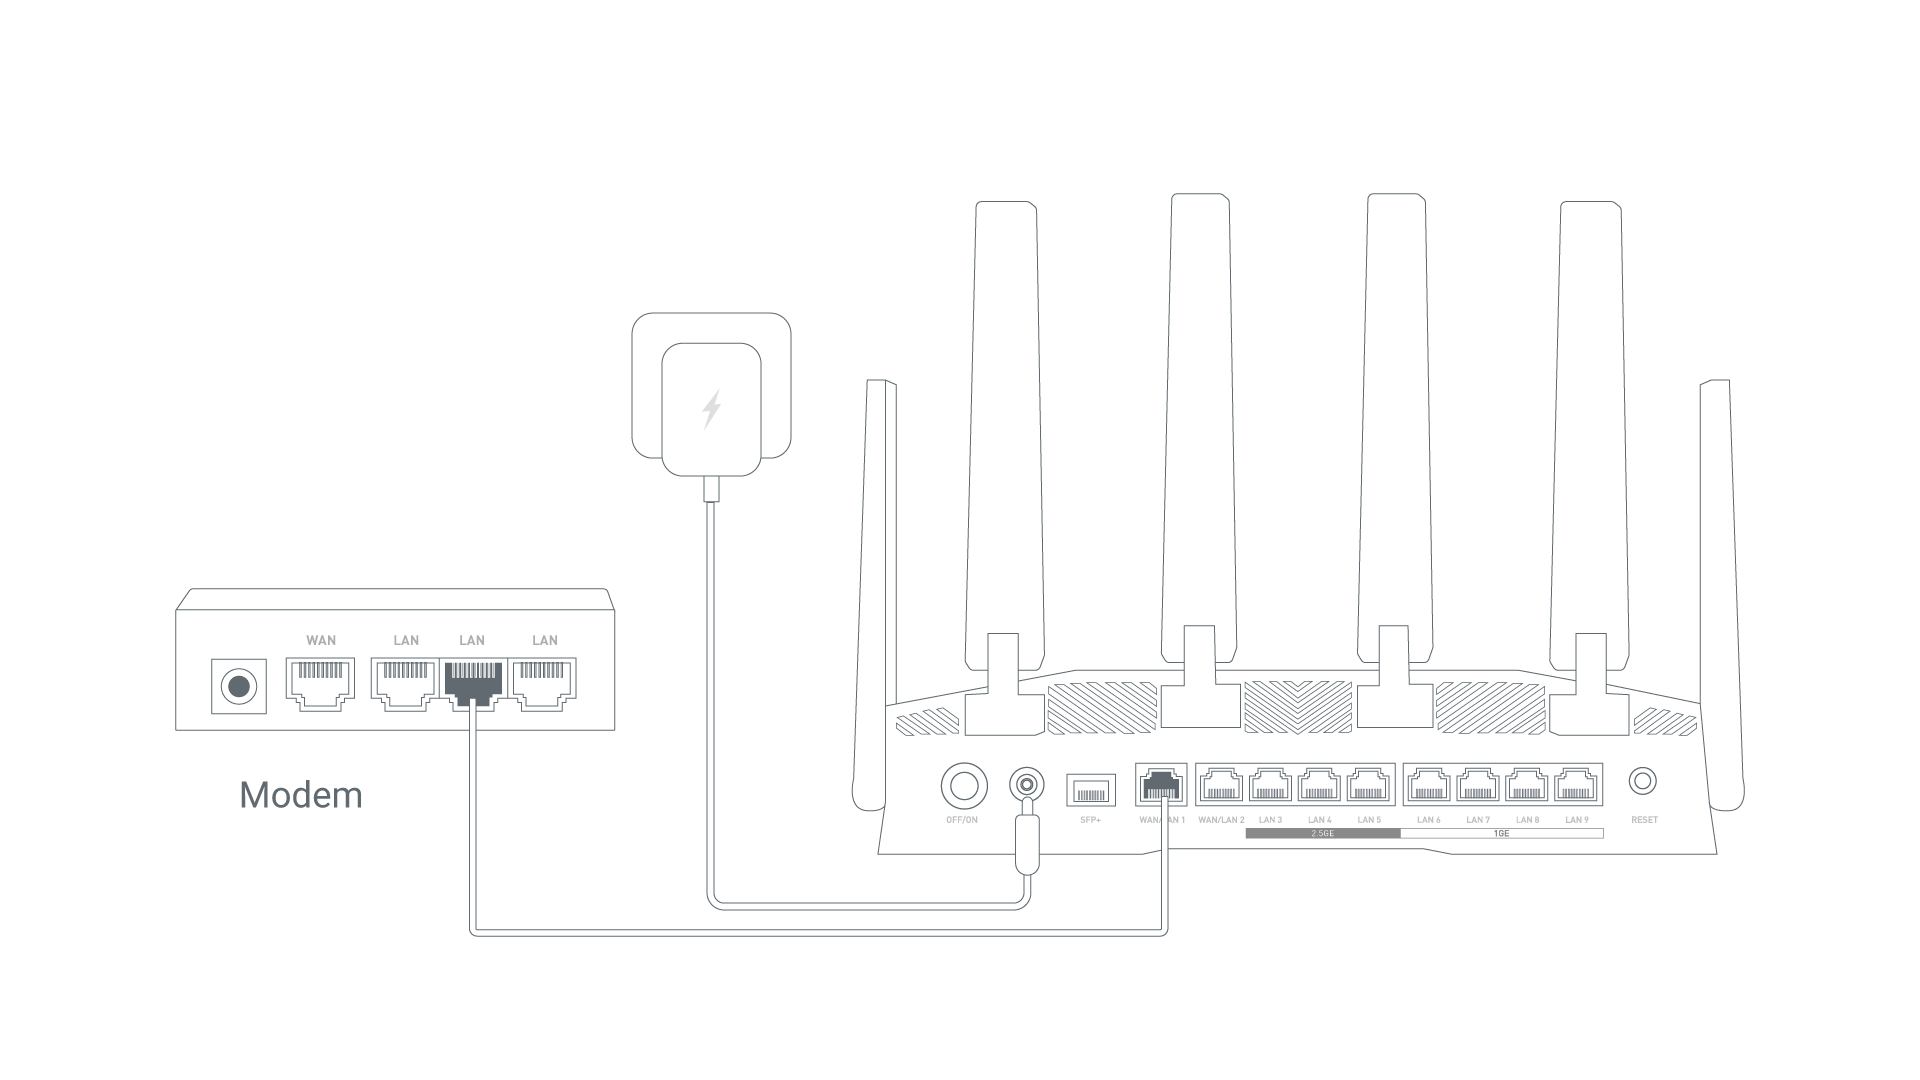
- Connect the Flint 4's WAN port to an upstream device (e.g., ISP modem, network switch, or wall Ethernet jack) using an Ethernet cable.
- Flint 4 will attempt to obtain network parameters (IP address, gateway, DNS) automatically via DHCP. If your ISP requires PPPoE or static IP addressing, adjust the WAN connection settings in the web Admin Panel accordingly.
- Once successfully connected to the internet, the Ethernet section on the touchscreen homepage will turn blue (active). You can either tap Ethernet on the touchscreen or log in to the web admin panel to check connection details.
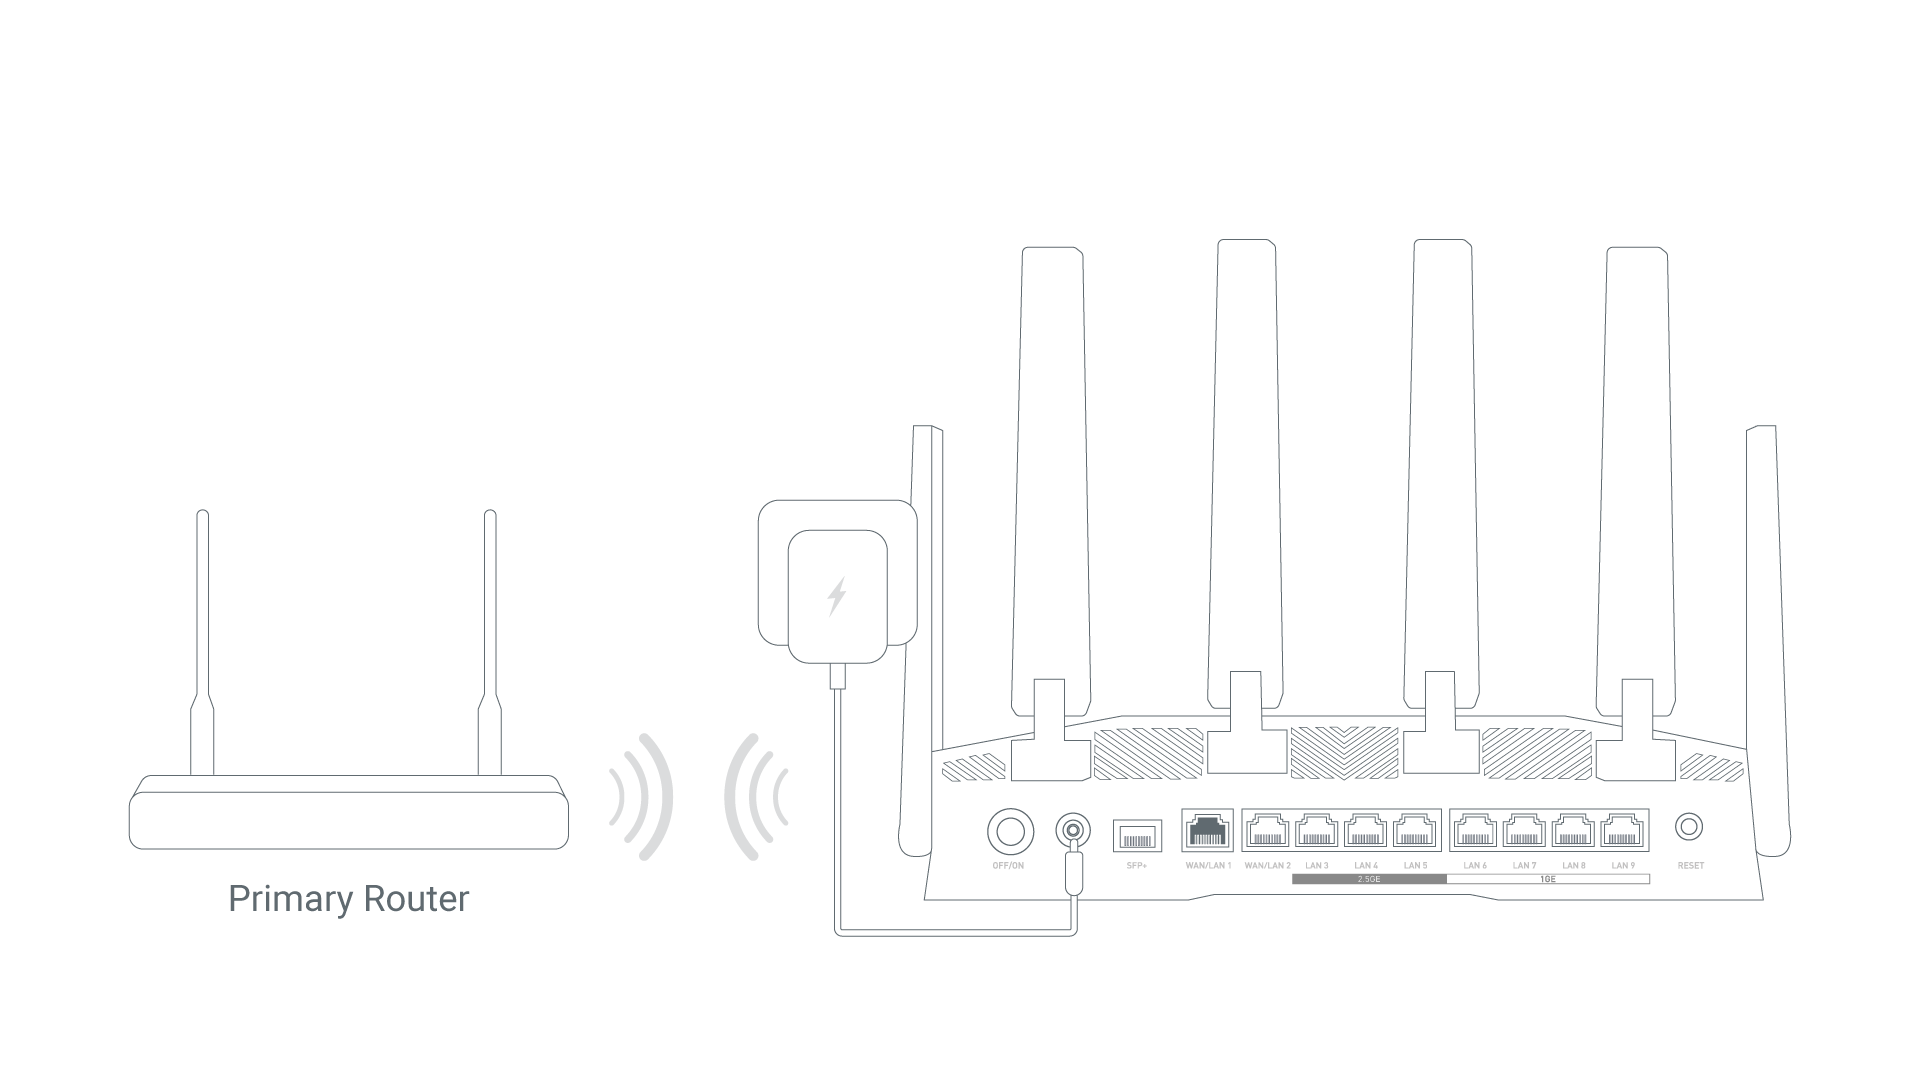
- Tap Repeater on the touchscreen. It will start scanning for available Wi-Fi networks.
- Select the Wi-Fi network you want Flint 4 to extend.
- Enter the password and tap Apply.
- Once successfully connected to the internet, the Repeater section on the touchscreen homepage will turn blue (active). You can either tap Repeater on the touchscreen or log in to the web admin panel to check connection details.
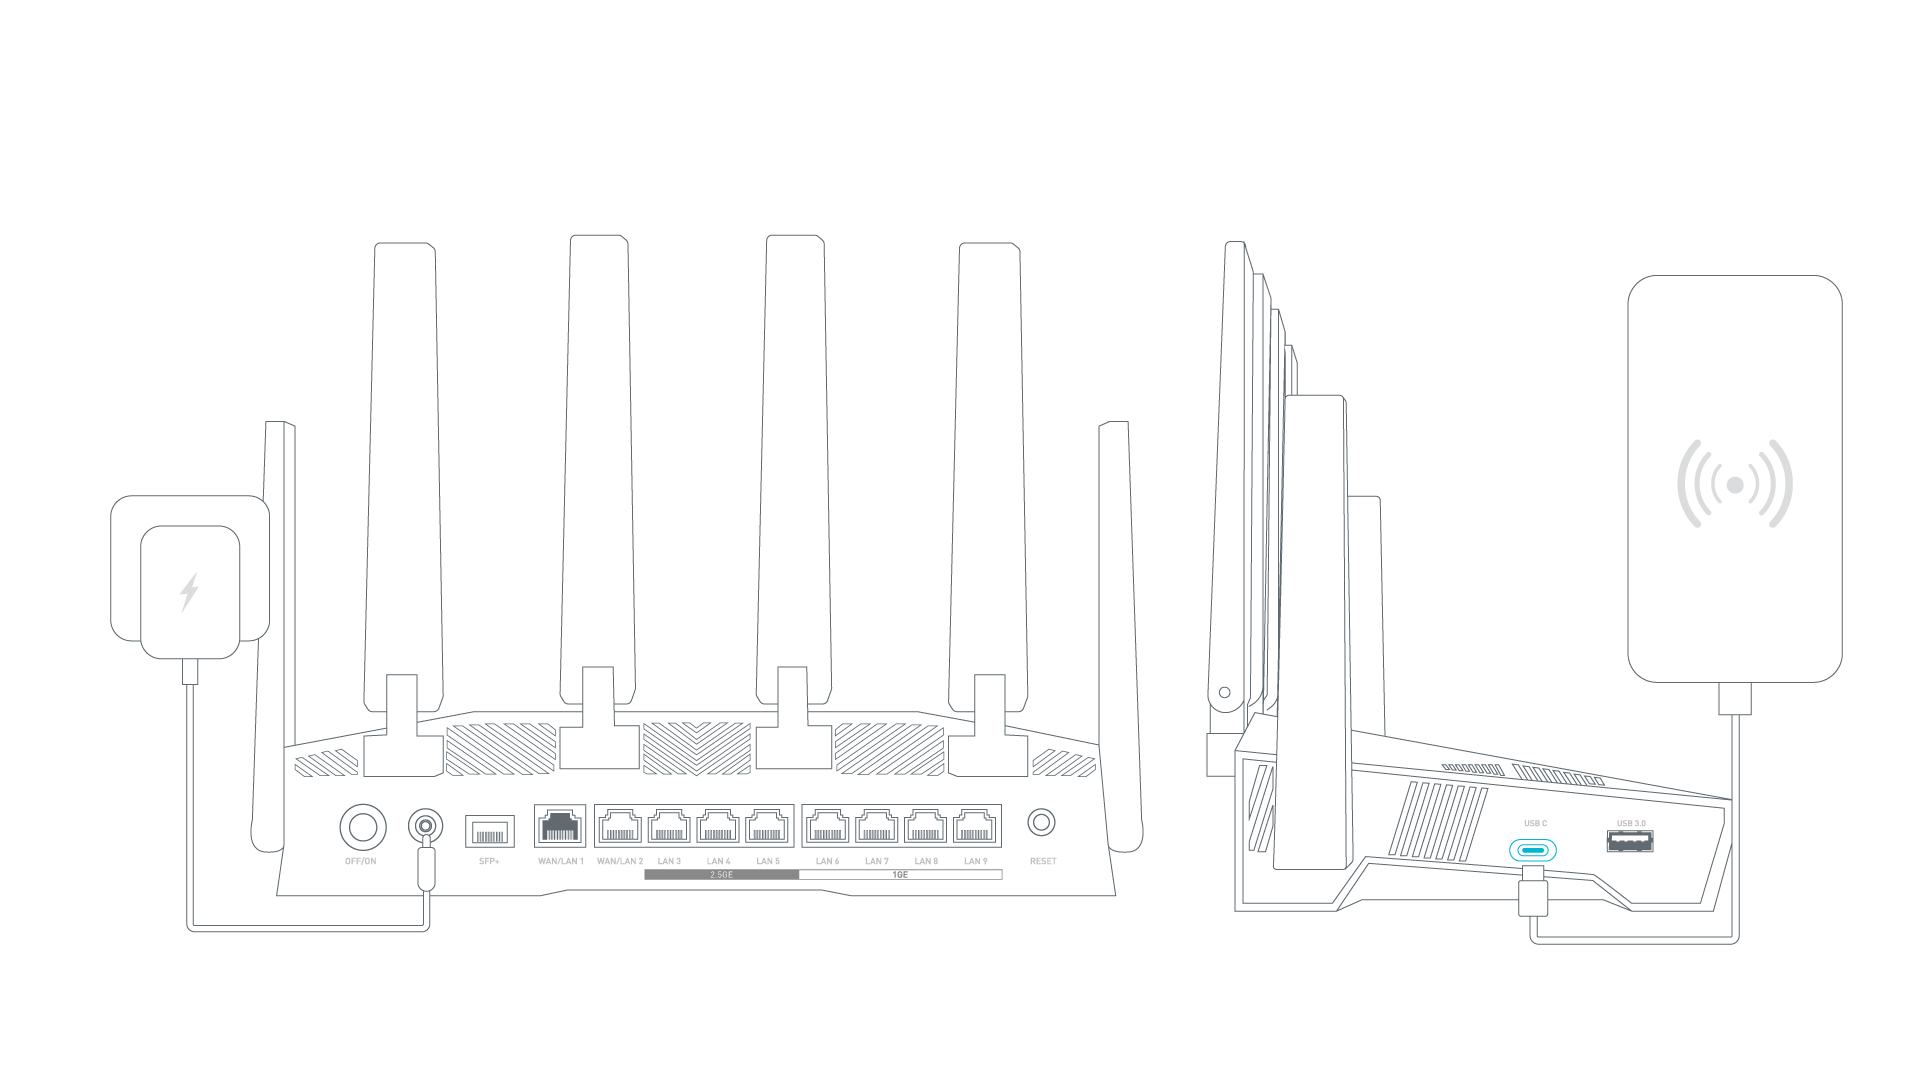
- Connect a mobile device (e.g., smartphone) to the Flint 4's USB port via a USB cable.
- On your mobile device, go to Settings and enable USB Tethering or Personal Hotspot. For iPhone, tap Trust This Device if prompted.
- On the Flint 4's touchscreen, select Tethering and tap Connect. It will then connect to your device.
- Once successfully connected to the internet, the Tethering section on the touchscreen homepage will turn blue (active). You can either tap Tethering on the touchscreen or log in to the web admin panel to check connection details.
Note: If the connection fails, make sure the power supply voltage is 12V 4A, as low power supply may prevent the USB port from powering up. Repeat the steps above, or log in to the web admin panel to check the Tethering connection status.
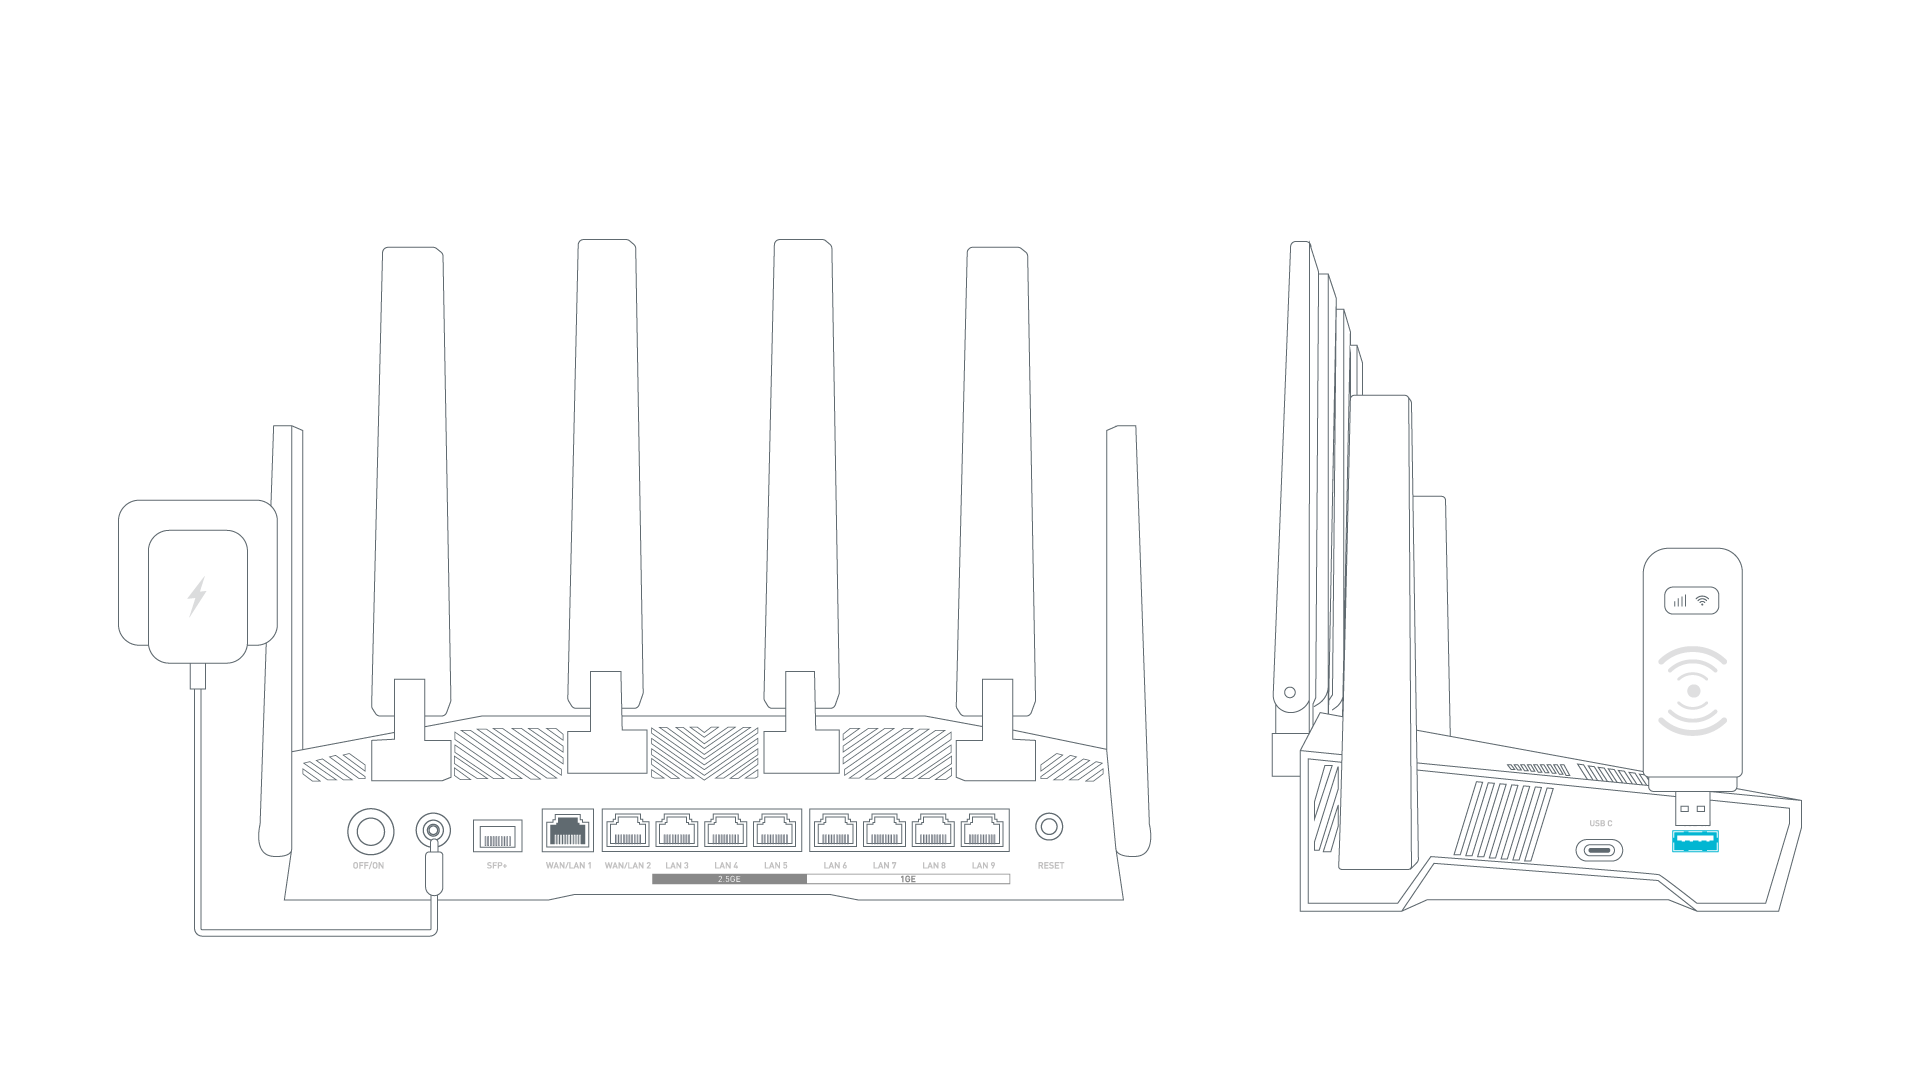
- Plug a cellular modem or USB dongle into the Flint 4's USB port. This is useful for sharing internet from a USB modem to all connected devices.
- Once successfully connected to the internet, the Cellular section on the touchscreen homepage will turn blue (active). You can either tap Cellular on the touchscreen or log in to the web admin panel to check connection details.
Below is an overview of the features in the Flint 4 web Admin Panel.
Wireless
The Wireless page allows you to configure various Wi-Fi networks for your Flint 4, including MLO Wi-Fi, Main Network, Guest Network and IoT Network.
Please refer to Wireless for details.
Clients
The Clients page displays information about connected devices. For each client, it shows the name, IP and MAC addresses, download and upload speeds, total traffic, and provides the ability to block the client or perform other actions.
Please refer to Clients for details.
Cloud Services
GL.iNet GoodCloud provides an easy and simple way to remotely access and manage GL.iNet routers.
Please refer to GoodCloud for details.
AstroWarp is an advanced networking feature integrated into GL.iNet routers. It enables seamless remote access to your home network without registration or login. Using the AmneziaWG protocol with built-in traffic obfuscation, it keeps your connection stable and secure, making it ideal for reliable remote access wherever you go. Users can set up an AstroWarp network directly through the GL.iNet router admin panel. Simply pair your routers using an access code and you can securely connect your travel router to your home network in seconds.
Please refer to AstroWarp for details.
VPN
A VPN (virtual private network) creates a secure, encrypted traffic between your device and the VPN server. It provides an added layer of privacy and security (VPN client) and allows you to access a remote network (VPN server). Flint 4 supports OpenVPN and WireGuard protocols.
Flint 4 (and other GL.iNet routers) support the OpenVPN protocol which offers strong security. To set up OpenVPN, refer to the tutorials below:
Flint 4 (and other GL.iNet routers) support the WireGuard protocol which offers great speeds and convenience. To set up WireGuard, refer to the tutorials below:
Network
Multi-WAN is a networking feature that allows you to set up your router with multiple internet connections (e.g., cellular, repeater, and ethernet) at the same time. If your current internet connection fails, the router will automatically switch to another internet connection. This ensures smooth and uninterrupted internet access.
Please refer to Multi-WAN for details.
The Subnet page centralizes management of LAN, Guest Network, IoT Network, and custom VLAN Networks, allowing you to create and manage multiple subnets to isolate different types of devices or traffic.
Please refer to Subnet for details.
The Ethernet Port page allows you to manage Ethernet port role (WAN/LAN) and VLAN segmentation, as well as viewing port details such as MAC address and negotiated speed.
Please refer to Ethernet Port for details.
The DNS page allows you to set custom DNS servers, enable DNS rebinding attack protection and override DNS settings of all clients, allow custom DNS to override VPN DNS, and configure the DNS server settings mode to automatic or manually specify DNS servers from the Ethernet connection.
Please refer to DNS for details.
IPv6, or Internet Protocol version 6, is the most recent version of the Internet Protocol designed to replace IPv4. It provides a vastly larger address space, allowing for a virtually unlimited number of unique IP addresses, which is essential for accommodating the growing number of devices connected to the internet.
Please refer to IPV6 for details.
IGMP snooping is a network optimization technique used in Ethernet switches to manage and control multicast traffic.
Please refer to IGMP Snooping for details.
Network mode refers to the various operational roles and functions that a router can assume to meet different network deployment needs. Common network modes for router include router mode, extender mode, and access point mode.
Please refer to Network Mode for details.
Drop-in Gateway is a flexible feature that enables capability expansion for an existing main router without replacing or reconfiguring it. By setting a GL.iNet router as the Drop-in Gateway, you can add advanced features onto the existing network infrastructure, such as AdGuard Home, VPN, encrypted DNS, etc.
Please refer to the links below to set up drop-in gateway.
Network acceleration can reduce CPU load and speeds up traffic packet forwarding.
Please refer to Network Acceleration for details.
Flow Control
DPI (Deep Packet Inspection) is a core capability of intelligent network management. It can overcome the limitation of traditional routers (which only identify source or destination addresses), analyze data packet payloads in depth, and accurately identify user-accessed applications and websites through feature library comparison, enabling refined traffic classification and control.
Integrated with Netify, GL.iNet DPI feature adopts a lightweight embedded plug-in for efficient deployment. With Netify online-updated signature database, it enables reliable management, making network control more accurate and efficient.
Please refer to DPI Engine for details.
Data Statistics offers an intelligent traffic insight dashboard that categorizes and visualizes network usage by applications, helping you monitor real-time and historical traffic for better network awareness and control.
Please refer to Data Statistics for details.
Content Filter provides smart online safety powered by DPI-based classification, automatically blocking harmful or malicious websites to keep your network clean and secure.
Please refer to Content Filter for details.
QoS (Quality of Service) optimizes bandwidth allocation by prioritizing critical activities (e.g., video calls, gaming) during network congestion, reducing latency and improving overall network performance. Note that this applies to local client traffic and VPN Client tunnel traffic, but not to traffic received when the router functions as a VPN Server.
Please refer to QoS for details.
SQM (Smart Queue Management) intelligently manages your router's network traffic to minimize latency and "bufferbloat", ensuring smoother gaming and voice calls.
Please refer to SQM for details.
Parental Control is designed to help you manage and control your children's devices. It includes limiting their screen time and restricting their access to certain content.
Please refer to Parental Control for details.
Security
Port forwarding allows remote servers and devices on the internet to access devices on a private network.
Please refer to Port Forwarding for details.
ACL, short for Access Control List, lets you create rules to manage network traffic based on connection protocols, device addresses and ports. It controls whether to allow or block network access. If multiple ACL rules conflict, the system applies the one with higher priority.
Please refer to ACL for details.
Admin Access allows you to configure various security settings to protect your network and router from unauthorized access. This page includes the following options:
- Local Access Control: Manage and restrict access to the router's interface from devices connected to your local network.
- Remote Access Control: Configure and restrict access to the router's interface from remote locations over the internet, enhancing security against external threats.
- Open Ports on Router: Control which ports are open on the router, limiting potential vulnerabilities and unauthorized access.
Please refer to Admin Access for details.
NAT Mode page allows you to enable or disable Full Cone NAT and SIP ALG (Application Layer Gateway) functionality.
Please refer to NAT Mode for details.
Applications
A plug-in is a software component that adds specific features or functionalities to an existing computer program, allowing for customization and enhancement of its capabilities.
Please refer to Plug-ins for details.
Dynamic DNS (DDNS) automatically detects and updates the IP address associated with a domain in real-time. It maps a domain name to your router's dynamic public IP address, so you can access your network remotely without a static IP address.
Please refer to Dynamic DNS for details.
Network storage refers to a centralized data storage solution that allows multiple users and devices to access and share files over a network.
Please refer to Network Storage for details.
AdGuard Home is a network-wide ad and tracker blocking solution that acts as a DNS server to filter unwanted content across all devices connected to a home network.
Please refer to AdGuard Home for details.
Integrated in Flint 4, the Bark service can help protect your child's digital world and provide comprehensive online protection. It typically requires a paid subscription. However, as part of our partnership with Bark, GL.iNet offers the Bark Home plan for free on select router models including Flint 4, providing advanced monitoring and alerts at no extra cost.
Please refer to Bark for details.
Tailscale is a VPN service that allows you to access your devices and applications anywhere.
Please refer to Tailscale for details.
ZeroTier is a software-defined networking solution that enables users to create secure, virtual networks over the internet, connecting devices as if they were on the same local network.
Please refer to ZeroTier for details.
Tor, short for The Onion Router, is a privacy-focused network that enables anonymous communication over the internet. It routes internet traffic through a series of volunteer-operated servers (nodes) to obscure the user's location and usage, making it difficult to trace online activities.
Please refer to Tor for details.
System
The Overview page provides a comprehensive snapshot of your router's current status and performance metrics. On this page, you can view:
- CPU Average Load: Monitor the average load on your router's CPU, helping to assess performance and identify potential bottlenecks.
- Memory Usage: Check how much of your router's memory is in use, aiding in the management of resources.
- Flash Usage: View the utilization of the router's flash storage, ensuring there's sufficient space for firmware and configuration data.
- Device Info: Access detailed information about your router's system, including uptime, hostname, model, architecture, OpenWrt version, kernel version, device ID, device MAC and device S/N.
- External Storage: Check the status of any external storage devices connected to the router, such as USB drives or TF cards.
These features provide essential insights and controls, helping you to effectively manage and monitor your router's operation.
Please refer to Overview for details.
The Admin Password page enables you to manage the password for the router's administrative interface to ensure only authorized users can modify settings.
Please refer to Admin Password for details.
The Upgrade page is used to update your router's firmware to the latest version, ensuring enhanced performance, security, and new features. This page offers two options for upgrading:
- Firmware Online Upgrade: Automatically check for the latest firmware version from the manufacturer's server. You can install the latest one if available online.
- Firmware Local Upgrade: Manually upload a firmware file from your computer to update the router, providing control over the upgrade version and timing.
Please refer to Upgrade for details.
The Scheduled Tasks page allows you to automate various router functions based on a pre-defined schedule, enhancing convenience and efficiency. Key features on this page include:
- LCD Display Schedule: Set a schedule to automatically turn the router's LCD display on or off, reducing light pollution during specific times.
- Schedule Reboot: Configure your router to reboot automatically at specified intervals, helping to maintain optimal performance and stability.
- Wi-Fi Status Schedule: Set a schedule to control the 6GHz / 5GHz / 2.4GHz / MLO Wi-Fi band, managing network availability and reducing power consumption.
These scheduling options provide you with greater control over your router's operations, ensuring it meets your specific needs and preferences.
Please refer to Scheduled Tasks for details.
The Display Management page offers you a full-range of functions to manage the touchscreen display and related settings.
‒ Wallpaper: Customize the wallpaper and wake display style. ‒ Brightness: Adjust the touchscreen brightness. Use the slider or enter a specific percentage to fit different lighting conditions. ‒ Auto Lock: Set the time delay for the screen to auto-lock when there is no activity. The range is 1 minute to 30 minutes. ‒ Screen Always On: Toggle this option to decide if the touchscreen stays on continuously or turns off after inactivity. ‒ Enable Screen Passcode: Set a passcode for the touchscreen for an extra layer of security.
Please refer to Display Management for details.
The Time Zone page allows you to set the correct time zone for your router, ensuring that all scheduled tasks, logs, and system events are accurately timestamped according to your local time. This setting is crucial for maintaining precise records and for the proper execution of time-based configurations.
Please refer to Time Zone for details.
The Reset Firmware page allows you to reset your router's current firmware version to its default settings, erasing all custom configurations. This process will restore the router to the default settings of the currently installed firmware version. This can be useful for troubleshooting persistent issues or starting fresh with the current firmware's default configuration.
Please refer to Reset Firmware for details.
The Log page provides access to various logs that record the router's activities and events, aiding in troubleshooting and performance monitoring. This page includes:
- System Log: Detailed logs of system-level events and activities.
- Kernel Log: Logs related to the kernel's operations and events.
- Crash Log: Records of system crashes and errors, useful for diagnosing critical issues.
- Cloud Log: Logs of interactions and activities related to GoodCloud services integrated with the router.
- Nginx Log: Logs from the Nginx web server, if used by the router, detailing web traffic and server operations.
Additionally, the page features an Export Log button, allowing you to export all collected logs for technical support analysis. This function is invaluable for diagnosing complex issues and obtaining professional assistance.
Please refer to Log for details.
The Advanced Settings page provides access to advanced configuration options through the OpenWrt LuCI interface, allowing experienced users to fine-tune their router's settings and functionalities beyond the basic interface options. This includes detailed network configurations, firewall settings, and other advanced system customizations.
Please refer to Advanced Settings for details.
Regulatory Statements
GL TECHNOLOGIES (HONG KONG) LIMITED declares that the radio equipment type [BE14000 Wi-Fi 7 Router, GL-BE14000] is in compliance with the essential requirements and other relevant provisions of Directive 2014/53/EU. The full text of the EU declaration of conformity is available at https://www.gl-inet.com/products/certificate.
For EU:
Maximum output power:
CE: ≤20dBm EIRP (2.412GHz–2.472GHz); ≤23dBm EIRP (5.15GHz–5.35GHz); ≤30dBm EIRP (5.47GHz–5.725GHz); ≤13.98dBm EIRP (5.725GHz–5.85GHz); ≤23dBm EIRP (5.925GHz–6.425GHz)